
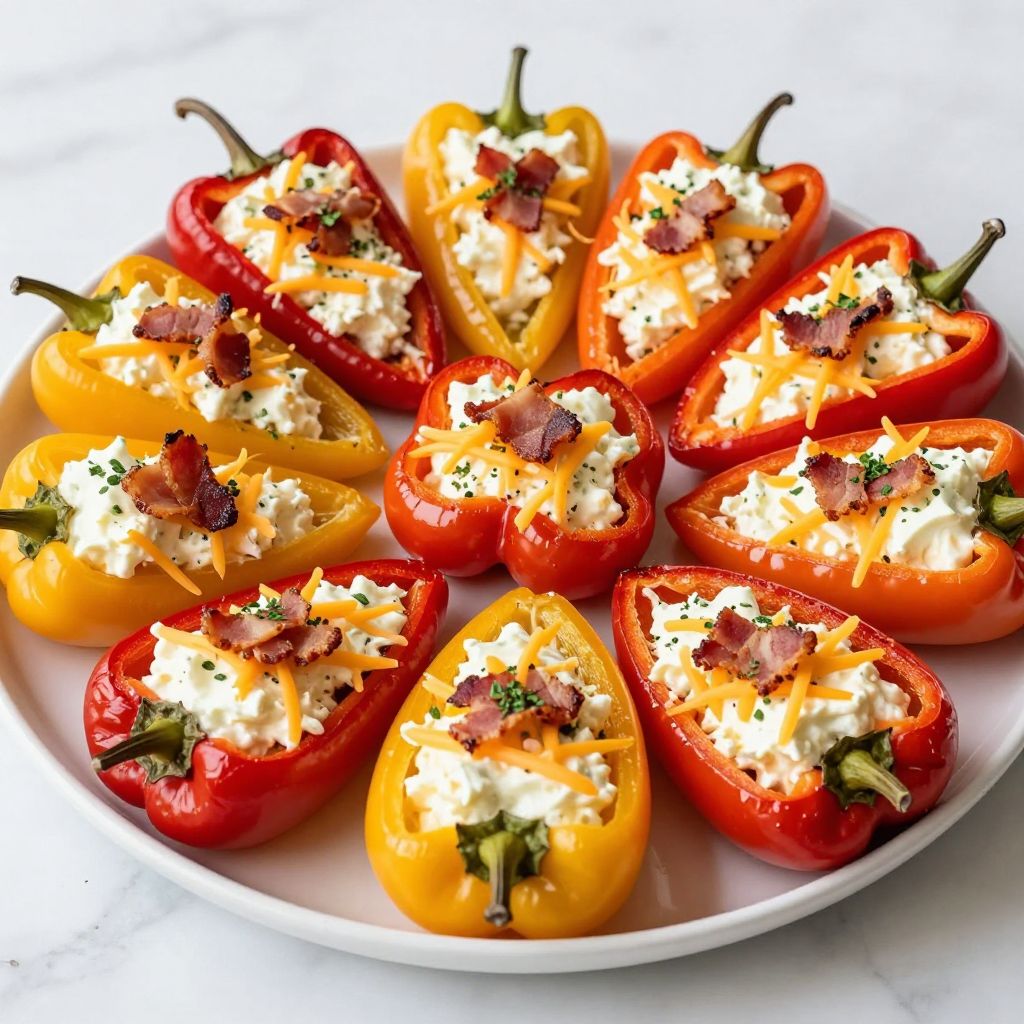
Colorful, crunchy, and oh-so-delicious, Mini Peppers are the ultimate bite-sized treat that brightens up any meal or gathering. These little gems are not only easy to prepare but also incredibly versatile, making them a perfect choice for busy weeknights or festive occasions. Their sweet flavor and satisfying crunch will have everyone reaching for more, whether stuffed, roasted, or grilled. Let’s dive into how to create these delightful mini peppers that are sure to impress!
Why You’ll Love This Recipe
This recipe will have you hooked with its simplicity and flavor.
- Quick and easy to prepare, perfect for weeknight dinners.
- Versatile; can be served as a snack, appetizer, or side dish.
- Beautifully colorful and appealing to the eye.
- Healthy and low-calorie, packed with vitamins.
- Customizable with your favorite fillings or spices.
My Experience Making This Recipe
When I first made these Mini Peppers, I was surprised at how quickly they disappeared. The vibrant colors made my kitchen feel alive, and the smell of them roasting was irresistible.
My family couldn’t get enough, and I loved how easy it was to whip them up. It’s a recipe I now keep on repeat, especially when hosting friends or family.
Recipe Overview
- Recipe Name: Mini Peppers
- Servings: 4
- Prep Time: 15 minutes
- Cook Time: 20 minutes
- Total Time: 35 minutes
- Course: Appetizer
- Cuisine: American
- Calories per Serving: 120
Equipment You Will Need
- Oven
- Baking sheet
- Parchment paper (optional)
- Mixing bowl
- Knife
- Cutting board
Ingredients for Mini Peppers
- 12 mini sweet peppers
- 1 cup cream cheese
- 1/2 cup shredded cheddar cheese
- 1/4 cup cooked bacon, crumbled
- 1 teaspoon garlic powder
- 1 teaspoon onion powder
- Salt and pepper to taste
- Fresh herbs (optional, for garnish)
Ingredient Notes and Substitutions
- Mini Sweet Peppers: These add sweetness and crunch. You can substitute with regular bell peppers, but the cooking time may vary.
- Cream Cheese: This provides a creamy texture. Greek yogurt can be used for a lighter option.
- Cheddar Cheese: Adds sharp flavor. Feel free to use mozzarella or pepper jack for a twist.
- Bacon: This adds a savory element. You can omit it for a vegetarian version or use turkey bacon.
How to Make Mini Peppers
Step 1: Preheat the Oven
Preheat your oven to 375°F (190°C). A hot oven ensures that the peppers roast evenly and develop a nice color.
Step 2: Prepare the Peppers
Wash the mini peppers and slice them in half lengthwise. Removing the seeds will help reduce bitterness and allow more room for filling.
Step 3: Make the Filling
In a mixing bowl, combine cream cheese, shredded cheddar, crumbled bacon, garlic powder, and onion powder. This mixture will be creamy and flavorful, making the peppers irresistible.
Step 4: Season the Filling
Add salt and pepper to taste. Adjusting the seasoning is crucial to ensure the filling has a delightful flavor profile.
Step 5: Stuff the Peppers
Using a spoon, fill each pepper half with the cheese mixture. Don’t be shy; a generous amount will create a satisfying bite.
Step 6: Arrange on Baking Sheet
Place the stuffed peppers on a baking sheet lined with parchment paper. This makes cleanup easier and prevents sticking.
Step 7: Bake the Peppers
Bake in the preheated oven for 20 minutes or until the peppers are tender and the cheese is bubbly. This roasting time enhances the natural sweetness of the peppers.
Step 8: Garnish and Serve
Remove from the oven and let cool slightly. Garnish with fresh herbs if desired, and serve warm for the best flavor experience.
Pro Tip: For extra flavor, try adding some chopped jalapeños or spices to the filling for a kick!
Tips for the Best Mini Peppers
- Ensure your cream cheese is at room temperature for easy mixing.
- Don’t overstuff the peppers; they should bake evenly without spilling over.
- Experiment with different cheeses for unique flavors.
- Keep an eye on the baking time to avoid burning.
- Allow the peppers to cool slightly before serving to enhance the flavor.
Common Mistakes to Avoid
- Not preheating the oven, which can lead to uneven cooking.
- Skipping the seasoning can make the filling bland.
- Using cold cream cheese, which makes it hard to mix.
- Overbaking the peppers, which can turn them mushy.
Serving Suggestions
These mini peppers pair beautifully with many dishes or can stand alone as snacks.
- Serve alongside a fresh garden salad.
- Pair with a hearty soup for a comforting meal.
- Offer them as appetizers at parties or gatherings.
- Enjoy with a side of guacamole or salsa.
Variations to Try
- Try stuffing with quinoa and black beans for a vegetarian option.
- Use feta cheese and spinach for a Mediterranean twist.
- Add chopped sun-dried tomatoes to the filling for extra flavor.
- For a smoky flavor, use smoked gouda instead of cheddar.
Dietary Adaptations
- For a gluten-free option, ensure all ingredients are certified gluten-free.
- To make dairy-free, swap the cream cheese with cashew cream.
- Vegetarians can enjoy them without bacon or use a meat substitute.
- For a low-carb version, skip the cheese and stuff with seasoned ground turkey.
Storage and Reheating
Refrigerator
Store any leftover mini peppers in an airtight container in the refrigerator.
- They will keep well for 3 to 4 days.
Freezer
You can freeze the stuffed peppers before baking for a convenient meal later.
- Wrap them tightly and store in a freezer-safe container for up to 2 months.
Reheating
Reheat in the oven at 350°F (175°C) until warmed through.
- Microwaving is an option, but the oven ensures they stay crispy.
Nutrition Information
| Nutrient | Amount |
|---|---|
| Calories | 120 |
| Total Fat | 9g |
| Saturated Fat | 5g |
| Carbohydrates | 5g |
| Fiber | 2g |
| Sugar | 2g |
| Protein | 5g |
| Sodium | 250mg |
| Cholesterol | 30mg |
This nutrition information is approximate and may vary based on ingredient brands and measurements.
Frequently Asked Questions
Can I make these mini peppers ahead of time?
Absolutely! You can prepare them in advance and bake them right before serving.
What can I substitute for the cream cheese?
Greek yogurt or dairy-free cream cheese works well for a lighter option.
How do I store leftover mini peppers?
Store them in an airtight container in the refrigerator for up to four days.
Can I freeze stuffed mini peppers?
Yes, freeze them before cooking for a quick meal later. Just bake from frozen, adding a few extra minutes to the cooking time.
What can I do if the filling is too thick?
If the filling is too thick, mix in a little milk or sour cream for a creamier texture.
Final Thoughts
Now that you know how to make these delightful Mini Peppers, I hope you are inspired to try them out for yourself. They are perfect for any occasion and will surely become a favorite in your household.
Don’t forget to explore more recipes like Poblano Peppers or Unstuffed Peppers for even more delicious options.
Mini Peppers
Ingredients
Equipment
Method
- Preheat your oven to 375°F (190°C).
- Wash the mini peppers and slice them in half lengthwise.
- In a mixing bowl, combine cream cheese, shredded cheddar, crumbled bacon, garlic powder, and onion powder.
- Add salt and pepper to taste.
- Stuff each pepper half with the cheese mixture.
- Place the stuffed peppers on a baking sheet lined with parchment paper.
- Bake in the preheated oven for 20 minutes or until the peppers are tender and the cheese is bubbly.
- Remove from the oven and let cool slightly.
- Garnish with fresh herbs if desired, and serve warm.