Chicken stock recipe lovers, this one is for you. A pot of homemade chicken stock transforms your soups, risottos, and braises from ordinary to extraordinary with minimal effort and maximum flavor.
Store bought versions simply cannot compete with the rich, golden liquid you will create today. Let me walk you through every step of making restaurant quality stock in your own kitchen.
Why You’ll Love This Recipe
Making your own chicken stock feels like a kitchen superpower once you get the hang of it. Here is what makes this recipe a keeper.
- Uses kitchen scraps you would otherwise throw away, making it incredibly economical
- Fills your home with the most comforting aroma imaginable
- Contains zero preservatives, artificial flavors, or excessive sodium
- Freezes beautifully for up to six months of convenience
- Produces a stock so flavorful you can sip it straight from a mug
My Experience Making This Recipe
I remember the first time I made chicken stock from scratch and wondered why I had ever bought those sad little cartons. The kitchen smelled like my grandmother’s house on Sunday afternoons, all warmth and promise of good things to come.
My family now expects a pot simmering on the stove every few weeks. They have become spoiled by the depth of flavor it adds to even simple rice dishes.
The real magic happens when you taste your first spoonful of properly reduced, deeply golden stock. You will never go back to commercial versions again.
Recipe Overview
- Recipe Name: Homemade Chicken Stock
- Servings: 12 cups
- Prep Time: 20 minutes
- Cook Time: 4 hours
- Total Time: 4 hours 20 minutes
- Course: Base, Soup
- Cuisine: French, Universal
- Calories per Serving: 15 per cup
Equipment You Will Need
- Large stockpot (8 to 12 quart capacity)
- Fine mesh strainer
- Cheesecloth or clean kitchen towel
- Large bowl for straining
- Ladle
- Sharp knife and cutting board
- Storage containers or freezer bags
- Slotted spoon for skimming
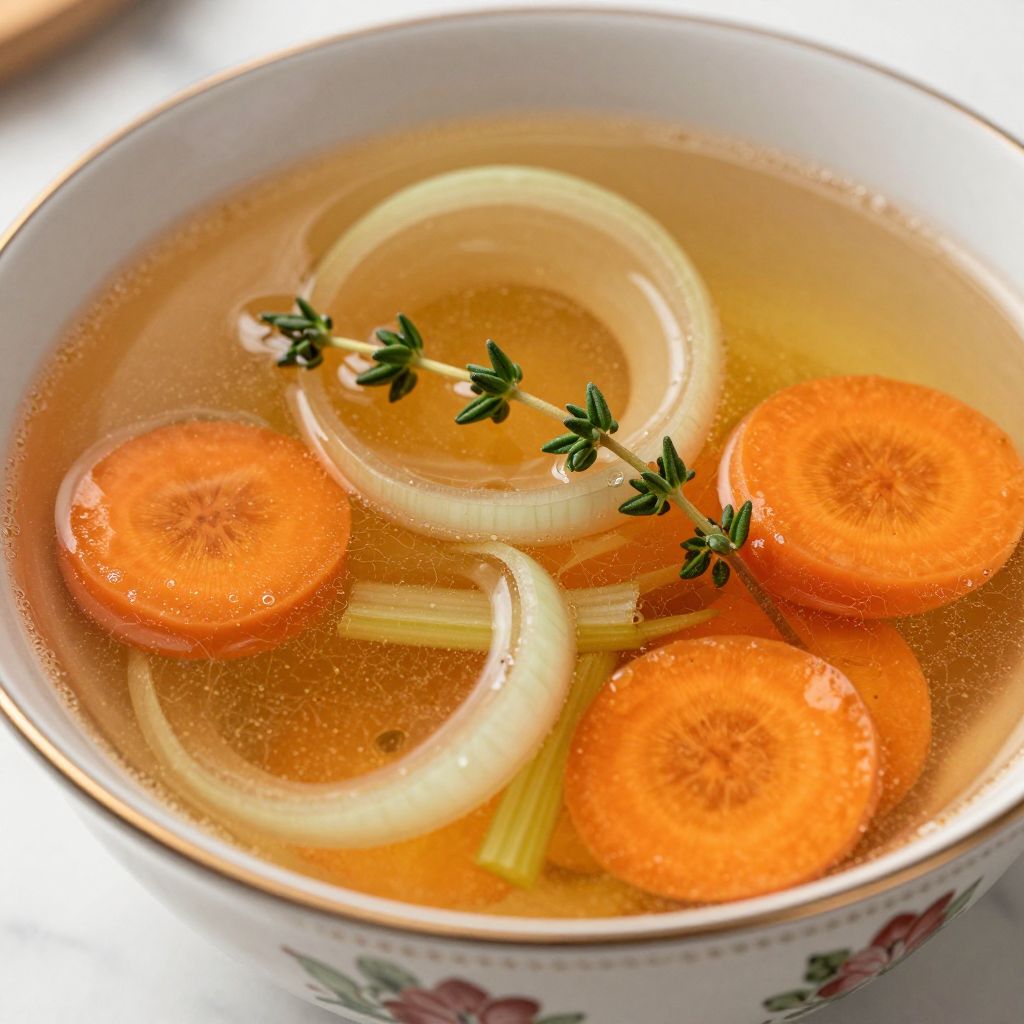
Ingredients for Chicken Stock
For the Stock Base
- 4 pounds chicken bones (backs, necks, wings, or carcass from roasted chicken)
- 2 large onions, quartered
- 3 large carrots, roughly chopped
- 4 celery stalks, roughly chopped
- 1 head garlic, halved crosswise
- 16 cups cold water
For the Aromatics
- 6 sprigs fresh thyme
- 8 sprigs fresh parsley with stems
- 2 bay leaves
- 1 teaspoon whole black peppercorns
Ingredient Notes and Substitutions
- Chicken bones: Raw bones produce a lighter, cleaner stock while roasted bones create deeper flavor. Use a combination for the best of both worlds.
- Onions: Yellow onions offer the most balanced sweetness. White onions work fine, but avoid red onions as they can discolor your stock.
- Carrots: These add natural sweetness and golden color. No need to peel them if they are well scrubbed.
- Celery: Provides savory backbone and subtle bitterness that balances the stock. Include the leaves for extra flavor.
- Fresh herbs: Dried herbs can substitute in a pinch at one third the quantity. Fresh herbs produce a brighter, more aromatic result.
- Garlic: Adds subtle depth without overpowering. Skip it if you prefer a more neutral stock.
How to Make Chicken Stock
Step 1: Prepare Your Bones
Rinse your chicken bones under cold water to remove any blood or debris. This simple step prevents cloudiness and off flavors in your finished stock.
If using a leftover roasted chicken carcass, break it into smaller pieces to expose more surface area.
Step 2: Prepare the Vegetables
Roughly chop your onions, carrots, and celery into large chunks about two inches in size. Precision does not matter here since everything gets strained out later.
Cut your garlic head in half horizontally to expose all those lovely cloves without peeling.
Step 3: Add Everything to the Pot
Place the bones in your largest stockpot and add the vegetables on top. Pour in enough cold water to cover everything by about two inches.
Starting with cold water helps extract more collagen and produces a clearer stock than starting with hot water.
Step 4: Bring to a Gentle Simmer
Place the pot over medium high heat and bring it slowly to a simmer. This gradual heating allows proteins to coagulate gently instead of dispersing throughout the liquid.
Watch carefully and reduce the heat before it reaches a full boil. Boiling creates cloudy, greasy stock.
Step 5: Skim the Surface
As the stock heats, foam and impurities will rise to the surface. Use a slotted spoon or ladle to skim this scum away every fifteen minutes during the first hour.
Diligent skimming is the secret to crystal clear, professional quality stock.
Step 6: Add the Aromatics
Once you have finished the initial skimming, add your thyme, parsley, bay leaves, and peppercorns. These go in later because prolonged cooking can make some herbs bitter.
Push them down gently so they submerge in the liquid.
Step 7: Simmer Low and Slow
Maintain the gentlest possible simmer for 3 to 4 hours. You want lazy bubbles breaking the surface occasionally, not a rolling boil.
This patient cooking extracts maximum flavor and gelatin from the bones without emulsifying the fat.
Step 8: Strain the Stock
Set a fine mesh strainer lined with cheesecloth over a large bowl or clean pot. Carefully ladle the stock through, pressing gently on the solids to extract every drop of liquid gold.
Discard the spent bones and vegetables since they have given everything to the stock.
Step 9: Cool and Defat
Cool the stock quickly by placing the container in an ice bath, stirring occasionally. Rapid cooling prevents bacterial growth and is a food safety must.
Once chilled, the fat will solidify on top and can be easily removed with a spoon.
Step 10: Store Your Stock
Transfer your finished stock to airtight containers, leaving room for expansion if freezing. Label everything with the date because future you will thank present you.
Pro Tip: Freeze stock in ice cube trays first, then transfer the cubes to freezer bags. This gives you perfect small portions for deglazing pans or adding to sauces without thawing a whole container.
Tips for the Best Chicken Stock
- Save vegetable scraps and chicken bones in freezer bags until you have enough for a batch. Free stock ingredients accumulate faster than you think.
- Never add salt during cooking. You want full control over seasoning when you use the stock in recipes later.
- Add a splash of apple cider vinegar to help extract more minerals and collagen from the bones. You will not taste it.
- Keep the liquid level consistent by adding hot water if it reduces too much. The bones should stay covered throughout cooking.
- A properly made stock will be jiggly like gelatin when cold. This means you extracted lots of collagen and achieved stock perfection.
- Taste your stock before straining. If the flavor seems weak, simmer it uncovered for another hour to concentrate.
Common Mistakes to Avoid
- Boiling instead of simmering: Aggressive heat creates cloudy, greasy stock with less refined flavor.
- Skipping the skimming: That foam contains impurities that make your stock murky and can add off flavors.
- Adding salt too early: Stock often gets reduced in final dishes, which concentrates saltiness to unpleasant levels.
- Using too many strong vegetables: Cabbage, broccoli, and turnips can overpower the delicate chicken flavor. Stick to the classic trio of onion, carrot, and celery.
- Cooling stock too slowly: Leaving stock at room temperature creates a bacterial playground. Cool it fast and refrigerate promptly.
Serving Suggestions
A quality chicken stock elevates countless dishes from good to memorable. Here are some of my favorite ways to use it.
- As the base for velvety chicken noodle soup or any brothy creation
- For cooking risotto, pilaf, or any grain that absorbs liquid
- Deglazing pans to create quick pan sauces for roasted meats
- Braising vegetables or proteins for deep, savory flavor
- Sipping warm from a mug with a pinch of salt when you need comfort
Variations to Try
- Roasted Chicken Stock: Roast your bones and vegetables at 400F for 45 minutes before simmering. This creates a darker, more intensely flavored stock.
- Asian Style Stock: Add ginger, scallions, and a star anise pod instead of Western herbs. Perfect for wonton soup or ramen.
- Double Stock: Use already made stock instead of water when cooking a new batch of bones. Produces incredibly rich, concentrated flavor.
- Herb Forward Stock: Add extra rosemary, sage, and thyme for stock destined for holiday stuffing or gravy.
- Light Summer Stock: Reduce cooking time to 2 hours for a more delicate stock suited to light summer soups.
Dietary Adaptations
- Gluten Free: This recipe is naturally gluten free. Just ensure any recipes you add the stock to maintain that status.
- Dairy Free: Chicken stock contains no dairy whatsoever and fits perfectly into dairy free cooking.
- Low Carb and Keto: With virtually zero carbohydrates, homemade stock is ideal for ketogenic diets and bone broth fasting protocols.
- Whole30 and Paleo: Completely compliant when made without added sugars or non compliant ingredients. A staple for clean eating.
Storage and Reheating
Refrigerator
Properly stored chicken stock stays fresh in the refrigerator for up to one week.
- Keep in airtight containers with minimal headspace
- The layer of fat on top actually helps preserve it longer
- If it smells sour or looks cloudy when cold, discard it
Freezer
Frozen stock maintains quality for up to six months.
- Leave one inch headspace in containers to allow for expansion
- Freezer bags laid flat stack efficiently and thaw quickly
- Label with the date and amount for easy meal planning
Reheating
Bring stock back to life gently over medium heat.
- Thaw frozen stock overnight in the refrigerator or use the defrost setting on your microwave
- Heat only what you need rather than reheating the entire batch repeatedly
- Stock can be added directly to recipes without thawing first in many cases
Nutrition Information
| Nutrient | Amount |
|---|---|
| Calories | 15 |
| Total Fat | 0.5g |
| Saturated Fat | 0g |
| Carbohydrates | 1g |
| Fiber | 0g |
| Sugar | 0g |
| Protein | 2g |
| Sodium | 20mg |
| Cholesterol | 0mg |
Nutritional values are estimates based on defatted stock made without added salt. Actual values may vary based on ingredients and cooking methods used.
Frequently Asked Questions
What is the difference between chicken stock and chicken broth?
Stock uses bones and simmers longer to extract collagen, creating body and richness. Broth typically uses meat, cooks faster, and produces a thinner liquid.
Can I make chicken stock in a slow cooker or Instant Pot?
Absolutely. Slow cookers work wonderfully on low for 8 to 12 hours, while pressure cookers produce excellent stock in just 1 to 2 hours.
Why did my stock turn out cloudy?
Boiling too vigorously or stirring the pot during cooking causes cloudiness. A gentle simmer and hands off approach yields clear stock.
Can I reuse the bones for a second batch?
You can make a weaker second extraction called a remouillage, but the flavor will be significantly reduced. It works best blended with fresh stock.
My stock did not gel when cold. Did I do something wrong?
Lack of gelatin usually means too much water or not enough bones. More bones and longer cooking time will increase gelatin extraction next time.
Final Thoughts
Homemade chicken stock represents one of those fundamental kitchen skills that pays dividends in every dish you create. Once you taste the difference, those supermarket cartons will feel like a sad compromise.
Give this recipe a try this weekend and watch your soups, sauces, and braises reach new heights. Your future self, sipping warm stock on a cold evening, will be grateful you took the time.
Homemade Chicken Stock
Ingredients
Method
- Rinse the chicken bones under cold water to remove blood and debris.
- Roughly chop onions, carrots, and celery into 2-inch pieces, and slice the garlic head in half crosswise.
- Place bones, onions, carrots, celery, and garlic in a large 8–12 quart stockpot and add 16 cups of cold water to cover by about 2 inches.
- Set the pot over medium-high heat and slowly bring to a gentle simmer (about 30 minutes); do not allow it to boil.
- Skim off any foam or impurities that rise to the surface every 15 minutes during the first hour.
- Add thyme, parsley, bay leaves, and peppercorns, gently submerging them in the liquid.
- Reduce heat to low and maintain the faintest simmer for 3 to 4 hours, adding hot water if necessary to keep bones covered.
- Set a fine-mesh strainer lined with cheesecloth over a large bowl and carefully ladle the stock through, pressing solids lightly to extract liquid.
- Cool the strained stock quickly in an ice bath, then refrigerate until the fat solidifies; remove and discard the fat layer.
- Transfer cooled stock to airtight containers, leaving headspace if freezing, label with the date, and refrigerate up to 1 week or freeze up to 6 months.