
Picture this: a soft, velvety slice of cake with a rich cocoa flavor, just waiting to be paired with cream cheese frosting. This Red Velvet Cake Recipe Without Food Coloring brings a delightful twist to the classic dessert without the artificial hues, making it perfect for those who prefer a more natural approach.
This cake is not only visually appealing but also incredibly moist and tender. The combination of buttermilk and vinegar gives it a unique tang and a wonderfully soft texture that will have everyone asking for seconds.
Why You’ll Love This Recipe
This recipe is a favorite for many reasons. It marries tradition with a healthier choice, making indulgence guilt-free.
- Unique flavor profile with a hint of cocoa.
- Moist, tender texture that melts in your mouth.
- Simple ingredients you likely have on hand.
- No artificial food coloring required.
- Perfect for special occasions or any day of the week.
My Experience Making This Recipe
When I first made this cake, I was a bit skeptical about skipping the food coloring. But as the batter came together, the rich cocoa aroma filled my kitchen, and I started to feel excited.
The first bite was pure bliss; it was moist and had that perfect balance of sweetness and tang. My family was amazed that it looked so good without any dye, and it quickly became a household favorite.
Recipe Overview
- Recipe Name: Red Velvet Cake Without Food Coloring
- Servings: 8
- Prep Time: 20 minutes
- Cook Time: 30 minutes
- Total Time: 50 minutes
- Course: Dessert
- Cuisine: American
- Calories per Serving: 320
Equipment You Will Need
- Two 9-inch round cake pans
- Mixing bowls
- Electric mixer or whisk
- Measuring cups and spoons
- Rubber spatula
- Cooling rack
Ingredients for Red Velvet Cake
- 2 cups all-purpose flour
- 1 ½ cups granulated sugar
- 1 cup vegetable oil
- 1 cup buttermilk, room temperature
- 2 large eggs, room temperature
- 2 tablespoons unsweetened cocoa powder
- 1 teaspoon baking soda
- 1 teaspoon white vinegar
- 1 teaspoon vanilla extract
- ½ teaspoon salt
Ingredient Notes and Substitutions
- All-purpose flour: It provides the cake structure. You may substitute with cake flour for a lighter texture.
- Granulated sugar: Sweetens the cake. Brown sugar can add a deeper flavor.
- Vegetable oil: Keeps the cake moist. Melted butter can be used for a richer flavor.
- Buttermilk: Adds tanginess and moisture. You can make a substitute using milk and vinegar.
- Cocoa powder: Gives the cake its chocolate flavor. Use Dutch-processed cocoa for a smoother taste.
How to Make Red Velvet Cake
Step 1: Preheat the Oven
Start by preheating your oven to 350°F (175°C). This ensures that your cake bakes evenly from the moment it goes in.
Step 2: Prepare the Cake Pans
Grease and flour two 9-inch round cake pans. This helps the cakes release easily once they’re baked, preventing any sticky situations.
Step 3: Mix the Dry Ingredients
In a bowl, whisk together the flour, cocoa powder, baking soda, and salt. Combining these first helps distribute the leavening agents evenly throughout the cake.
Step 4: Combine Wet Ingredients
In another bowl, mix the sugar and oil until well combined. Then, add the eggs, buttermilk, vinegar, and vanilla, mixing until smooth and creamy.
Step 5: Combine Dry and Wet Mixtures
Gradually add the dry mixture to the wet ingredients. This prevents lumps and ensures a uniform batter, which is key for that perfect texture.
Step 6: Pour the Batter
Divide the batter evenly between the prepared cake pans. Level the tops with a spatula to help them bake evenly.
Step 7: Bake the Cakes
Place the pans in the oven and bake for 25-30 minutes. You’ll know they are done when a toothpick inserted into the center comes out clean.
Step 8: Cool the Cakes
Once baked, remove the cakes from the oven and let them cool in the pans for 10 minutes. Then, transfer them to a wire rack to cool completely before frosting.
Pro Tip: Always use room temperature ingredients for a smoother batter and better rise.
Tips for the Best Red Velvet Cake
- Use fresh ingredients for the best flavor and texture.
- Don’t overmix the batter; mix just until combined to prevent a tough cake.
- Let your cakes cool completely before frosting to avoid melting the icing.
- For an extra touch, add a pinch of cinnamon to the batter for warmth.
- Use high-quality cocoa powder for a richer chocolate flavor.
Common Mistakes to Avoid
- Overmixing the batter can lead to a dense cake instead of a fluffy one.
- Not measuring ingredients accurately can throw off the texture and flavor.
- Baking at the wrong temperature can lead to uneven baking.
- Skipping the cooling time can result in a messy frosting situation.
Serving Suggestions
This cake is delightful on its own, but pair it with a few extras for a special treat.
- Serve with cream cheese frosting for that classic combo.
- Add a scoop of vanilla ice cream for a decadent dessert.
- Top with fresh berries for a burst of flavor.
- Accompany with coffee or tea for a cozy afternoon break.
Variations to Try
- Substitute half of the flour with almond flour for a nutty flavor.
- Add crushed walnuts or pecans in the batter for a crunchy texture.
- Make cupcakes instead of a layered cake for individual servings.
- Swirl in some raspberry puree for a fruity twist.
Dietary Adaptations
- Gluten-free: Use a gluten-free flour blend for a suitable alternative.
- Dairy-free: Substitute buttermilk with almond milk and a splash of vinegar.
- Vegan: Replace eggs with flax eggs and use plant-based buttermilk.
- Low-carb/keto: Use almond flour and erythritol in place of sugar.
Storage and Reheating
Refrigerator
Store leftover cake in an airtight container in the fridge for up to 5 days.
- Wrap slices individually for easy grabbing.
- Let it come to room temperature before serving for the best flavor.
Freezer
This cake freezes well. Wrap it tightly in plastic wrap and store in an airtight container.
- It can last up to 3 months in the freezer.
- Thaw overnight in the fridge before serving.
Reheating
To enjoy leftover cake warm, place a slice in the microwave for about 10-15 seconds.
- Be careful not to overheat, as it can dry out.
Nutrition Information
| Nutrient | Amount |
|---|---|
| Calories | 320 |
| Total Fat | 18g |
| Saturated Fat | 3g |
| Carbohydrates | 38g |
| Fiber | 1g |
| Sugar | 25g |
| Protein | 3g |
| Sodium | 250mg |
| Cholesterol | 30mg |
This information is based on standard ingredients and can vary based on specific brands and measurements.
Frequently Asked Questions
Can I use regular milk instead of buttermilk?
Yes, you can mix regular milk with vinegar to create a buttermilk substitute.
How can I store leftover cake?
Wrap it tightly in plastic wrap and store it in the refrigerator for up to 5 days.
Can I make this cake a day ahead?
Absolutely! In fact, letting it sit overnight can enhance the flavors.
Why is my cake dense?
This could be due to overmixing the batter or using too much flour.
What frosting works best with this cake?
A classic cream cheese frosting pairs perfectly, balancing the cake’s flavors.
Final Thoughts
This Red Velvet Cake Without Food Coloring is a testament to deliciousness without compromise. Whether for a birthday or a simple celebration, this cake will surely leave a lasting impression.
Don’t hesitate to give this recipe a try; it might just become your go-to for all occasions. For more insights, check out does food coloring expire and find out good substitutes for rosemary!
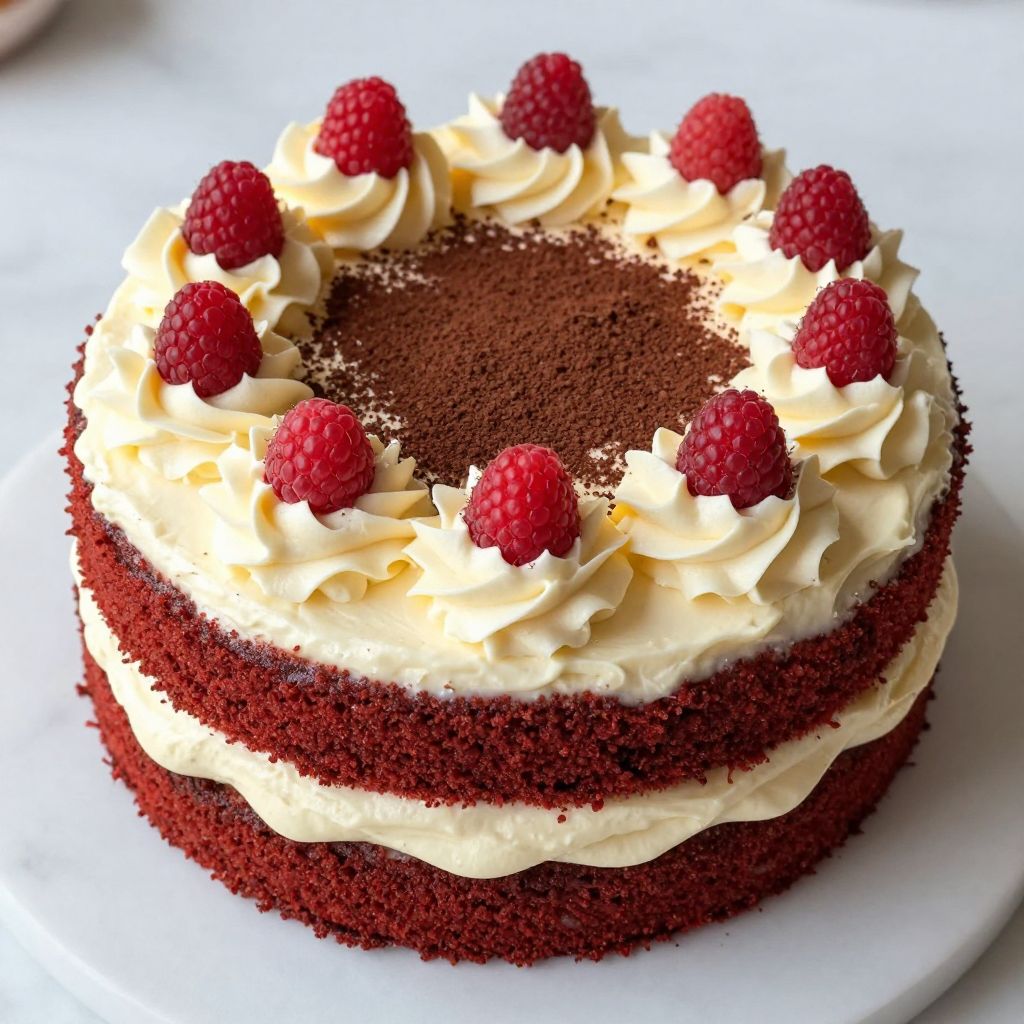
Red Velvet Cake Without Food Coloring
Ingredients
Equipment
Method
- Preheat the oven to 350°F (175°C).
- Grease and flour two 9-inch round cake pans.
- In a bowl, whisk together the flour, cocoa powder, baking soda, and salt.
- In another bowl, mix the sugar and vegetable oil until combined.
- Add the eggs, buttermilk, vinegar, and vanilla to the oil mixture and mix until smooth.
- Gradually add the dry mixture to the wet ingredients and mix until just combined.
- Divide the batter evenly between the prepared cake pans.
- Bake for 25-30 minutes, or until a toothpick inserted into the center comes out clean.
- Cool the cakes in the pans for 10 minutes, then transfer to a wire rack to cool completely.