
Picture a slice of golden pastry giving way to layers of chocolate, caramel, and cream so rich it tastes like edible wealth.
Millionaire Pie earned its name for good reason: this dessert delivers maximum indulgence with minimal fuss. The combination of a buttery crust, silky chocolate filling, gooey caramel layer, and cloud-like whipped cream topping creates a showstopper that tastes far more complicated than it actually is.
What makes this pie special is how it stacks flavors and textures without demanding hours in the kitchen. The contrast between crispy crust, smooth chocolate, sticky caramel, and airy topping keeps each bite interesting.
This is the kind of pie you bring to potlucks when you want people asking for the recipe, or keep tucked in your fridge for those moments when nothing else will satisfy a serious sweet tooth. Ready to make some edible wealth?
Why You’ll Love This Recipe
This pie delivers restaurant-quality results without requiring advanced baking skills or hard-to-find ingredients. The layers create multiple flavor and texture experiences in every single bite.
- Combines chocolate, caramel, and cream for maximum flavor complexity
- Uses a store-bought crust to save prep time
- No blind baking or tricky techniques required
- Serves a crowd and keeps well in the refrigerator
- Impressive enough for special occasions yet simple enough for weeknight cravings
My Experience Making This Recipe
The first time I made Millionaire Pie, I was honestly skeptical that something this easy could taste so decadent. I melted chocolate, spread caramel sauce, and topped it with whipped cream, and within minutes I had a dessert that looked like it came from a bakery.
My family’s reaction was priceless. My teenage son went back for thirds, my partner declared it his new favorite pie, and I realized I had stumbled onto a dessert that would become a regular request.
The best part? Cleanup was minimal, and I could prep it the morning of a dinner party and refrigerate until serving. That combination of impressive results and low stress makes this pie a permanent fixture in my rotation.
Recipe Overview
- Recipe Name: Millionaire Pie
- Servings: 8 to 10
- Prep Time: 15 minutes
- Cook Time: 10 minutes
- Total Time: 25 minutes plus 2 hours chilling
- Course: Dessert
- Cuisine: American
- Calories per Serving: 520
Equipment You Will Need
- 9-inch pie dish
- Medium saucepan
- Large mixing bowl
- Whisk or electric mixer
- Rubber spatula
- Measuring cups and spoons
- Microwave-safe bowl
- Wooden spoon
Ingredients for Millionaire Pie
- 1 pre-made 9-inch pie crust (store-bought or homemade)
- 6 ounces semi-sweet chocolate, chopped or chips
- 3 tablespoons butter
- 1 cup caramel sauce (store-bought or homemade)
- 8 ounces cream cheese, softened to room temperature
- 1 cup heavy whipping cream
- 1/4 cup powdered sugar
- 1 teaspoon vanilla extract
- 1/4 teaspoon salt
- Optional: 2 tablespoons cocoa powder for garnish
Ingredient Notes and Substitutions
- Semi-sweet chocolate: This provides a balanced sweetness that doesn’t overpower the caramel. Use dark chocolate for deeper, less sweet flavor or milk chocolate for extra sweetness.
- Butter: Real butter creates a silky texture when melted with chocolate. Coconut oil works as a dairy-free substitute but changes the flavor slightly.
- Caramel sauce: Store-bought saves time and delivers consistent results. Homemade caramel gives you flavor control but requires careful cooking.
- Cream cheese: This creates the smooth filling layer and adds tanginess that balances sweetness. Greek yogurt can replace half the cream cheese for a lighter version, though texture will differ.
- Heavy whipping cream: This whips into stable peaks that won’t deflate before serving. Heavy cream works better than regular cream because it contains more fat.
How to Make Millionaire Pie
Step 1: Prepare the Pie Crust
If using a frozen pie crust, let it thaw at room temperature for 10 minutes while you prep other ingredients. Prick the bottom and sides with a fork to prevent air bubbles during baking.
Step 2: Blind Bake the Crust
Bake the crust in a 350-degree Fahrenheit oven for 10 minutes until it turns light golden brown. This pre-baking step prevents a soggy bottom when you add the wet filling layers.
Remove the crust from the oven and let it cool for 5 minutes while you prepare the chocolate layer.
Step 3: Melt the Chocolate
Combine the chopped chocolate and butter in a microwave-safe bowl and heat in 30-second intervals, stirring between each interval, until completely melted and smooth. This gentle heating prevents chocolate from becoming grainy or scorched.
Once melted, let the chocolate cool for 2 minutes so it thickens slightly and won’t seep through the crust.
Step 4: Spread the Chocolate Layer
Pour the melted chocolate into the cooled pie crust and spread it evenly across the bottom with a rubber spatula. The chocolate should cover the entire surface but stay thin so other layers balance properly.
Place the crust in the refrigerator while you prepare the next layer, about 5 minutes, until the chocolate firms up enough to hold the caramel without mixing.
Step 5: Add the Caramel Layer
Spread the caramel sauce evenly over the set chocolate layer, leaving a small border around the edges. The caramel adds that sticky sweetness that makes this pie feel indulgent.
Refrigerate again for 5 minutes to let the caramel set slightly before adding the cream cheese filling.
Step 6: Prepare the Cream Cheese Filling
In a large bowl, beat the softened cream cheese with an electric mixer on medium speed for 2 minutes until light and fluffy. Beating incorporates air and prevents a dense, heavy texture.
Add the vanilla extract and salt, then mix until just combined. Scrape the sides of the bowl with a spatula to ensure everything mixes evenly.
Step 7: Whip the Cream
In a separate bowl, whip the cold heavy cream with the powdered sugar until stiff peaks form. This should take 3 to 5 minutes with an electric mixer on high speed.
Stiff peaks mean the cream stands upright when you lift the whisk, creating the fluffy topping that defines this pie’s texture.
Step 8: Combine and Layer
Fold the whipped cream into the cream cheese mixture gently using a rubber spatula, stirring just until no white streaks remain. Over-mixing deflates the whipped cream and creates a dense, heavy filling.
Spread this creamy mixture evenly over the caramel layer and smooth the top with a spatula.
Step 9: Chill and Set
Cover the pie loosely with plastic wrap and refrigerate for at least 2 hours before serving. This chilling time allows all layers to set and flavors to meld together.
The pie can stay refrigerated for up to 24 hours before serving. Optional: dust the top with cocoa powder right before serving for visual appeal and a subtle chocolate note.
Pro Tip: Let the pie sit at room temperature for 10 minutes before slicing for cleaner cuts and better flavor intensity.
Tips for the Best Millionaire Pie
- Use softened cream cheese straight from the counter, not cold from the fridge. Cold cream cheese creates lumps that won’t blend smoothly with the whipped cream.
- Keep your mixer bowl and whisk attachment cold before whipping cream. Cold equipment helps cream whip faster and hold its shape longer.
- Don’t skip the blind baking step on the crust. This prevents sogginess and keeps the bottom layer crispy instead of mushy.
- Make the pie a full day ahead if you’re serving guests. Advance prep removes stress and gives flavors time to develop fully.
- Invest in good quality caramel sauce. The caramel makes up a major flavor component, so better sauce creates a noticeably better pie.
- Use a warm knife dipped in hot water between slices for clean cuts. Wiping and re-warming the knife for each slice gives you bakery-quality presentation.
Common Mistakes to Avoid
- Skipping the pie crust pre-bake: Raw crust absorbs moisture from the filling and stays doughy rather than crispy.
- Spreading hot chocolate on the crust: Hot chocolate can soften or melt the crust. Let it cool slightly first to maintain the structure.
- Over-mixing the whipped cream into cream cheese: This deflates the fluffy texture and creates a dense, heavy filling that lacks airiness.
- Using cold cream cheese from the fridge: Cold cream cheese won’t blend smoothly and creates lumps and an uneven texture throughout the filling.
- Not chilling long enough: Rushing the chilling time means layers don’t set properly and the pie becomes difficult to slice cleanly.
Serving Suggestions
This pie shines on its own but pairs beautifully with coffee, ice cream, or fresh berries for contrast. Consider the occasion and your guests’ preferences when choosing accompaniments.
- Serve a slice with strong black coffee for breakfast or brunch
- Top with vanilla ice cream for extra richness and temperature contrast
- Pair with fresh raspberries or strawberries to cut through the sweetness
- Offer alongside whipped cream and chocolate shavings for an elegant plating
- Serve with a small glass of dessert wine or port for special dinners
Variations to Try
- Espresso Millionaire Pie: Add 1 tablespoon instant espresso powder to the melted chocolate for deep coffee notes that enhance the chocolate flavor without making it taste like coffee.
- Salted Caramel Version: Drizzle 1/4 teaspoon fleur de sel over the caramel layer before adding the cream cheese filling. The salt makes sweetness pop and adds sophistication.
- Chocolate Crust Upgrade: Replace the standard pie crust with a chocolate cookie crust for extra chocolate depth and a more interesting texture contrast.
- Peanut Butter Twist: Swirl 1/2 cup peanut butter mixed with 2 tablespoons powdered sugar into the cream cheese filling for nutty richness that complements chocolate and caramel.
- Coconut Lover’s Pie: Add 1/2 cup toasted coconut flakes to the whipped cream filling and sprinkle more on top for tropical flavor and texture.
Dietary Adaptations
- Gluten-Free: Use a gluten-free pie crust or make your own with gluten-free flour. The rest of the recipe remains the same since chocolate, caramel, and cream cheese are naturally gluten-free.
- Dairy-Free: Replace butter with coconut oil, use dairy-free cream cheese, and substitute heavy cream with coconut cream. The pie will taste different but still deliver the layered effect.
- Vegan: Use a vegan pie crust, dairy-free chocolate, coconut oil, vegan cream cheese, and coconut whipped cream. Store-bought vegan caramel sauce simplifies the process significantly.
- Low-Carb or Keto: Use an almond flour crust, sugar-free chocolate, and replace powdered sugar with erythritol. Choose a low-carb caramel sauce or make your own with butter and sugar substitutes.
Storage and Reheating
Refrigerator
Store the pie covered loosely with plastic wrap or foil in the refrigerator for up to 3 days. The cool temperature keeps all layers set and prevents the whipped cream from melting.
- Keep the pie on a shelf rather than on the door to avoid temperature fluctuations
- Cover loosely instead of airtight to prevent condensation from softening the crust
Freezer
Wrap the cooled pie tightly with plastic wrap and aluminum foil, then freeze for up to 2 months. The pie thaws evenly because its dense structure holds up well in the freezer.
- Thaw in the refrigerator for 4 to 6 hours before serving
- Do not thaw at room temperature as this causes uneven texture
Reheating
This pie serves best cold straight from the refrigerator and doesn’t need reheating. If you prefer it slightly warmer, let a slice sit at room temperature for 10 to 15 minutes.
- Never microwave the pie as this melts the whipped cream and separates the layers
- The cold version actually showcases flavors and textures better than any warm version
Nutrition Information
| Nutrient | Amount |
|---|---|
| Calories | 520 |
| Total Fat | 38g |
| Saturated Fat | 22g |
| Carbohydrates | 45g |
| Fiber | 1g |
| Sugar | 38g |
| Protein | 6g |
| Sodium | 280mg |
| Cholesterol | 65mg |
These values are based on a standard 8-serving pie and include the pie crust, chocolate layer, caramel sauce, and whipped cream filling. Individual servings may vary depending on slice size and specific ingredient brands used.
Frequently Asked Questions
Can I make this pie without a store-bought crust?
Absolutely. Use any pie crust recipe you prefer, whether homemade or made from scratch using flour, butter, and water. The blind baking step remains the same regardless of crust origin.
How far in advance can I prepare this pie?
You can make the pie up to 2 days before serving, which makes it perfect for parties or meal prep. Just store it covered in the refrigerator and serve straight from the cold.
What should I do if my whipped cream deflates?
Whip a fresh batch of cream with powdered sugar until stiff peaks form, then fold it gently into the cream cheese layer. Avoid over-mixing, which destroys the airy structure you worked to create.
Can I use homemade caramel instead of store-bought?
Yes, homemade caramel works beautifully and gives you complete flavor control. Let it cool to room temperature before spreading so it doesn’t soften the chocolate layer underneath.
Why is my pie crust soggy on the bottom?
This happens when you skip the blind baking step or don’t bake it long enough. The 10-minute pre-bake is essential to create a moisture barrier that keeps the crust crispy throughout chilling.
Can I substitute the cream cheese with something else?
Mascarpone cheese works as a close substitute with a slightly richer flavor, though Greek yogurt can replace half the cream cheese for a lighter version. Full substitution with yogurt creates a different texture that may be too liquid.
What pie server works best for clean slices?
A warm knife dipped in hot water between slices gives cleaner results than any pie server. Wipe the knife clean and re-warm it for each slice to prevent layers from sticking together.
Final Thoughts
Making Millionaire Pie transformed my dessert game from someone who bought bakery cakes to someone who confidently serves homemade pies that impress every single time. The combination of buttery crust, silky chocolate, gooey caramel, and cloud-like cream is hard to resist, and the ease of assembly makes it stress-free even for less experienced bakers.
If you’ve been intimidated by pie-making in the past, this recipe proves that impressive desserts don’t require complicated techniques. Give it a try, watch your family and friends react with pure joy, and prepare to make this pie again and again.
While you’re exploring delicious desserts, check out more indulgent treats on the site. For another decadent option, try the million dollar pie recipe for a slightly different take on this classic. If you want something to serve alongside your pie, the million dollar dip recipe makes an excellent appetizer for parties where you’re also serving dessert.
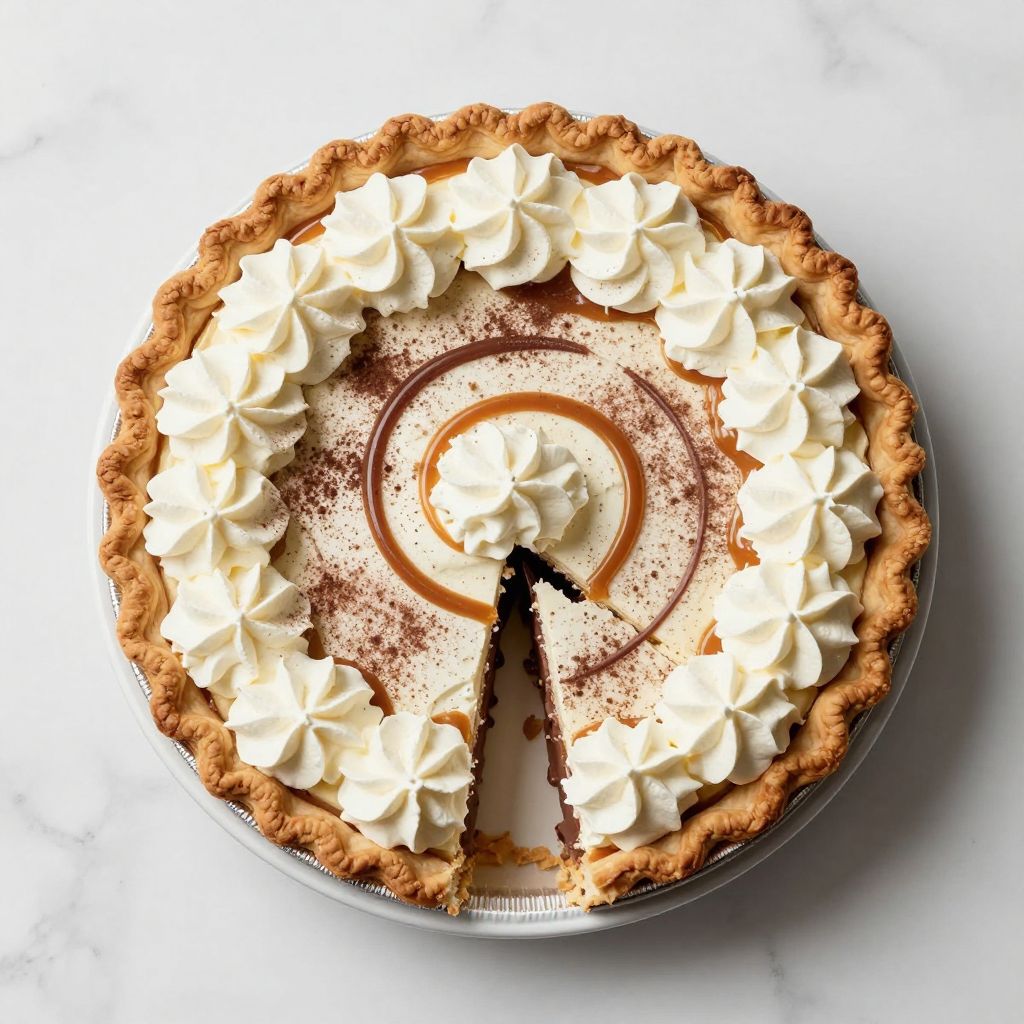
Millionaire Pie
Ingredients
Equipment
Method
- Preheat the oven to 350°F (175°C) and let the frozen pie crust thaw for 10 minutes, then prick with a fork.
- Blind bake the crust for 10 minutes until light golden brown, then remove from oven and cool for 5 minutes.
- In a microwave-safe bowl, combine chocolate and butter and heat in 30-second intervals, stirring between each, until smooth; allow to cool for 2 minutes.
- Spread the melted chocolate evenly in the cooled crust and chill for 5 minutes until set.
- Pour and spread the caramel sauce over the chocolate layer, then chill for another 5 minutes.
- In a large bowl, beat softened cream cheese on medium speed for 2 minutes until light and fluffy, then add vanilla and salt and mix until combined.
- In a separate bowl, whip heavy cream with powdered sugar on high speed for 3 to 5 minutes until stiff peaks form.
- Fold whipped cream into the cream cheese mixture until just combined; spread this filling over the caramel layer.
- Cover loosely and refrigerate the pie for at least 2 hours before serving.
- Dust the top with cocoa powder before slicing for garnish and let sit at room temperature for 10 minutes for clean cuts.