
The smell of charred meat and warm flatbread hits you the moment you step into a Persian kebab house, and that’s when you know something special is about to happen. Koobideh is a beloved Iranian ground meat kebab that’s crispy on the outside, juicy on the inside, and absolutely addictive.
This recipe delivers authentic flavor without requiring a trip to Tehran or special equipment you don’t already own. The magic lives in the seasoning blend, the technique of molding the meat onto skewers, and a quick sear over high heat that creates that signature crust.
What makes koobideh so special is its simplicity paired with serious depth of flavor. You get tender, garlicky meat with just enough char to make each bite memorable, and it pairs perfectly with rice, grilled tomatoes, and tangy yogurt.
Ready to master this Persian favorite at home? Let’s walk through how to build these skewers and cook them like a pro.
Why You’ll Love This Recipe
Koobideh hits all the marks for a weeknight dinner or weekend gathering.
- Fast to prep and cook, ready in under 30 minutes from start to finish
- Uses simple, everyday ingredients with no exotic finds required
- Works beautifully on a grill, stovetop, or under a broiler
- Naturally gluten-free and easily adapted for dietary restrictions
- Impresses guests while feeling effortless to execute
My Experience Making This Recipe
I first tasted koobideh at a small family-run restaurant where the owner’s mother still prepared the meat by hand each morning. The moisture, the way it held together on the skewer, the perfect pink center that turned golden brown on the grill—I was hooked instantly.
My early attempts were messy disasters. The meat fell apart, the seasonings felt flat, and I burned the outside before the inside cooked through. Everything changed when I started mixing the meat in a food processor and learned to keep my hands and equipment cold.
Now when I make koobideh at home, my family gathers around the grill before I even finish cooking the first batch. The smell draws them in, but it’s that first bite—that balance of smoke, spice, and tender meat—that keeps them coming back.
Recipe Overview
- Recipe Name: Persian Ground Meat Koobideh
- Servings: 4 servings (8 skewers)
- Prep Time: 15 minutes
- Cook Time: 8 minutes
- Total Time: 23 minutes
- Course: Main Dish
- Cuisine: Persian/Iranian
- Calories per Serving: 285
Equipment You Will Need
- Food processor or meat grinder
- Metal skewers or flat metal skewers (8 total)
- Large bowl
- Measuring spoons and cups
- Grill, grill pan, or cast iron skillet
- Meat thermometer (optional but helpful)
- Paper towels
- Tongs
Ingredients for Koobideh
- Ground lamb or ground beef: 1 pound (85/15 blend)
- Yellow onion: 1 medium, roughly chopped
- Garlic cloves: 4 large
- Fresh parsley: 1/4 cup, packed
- Kosher salt: 1.5 teaspoons
- Black pepper: 1/2 teaspoon, freshly ground
- Sumac: 1/2 teaspoon (optional but recommended)
- Olive oil: 2 tablespoons, plus more for greasing
- Water: 2 tablespoons
Ingredient Notes and Substitutions
- Ground lamb: Lamb delivers the authentic, slightly gamey flavor that defines koobideh. Ground beef works fine as a substitute and produces a milder, more familiar taste.
- Sumac: This tart, lemony spice adds brightness and complexity to the meat. If you don’t have it, skip it rather than substitute, or use a pinch of lemon zest mixed into the meat.
- Fresh parsley: The herb binds moisture and adds freshness. You can use fresh mint for a different but equally Persian approach, though the flavor shifts noticeably.
- Yellow onion: The sulfur compounds in raw onion break down the meat structure and help it stay moist. Red onion works but tastes sweeter and less sharp.
- Olive oil: Use a neutral oil if you prefer a cleaner sear. Olive oil adds a subtle fruity note that some cooks skip.
How to Make Koobideh
Step 1: Prep Your Ingredients and Equipment
Chill your food processor bowl and blade in the freezer for at least 10 minutes. Cold equipment keeps the meat from warming up and becoming mushy, which prevents it from holding together on the skewer.
Step 2: Pulse the Aromatics
Place the onion, garlic, and parsley into your chilled food processor. Pulse until finely minced, roughly 10 to 12 pulses, stopping to scrape down the sides as needed.
You want the aromatics broken down enough to distribute evenly through the meat but not so fine that they become a paste.
Step 3: Add the Meat and Season
Add the ground meat, salt, black pepper, sumac, and 2 tablespoons of water to the food processor. Pulse another 8 to 10 times, just until the mixture comes together and no streaks of raw meat remain visible.
Overworking at this stage creates a dense, rubbery texture, so stop as soon as everything looks evenly combined and slightly sticky.
Step 4: Chill the Mixture
Transfer the meat mixture to a bowl and refrigerate for at least 10 minutes while you prepare your grill or pan. A cold mixture molds more easily onto the skewer and holds its shape through cooking.
Step 5: Prepare Your Skewers
If using wooden skewers, soak them in water for 15 minutes to prevent burning. Oil your metal skewers lightly with olive oil or spray them with cooking spray so the meat slides off easily after cooking.
Step 6: Mold the Meat onto Skewers
Wet your hands with cold water and grab roughly 2 ounces of meat (about 1/4 cup). Press and mold it around the length of the skewer in an oval log shape, making it roughly 1 inch thick and 5 to 6 inches long, leaving 1 inch at each end free.
The meat should cling to the skewer tightly. If it slips, your mixture was too warm or too wet, so refrigerate for another 5 minutes and try again.
Step 7: Heat Your Cooking Surface
If grilling, preheat to high heat (around 450 to 500 degrees Fahrenheit), letting the grates get very hot. If using a grill pan or cast iron, heat it over high heat until a drop of water immediately sizzles and evaporates when it hits the surface.
High heat creates that brown crust that makes koobideh so appealing and locks in juices inside the meat.
Step 8: Cook the Koobideh
Place the skewers directly on the hot grates or pan, laying them parallel to the grates if grilling. Cook without moving them for 3 to 4 minutes until deeply browned and charred spots appear.
Flip gently and cook the other side for another 3 to 4 minutes until the internal temperature reaches 160 degrees Fahrenheit for beef or 160 to 165 degrees for lamb.
Step 9: Rest Before Serving
Transfer the skewers to a clean plate and let them rest for 2 minutes. This brief pause allows juices to redistribute through the meat so each bite stays moist.
Pro Tip: Cold meat mixture, hot equipment, and one flip only. These three rules separate beautiful, juicy koobideh from dense, overcooked mistakes.
Tips for the Best Koobideh
- Use a meat grinder instead of a food processor if you own one, as it creates better texture and handles the meat more gently than pulsing.
- Keep everything as cold as possible before cooking, from the equipment to your hands to the meat itself, which ensures the mixture stays together and cooks evenly.
- Don’t skip the sumac if you can find it, as its tangy brightness lifts the entire dish and adds that authentic Persian taste you can’t replicate otherwise.
- Use flat metal skewers rather than round ones because the meat grips better and doesn’t spin around as you flip.
- Pat the cooked koobideh dry with a paper towel right after cooking to remove surface moisture and help the exterior crisp even more.
- Make a double batch and freeze the molded, uncooked skewers individually on a sheet pan, then transfer to freezer bags for up to 3 months of easy weeknight dinners.
Common Mistakes to Avoid
- Overmixing the meat: Working it too much develops gluten-like strands that make the koobideh dense and rubbery rather than tender and moist.
- Cooking at medium heat: The temperature must be high to create the crusty exterior before the inside dries out.
- Flipping too often: Constant turning prevents browning and dries out the meat, so resist the urge to fuss and stick with one flip.
- Using lean ground meat: An 85/15 blend is essential because the fat keeps the meat moist and adds flavor that lean versions lack.
- Skipping the chill time: Warm mixture slides around the skewer and falls apart during cooking, making your job ten times harder.
Serving Suggestions
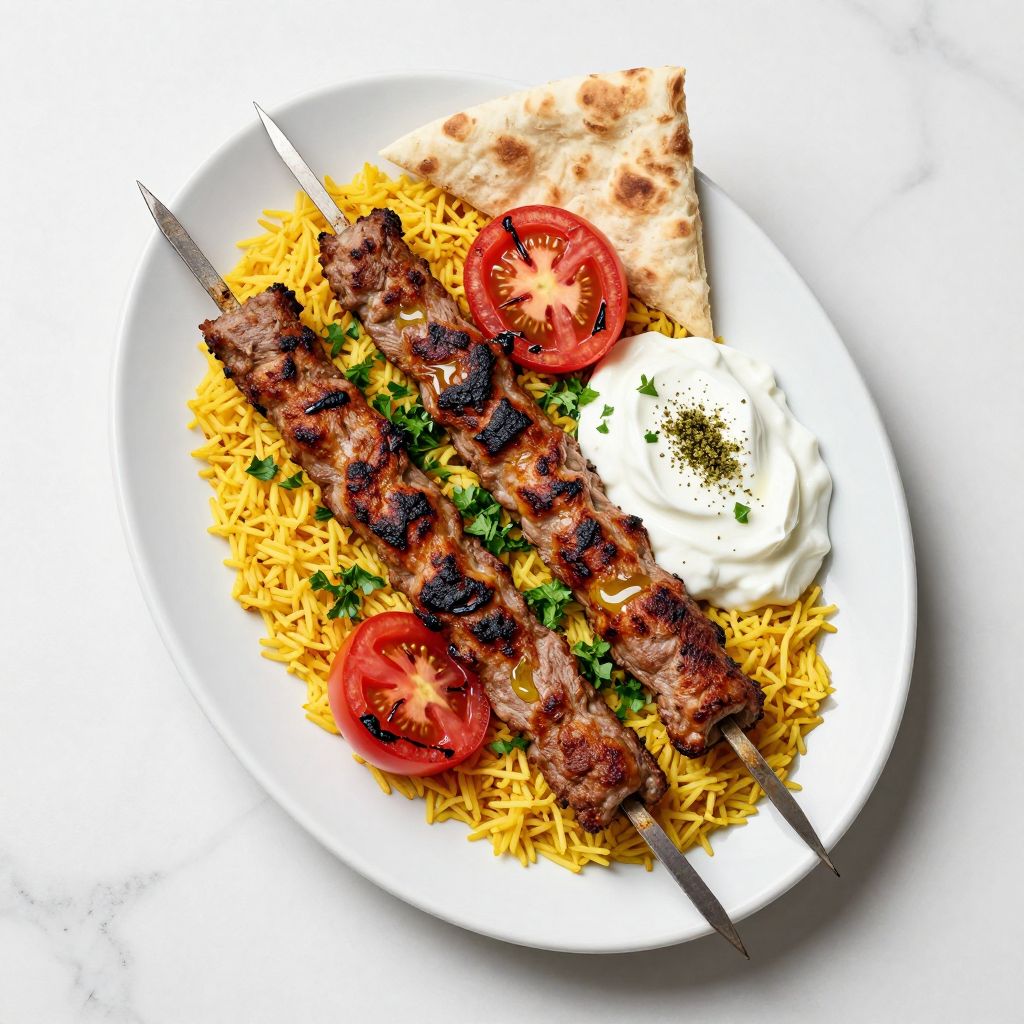
Koobideh tastes best alongside warm basmati rice, grilled tomatoes, and a dollop of cooling yogurt. The contrasts of hot and cold, spiced and plain, and crispy and creamy make every bite feel complete.
- Fluffy white or saffron basmati rice to soak up the meat’s juices
- Grilled tomato halves or fresh tomato wedges for acidity and brightness
- Plain yogurt or cucumber yogurt sauce for cooling contrast
- Warm lavash or flatbread to wrap everything together
- Pickled vegetables or a crisp green salad for crunch and freshness
Variations to Try
- Koobideh with Herbs: Add 2 tablespoons of fresh mint or cilantro along with the parsley for a more herbaceous, complex flavor that still honors the original recipe.
- Spiced Version: Stir in 1/4 teaspoon of cinnamon and a tiny pinch of clove for a warmer, deeper flavor reminiscent of Persian spice blends.
- Koobideh Shaami: Replace half the meat with cooked chickpeas pulsed into a paste, then proceed as normal for a texture change and added fiber.
- Smoky Koobideh: Add 1/2 teaspoon of smoked paprika and cook exclusively over charcoal for an even deeper, smokier crust.
- White Koobideh: Use all ground chicken or turkey instead of lamb or beef for a leaner option that cooks slightly faster and tastes more delicate.
Dietary Adaptations
- Gluten-Free: This recipe is naturally gluten-free as written, with no flour or gluten-containing ingredients anywhere in the mix.
- Dairy-Free: Serve koobideh with dairy-free yogurt or skip the yogurt entirely, as the meat stands beautifully on its own.
- Vegan/Vegetarian: Pulse cooked lentils and walnuts in a 1:1 ratio as a replacement for the meat, keeping all seasonings the same and adding 1 extra tablespoon of water to help binding.
- Low-Carb/Keto: Serve koobideh over cauliflower rice or with grilled vegetables instead of basmati rice to keep carbohydrates minimal.
Storage and Reheating
Refrigerator
Cooked koobideh keeps safely in the refrigerator for up to 3 days. Store them in an airtight container on a paper towel to absorb excess moisture.
- Remove from the refrigerator 5 minutes before reheating so they warm evenly
- Reheat gently in a skillet over medium heat for 2 to 3 minutes per side to avoid drying them out
Freezer
Uncooked koobideh on skewers freeze beautifully for up to 3 months. Freeze them individually on a sheet pan first, then transfer to a freezer bag to prevent them from sticking together.
- Do not thaw before cooking, as thawing makes them harder to handle
- Cook directly from frozen, adding just 1 to 2 extra minutes per side
Reheating
Reheated koobideh tastes best when cooked quickly over high heat rather than warmed slowly. This approach restores some of the crispy exterior that makes them special.
- Grill pan over medium-high heat for 2 minutes per side brings back crispness
- Oven broiler for 3 to 4 minutes total also works well for reheating multiple skewers at once
Nutrition Information
| Nutrient | Amount |
|---|---|
| Calories | 285 |
| Total Fat | 18 grams |
| Saturated Fat | 7 grams |
| Carbohydrates | 3 grams |
| Fiber | 0.5 grams |
| Sugar | 0.5 grams |
| Protein | 31 grams |
| Sodium | 520 milligrams |
| Cholesterol | 92 milligrams |
These values are estimates based on USDA nutrition data and assume an 85/15 ground lamb blend with standard ingredient portions. Individual results vary based on brand, fat ratio, and cooking method.
Frequently Asked Questions
Can I Make Koobideh Without Sumac?
Yes, the recipe works without sumac, though the flavor becomes less complex and loses that tangy brightness. If you want to replace it, add a pinch of lemon zest to the meat mixture instead.
How Do I Keep the Meat from Falling Off the Skewer?
Keep everything cold before cooking, use flat metal skewers, and avoid overworking the meat mixture. If the meat still slides, your mixture was too warm or too wet, so chill it for another 10 minutes and try again.
Can I Make This on a Stovetop if I Don’t Have a Grill?
Absolutely. A cast iron skillet or grill pan over high heat produces nearly identical results to an outdoor grill. You’ll get the same brown crust and juicy interior in about the same cooking time.
What’s the Difference Between Koobideh and Kofta?
Koobideh and kofta are cousins, but koobideh specifically refers to ground meat molded onto a flat skewer, while kofta can be ground or minced meat shaped as patties, balls, or on skewers. The molding technique and thin shape are what make koobideh unique.
How Can I Tell When Koobideh is Done Cooking?
The internal temperature should reach 160 degrees Fahrenheit for beef and 160 to 165 degrees for lamb. You can also check by pressing the meat gently; it should feel firm and spring back slightly, not soft or mushy.
Can I Prep These Hours in Advance?
Yes, you can mold the koobideh onto skewers and refrigerate them for up to 8 hours before cooking. Keep them covered with plastic wrap so they don’t dry out or pick up refrigerator odors.
Final Thoughts
Koobideh proves that the simplest recipes often taste the best. You need just a handful of ingredients, basic equipment, and a little technique to create something genuinely special that tastes like it came straight from a Tehran street vendor.
Don’t be intimidated by the molding step or the need for high heat. You’ll nail it on your second or third try, and after that, koobideh becomes one of those recipes you make on repeat because everyone asks for it and you can pull it together in less than half an hour.
If you love this recipe, explore more of our best recipe collections or try your hand at steak alfredo for another crowd-pleasing main dish.
Persian Ground Meat Koobideh
Ingredients
Equipment
Method
- Chill the food processor bowl and blade in the freezer for at least 10 minutes.
- Place the chopped onion, garlic, and parsley in the chilled food processor and pulse 10–12 times until roughly minced.
- Add the ground meat, salt, pepper, sumac, olive oil, and water; pulse 8–10 times until the mixture is evenly combined and slightly sticky.
- Transfer the meat mixture to a bowl and refrigerate for at least 10 minutes.
- If using wooden skewers, soak them in water for 15 minutes; if using metal, lightly grease with olive oil.
- Wet your hands and divide the chilled meat into eight 2-ounce portions, then mold each around a skewer into a 5–6-inch long, 1-inch thick log.
- Preheat a grill or grill pan over high heat (450–500°F) until smoking hot.
- Place the skewers on the grill and cook without moving for 3–4 minutes until deeply browned.
- Flip the skewers and cook for another 3–4 minutes until the internal temperature reaches 160°F.
- Remove the skewers from heat and rest for 2 minutes before serving.