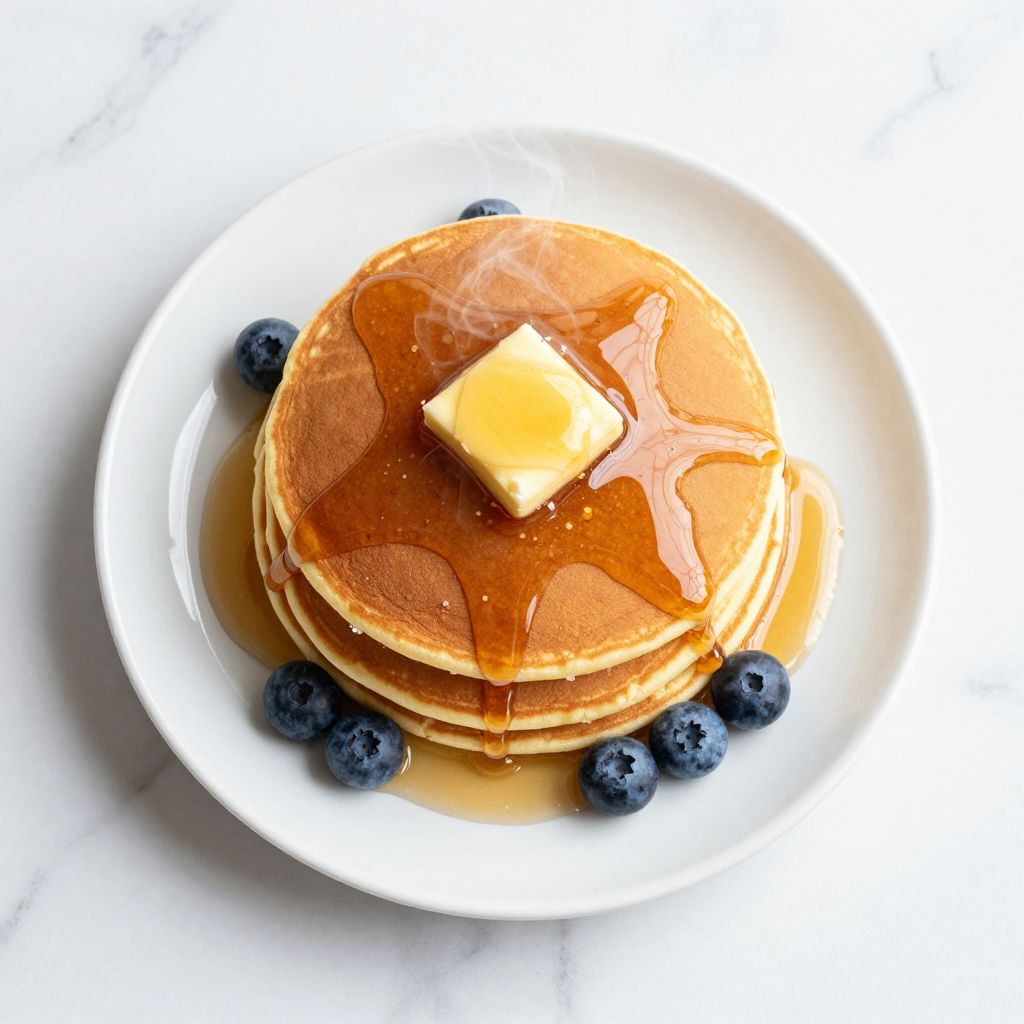
There’s something almost magical about drizzling warm honey syrup over warm pancakes and watching it pool into the butter beneath—that golden sweetness catching the morning light is pure comfort food theater. Honey syrup is one of those deceptively simple recipes that transforms your breakfast or dessert from ordinary to memorable, and the best part is you probably have everything you need in your kitchen right now.
This recipe skips the refined sugar trap and leans into real honey’s natural depth and complexity, giving you a syrup that tastes like something special without any fuss. You’ll have a gorgeous, pourable syrup ready in about ten minutes that beats bottled versions by a mile.
Why You’ll Love This Recipe
Honey syrup delivers pure simplicity with stunning results. It takes five minutes to make, requires minimal ingredients, and tastes exponentially better than store-bought alternatives.
- Ready in under 10 minutes from start to finish
- Uses just three basic ingredients you already have at home
- Tastes richer and more complex than refined sugar syrups
- Works beautifully on pancakes, waffles, ice cream, yogurt, and baked goods
- Naturally vegan and gluten-free without any special effort
My Experience Making This Recipe
I discovered this recipe on a lazy Sunday morning when I was tired of the artificial aftertaste from commercial syrup bottles. The first batch came together so quickly I almost didn’t believe it was done, but one taste changed everything.
The aroma that fills your kitchen is incredible—warm honey with hints of vanilla and butter creates something that smells more like a fancy bakery than your home stove. My partner actually wandered into the kitchen asking what was cooking because the smell drew him in from the other room.
What surprised me most was the texture. I expected something thin and runny, but this syrup has body and clings beautifully to pancakes without pooling all over the plate. I’ve made it dozens of times now, and it’s become my go-to for everything from weekend breakfasts to drizzling over cheesecake.
Recipe Overview
- Recipe Name: Honey Syrup
- Servings: Makes about 1 cup
- Prep Time: 2 minutes
- Cook Time: 5 minutes
- Total Time: 7 minutes
- Course: Breakfast, Dessert Sauce
- Cuisine: American
- Calories per Serving: 64 calories (per 1 tablespoon)
Equipment You Will Need
- Small saucepan (2-3 quart capacity)
- Wooden spoon or silicone spatula for stirring
- Measuring cups and spoons
- Whisk (optional but helpful for mixing vanilla)
- Heat-safe glass jar or container for storage
- Instant-read thermometer (optional but useful)
Ingredients for Honey Syrup
- 1 cup raw or pasteurized honey
- 1/4 cup water
- 2 tablespoons unsalted butter
- 1 teaspoon pure vanilla extract
- Pinch of sea salt (about 1/8 teaspoon)
Ingredient Notes and Substitutions
- Raw honey contains more enzymes and subtle floral notes than pasteurized honey, making it ideal for this recipe. If you only have pasteurized honey, it works perfectly fine and will cook slightly faster.
- Water thins the honey to the right consistency for pouring. You can substitute with maple syrup for a different flavor profile, though this changes the recipe’s character entirely.
- Unsalted butter adds richness and helps emulsify the syrup. You can use salted butter if that’s what you have, but reduce the added salt to just a pinch.
- Vanilla extract deepens the honey’s natural sweetness and adds warmth. Almond extract or maple extract both make excellent substitutes with different flavor results.
- Sea salt brings out honey’s complexity and cuts through the sweetness beautifully. Table salt works too, but use slightly less since it’s more densely packed.
How to Make Honey Syrup
Step 1: Measure Your Ingredients
Gather your honey, water, butter, vanilla, and salt and place them within arm’s reach of your stove. Having everything measured out and ready prevents you from scrambling once the heat is on, which makes the whole process feel less rushed and more controlled.
Step 2: Pour Honey Into the Saucepan
Add the 1 cup of honey directly into your small saucepan. Don’t worry about honey sticking to the measuring cup; a quick dip into hot water or a light spray of cooking oil makes cleanup effortless.
Step 3: Add Water and Set the Heat
Pour the 1/4 cup of water into the saucepan with the honey and place the pan over medium heat. The water dilutes the honey to the perfect pouring consistency while helping it heat evenly without scorching.
Step 4: Stir and Monitor the Temperature
Use a wooden spoon to stir the mixture slowly and continuously for about 2 minutes. You want the honey and water to combine smoothly; stir gently to avoid incorporating too much air, which can make the syrup cloudy rather than clear and glossy.
Step 5: Add the Butter
Once the honey and water are well combined, add the 2 tablespoons of butter and stir it in thoroughly. The butter will melt into the warm honey and add richness that transforms this from simple into luxurious.
Step 6: Remove From Heat and Add Vanilla
Pull the saucepan off the heat before adding the vanilla extract and pinch of sea salt. Vanilla is sensitive to heat and can lose its aromatic quality if exposed to high temperatures, so always add it after removing the pan from direct heat.
Step 7: Whisk Until Smooth
Give the syrup a final vigorous whisk or stir for about 30 seconds to ensure the vanilla and salt are evenly distributed throughout. This step creates a silky texture that feels more polished than if you simply stir.
Step 8: Let It Cool Slightly
Allow the syrup to cool for 2 to 3 minutes at room temperature before pouring over your pancakes or other dishes. The syrup will thicken slightly as it cools and reaches the perfect consistency for clinging to food without running everywhere.
Pro Tip: Make a double batch and store it in a glass jar in your pantry; it stays fresh for weeks and is ready to microwave in seconds whenever breakfast cravings strike.
Tips for the Best Honey Syrup
- Use medium heat or slightly lower to prevent the honey from caramelizing too quickly, which can create a burnt flavor and darker color than desired.
- Stir frequently but gently to avoid incorporating air bubbles that make the syrup look cloudy instead of clear and appealing.
- Add vanilla and salt only after removing from heat to preserve their delicate flavors and aromatic qualities.
- If your syrup becomes too thick as it cools, simply reheat it with an extra tablespoon of water to reach your preferred consistency.
- A pinch of cinnamon, nutmeg, or a drop of almond extract elevates the flavor profile and makes people wonder what your secret ingredient is.
- Pour the syrup into glass containers rather than plastic, which can absorb honey’s oils and flavors over time.
Common Mistakes to Avoid
- Heating honey above medium heat can cause it to caramelize and develop a bitter, burnt taste that ruins the entire syrup batch.
- Skipping the cooling time makes the syrup too runny; it needs a few minutes to thicken and reach the ideal pouring consistency.
- Overheating the vanilla by adding it while the pan is still on high heat causes you to lose its subtle aroma and flavor impact.
- Using too little water creates a syrup that’s too thick and sticky, while too much water makes it too thin and watery.
Serving Suggestions
This syrup works beautifully across sweet applications, from traditional breakfast to creative dessert applications. Drizzle it warm for the best flavor and texture, though it’s delicious at room temperature too.
- Over fluffy pancakes or waffles with a pat of butter melting underneath
- Drizzled across vanilla ice cream or Greek yogurt for a simple but elegant dessert
- Mixed into oatmeal or stirred into warm milk for a honey-sweetened beverage
- Spread over baked cheesecake or swirled into brownie batter before baking
- Spooned over fresh fruit, especially berries or stone fruits that benefit from the extra sweetness
Variations to Try
- Brown Butter Honey Syrup: Brown the butter before adding the honey for a nutty, caramelized depth that feels more sophisticated and restaurant-quality.
- Spiced Honey Syrup: Add 1/4 teaspoon each of cinnamon and nutmeg with the salt for a warm spice profile that pairs beautifully with fall breakfast foods.
- Citrus Honey Syrup: Whisk in 1 teaspoon of fresh lemon or orange zest just before adding vanilla for brightness and complexity that cuts through rich foods.
- Coffee Honey Syrup: Stir in 1 teaspoon of instant espresso powder dissolved in a tiny bit of water for coffee lovers who want sweet syrup with an espresso kick.
- Herbal Honey Syrup: Infuse the water with a chamomile or lavender tea bag before mixing with honey for a floral, calming variation perfect for desserts.
Dietary Adaptations
- Gluten-free: This recipe is naturally gluten-free since it contains no flour or grain products; use as-is without modification.
- Dairy-free: Replace the butter with coconut oil or vegan butter in equal amounts for a dairy-free version that tastes nearly identical.
- Vegan: Use vegan butter instead of dairy butter, and ensure your honey is certified vegan if that matters to you; maple syrup is a plant-based alternative.
- Low-carb or keto: Replace honey with monk fruit sweetener or erythritol at half the amount, though the flavor profile changes noticeably since honey has complex notes these sweeteners lack.
Storage and Reheating
Refrigerator
Pour cooled syrup into an airtight glass container and store it in the refrigerator for up to 3 weeks. The cold temperatures naturally slow any crystallization or separation that might occur over time.
- Check for crystallization before each use; this is normal and doesn’t indicate spoilage
- Stir well before using to recombine any separated ingredients
Freezer
You can freeze honey syrup in ice cube trays for portion-controlled servings that last up to 6 months. Once frozen solid, transfer the cubes to a freezer bag for convenient storage and quick thawing.
- Pop out one or two cubes and microwave for 15 to 20 seconds to reheat
- Label the bag with the date so you remember when you made it
Reheating
Microwave cold or frozen syrup in 15 to 20 second intervals, stirring between each burst to heat evenly. Alternatively, place a jar of syrup in a bowl of hot water for a gentler reheating method that preserves all the flavors.
- Never reheat on high heat, which can damage the vanilla and cause overheating
- Add a tablespoon of water if the syrup has thickened too much during storage
Nutrition Information
| Nutrient | Amount |
|---|---|
| Calories | 64 |
| Total Fat | 1.5g |
| Saturated Fat | 1g |
| Carbohydrates | 13g |
| Fiber | 0g |
| Sugar | 12g |
| Protein | 0g |
| Sodium | 25mg |
| Cholesterol | 4mg |
Nutritional information is calculated per 1 tablespoon serving. Actual values vary based on specific honey brands and whether you use salted or unsalted butter.
Frequently Asked Questions
Can I Use Flavored Honey for This Recipe?
Absolutely, and it’s a fun way to create unique syrup variations without extra work. Just remember that flavored honeys already have their own taste profiles, so skip the vanilla extract and adjust other seasonings to complement rather than compete with the honey’s existing flavor.
Why Did My Syrup Crystallize or Separate?
Crystallization happens naturally with honey as it cools and is completely harmless. Simply warm it gently in the microwave or a hot water bath, stir well, and it returns to smooth consistency.
How Long Does Honey Syrup Last at Room Temperature?
Honey’s natural antimicrobial properties mean this syrup lasts about 1 week on the counter in a sealed jar, though refrigerating it extends shelf life to 3 weeks. If you make it frequently, room temperature storage is convenient for regular use.
Can I Make This Syrup in Advance for Meal Prep?
Yes, make a double or triple batch at the start of the week and store it in the refrigerator; reheat portions as needed. This approach saves time during busy mornings when you want homemade syrup without any cooking fuss.
What’s the Difference Between This and Regular Honey?
This syrup is heated, thinned, and enriched with butter and vanilla, making it pourable and luxurious compared to straight honey, which is thicker and less versatile for drizzling. The heating also slightly mellows honey’s intensity while the added ingredients create a more complex, rounded flavor profile.
Final Thoughts
Making your own honey syrup is one of those small kitchen skills that feels fancy but requires almost no effort, and the results taste so much better than store-bought that you’ll never go back. Five minutes of your time transforms basic pantry ingredients into something that genuinely elevates everyday breakfast and desserts.
Try this recipe this weekend and discover how a homemade syrup can become a staple you make regularly. Your pancakes deserve it, and honestly, so do you.
Honey Syrup
Ingredients
Equipment
Method
- Gather your honey, water, butter, vanilla, and salt and place them within arm's reach of your stove.
- Add 1 cup of honey directly into your small saucepan.
- Pour 1/4 cup of water into the saucepan with the honey and place the pan over medium heat.
- Use a wooden spoon to stir the mixture slowly and continuously for about 2 minutes until the honey and water combine smoothly.
- Add 2 tablespoons of butter and stir it in thoroughly until melted and incorporated.
- Remove the saucepan from heat and add 1 teaspoon vanilla extract and 1/8 teaspoon sea salt.
- Whisk vigorously for about 30 seconds to ensure the vanilla and salt are evenly distributed throughout.
- Allow the syrup to cool for 2 to 3 minutes at room temperature before serving.