
There’s something undeniably comforting about the aroma of sizzling liver wafting through the kitchen. This Fried Liver Recipe is not just a nod to classic home cooking; it’s a quick, satisfying dish that packs a punch of flavor and nutrition. With its crispy exterior and tender inside, this liver dish is a delightful way to introduce a rich protein to your dinner rotation. Ready to dive in? Let’s gather our ingredients and get started!
Why You’ll Love This Recipe
This recipe brings together simplicity and bold flavors, making it a winner in any home kitchen.
- Quick to prepare, perfect for busy weeknights.
- Packed with nutrients, offering a great source of iron.
- Versatile, pairs well with various sides.
- Delicious crispy texture combined with a tender bite.
- Easily customizable with your favorite seasonings.
My Experience Making This Recipe
When I first made this fried liver, I was pleasantly surprised by how quickly it came together. The rich, hearty flavor of the liver combined with a crispy crust made it a hit at the dinner table.
My family was skeptical at first, but after one bite, they were hooked. It sparked a delightful conversation about childhood meals and comfort food, reminding me just how powerful a simple dish can be.
Recipe Overview
- Recipe Name: Fried Liver
- Servings: 4
- Prep Time: 10 minutes
- Cook Time: 15 minutes
- Total Time: 25 minutes
- Course: Main Course
- Cuisine: Traditional
- Calories per Serving: 300
Equipment You Will Need
- Large frying pan
- Cutting board
- Sharp knife
- Tongs or spatula
- Paper towels
Ingredients for Fried Liver
- 1 pound beef or chicken liver, cleaned and sliced
- 1 cup all-purpose flour, for dredging
- Salt, to taste
- Pepper, to taste
- 1 teaspoon garlic powder
- 4 tablespoons butter or oil for frying
- 1 medium onion, sliced (optional)
Ingredient Notes and Substitutions
- Liver: Rich in iron, it’s the star of the dish. You can substitute with turkey liver for a milder flavor.
- Flour: Used for dredging to create a crispy coating. Cornstarch can be a gluten-free alternative.
- Butter/Oil: Adds flavor while frying. You can use olive oil or ghee for a different taste.
- Onion: Adds sweetness and depth. Leave it out if you prefer a more straightforward liver flavor.
How to Make Fried Liver
Step 1: Prepare the Liver
Begin by cleaning the liver under cold water and patting it dry with paper towels. This step is key to ensuring a crispy texture.
Step 2: Slice the Liver
Cut the liver into thin slices, about half an inch thick. Thinner slices cook faster and develop a nice crust.
Step 3: Season the Flour
In a shallow dish, combine flour, salt, pepper, and garlic powder. This mixture will give the liver a flavorful crust.
Step 4: Dredge the Liver
Coat each slice of liver in the flour mixture, shaking off any excess. This helps to create that desirable crispy coating.
Step 5: Heat the Pan
Heat the frying pan over medium-high heat and add butter or oil. The pan should be hot enough that the fat sizzles when you add the liver.
Step 6: Fry the Liver
Add the liver slices to the hot pan in a single layer. Avoid overcrowding, as this can lead to steaming instead of frying.
Step 7: Cook Until Crispy
Fry for about 3-4 minutes on each side until golden brown. This step is crucial for developing that crispy texture.
Step 8: Add Onions (Optional)
If using, add sliced onions in the last few minutes of cooking. They will caramelize and add a lovely sweetness to the dish.
Pro Tip: Don’t overcook the liver; it should remain tender inside. Overcooking can make it tough and dry.
Tips for the Best Fried Liver
- Ensure the liver is at room temperature before cooking for even frying.
- Use a good quality frying fat for the best flavor.
- Keep the slices uniform in thickness for consistent cooking.
- Let the liver rest for a minute after frying to maintain juiciness.
- Pair with a squeeze of lemon for a bright finish.
Common Mistakes to Avoid
- Not drying the liver properly can lead to sogginess.
- Overcrowding the pan causes steaming instead of frying.
- Cooking on too low heat can result in a rubbery texture.
- Not seasoning enough will make the liver taste bland.
Serving Suggestions
This fried liver pairs beautifully with a variety of sides to complete your meal.
- Mashed potatoes for a creamy contrast.
- Steamed vegetables for a healthy touch.
- Rice or quinoa to soak up the juices.
- Fresh salad to balance the richness.
Variations to Try
- Add spices like paprika or cayenne for a kick.
- Make a liver and onion sandwich for a hearty lunch option.
- Top with sautéed mushrooms for an earthy flavor.
- Add a splash of balsamic vinegar while cooking for a tangy twist.
Dietary Adaptations
- Gluten-free: Use cornstarch or a gluten-free flour blend.
- Dairy-free: Substitute butter with vegetable oil.
- Low-carb: Skip the flour and use almond flour instead.
Storage and Reheating
Refrigerator
Store leftover fried liver in an airtight container in the fridge for up to 3 days.
- Let it cool before sealing to prevent moisture buildup.
Freezer
You can freeze cooked liver for up to 2 months.
- Wrap tightly in plastic wrap and then place in a freezer bag.
Reheating
Reheat in a skillet over low heat to maintain texture.
- For best results, avoid microwaving, as it can make the liver rubbery.
Nutrition Information
| Nutrient | Amount |
|---|---|
| Calories | 300 |
| Total Fat | 20g |
| Saturated Fat | 8g |
| Carbohydrates | 20g |
| Fiber | 2g |
| Sugar | 0g |
| Protein | 25g |
| Sodium | 300mg |
| Cholesterol | 200mg |
Nutrition values may vary based on specific ingredients used.
Frequently Asked Questions
Can I use frozen liver?
Yes, just make sure to thaw it completely before cooking for even results.
How do I know when the liver is done?
The liver should be browned on the outside, but still slightly pink in the center for a tender bite.
Can I make this ahead of time?
Yes, you can fry the liver ahead and reheat it later, though it is best fresh.
What if I don’t like the taste of liver?
You might enjoy it more with marinades or by pairing it with strong flavors like onions and spices.
Is it safe to eat liver frequently?
While liver is nutritious, moderation is key due to its high vitamin A levels.
Final Thoughts
It’s amazing how something so simple can evoke such rich flavors and memories. I encourage you to give this Fried Liver Recipe a try and maybe even share it with someone who hasn’t yet discovered the joys of liver.
Explore more delicious recipes like this one on my blog, including this Fried Liver Recipe and Fried Chicken Thighs Recipe. Happy cooking!
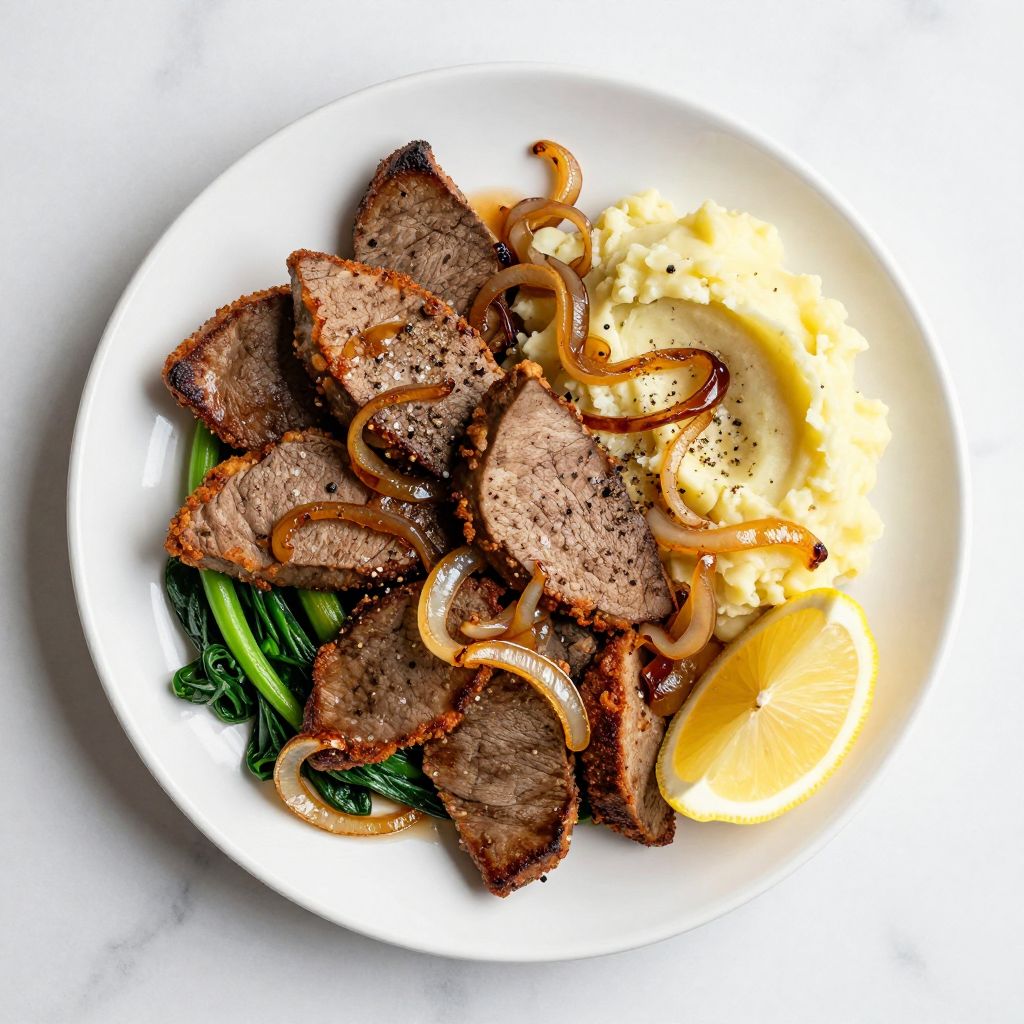
Fried Liver
Ingredients
Equipment
Method
- Begin by cleaning the liver under cold water and patting it dry with paper towels.
- Cut the liver into thin slices, about half an inch thick.
- In a shallow dish, combine flour, salt, pepper, and garlic powder.
- Coat each slice of liver in the flour mixture, shaking off any excess.
- Heat the frying pan over medium-high heat and add butter or oil.
- Add the liver slices to the hot pan in a single layer.
- Fry for about 3-4 minutes on each side until golden brown.
- If using, add sliced onions in the last few minutes of cooking.