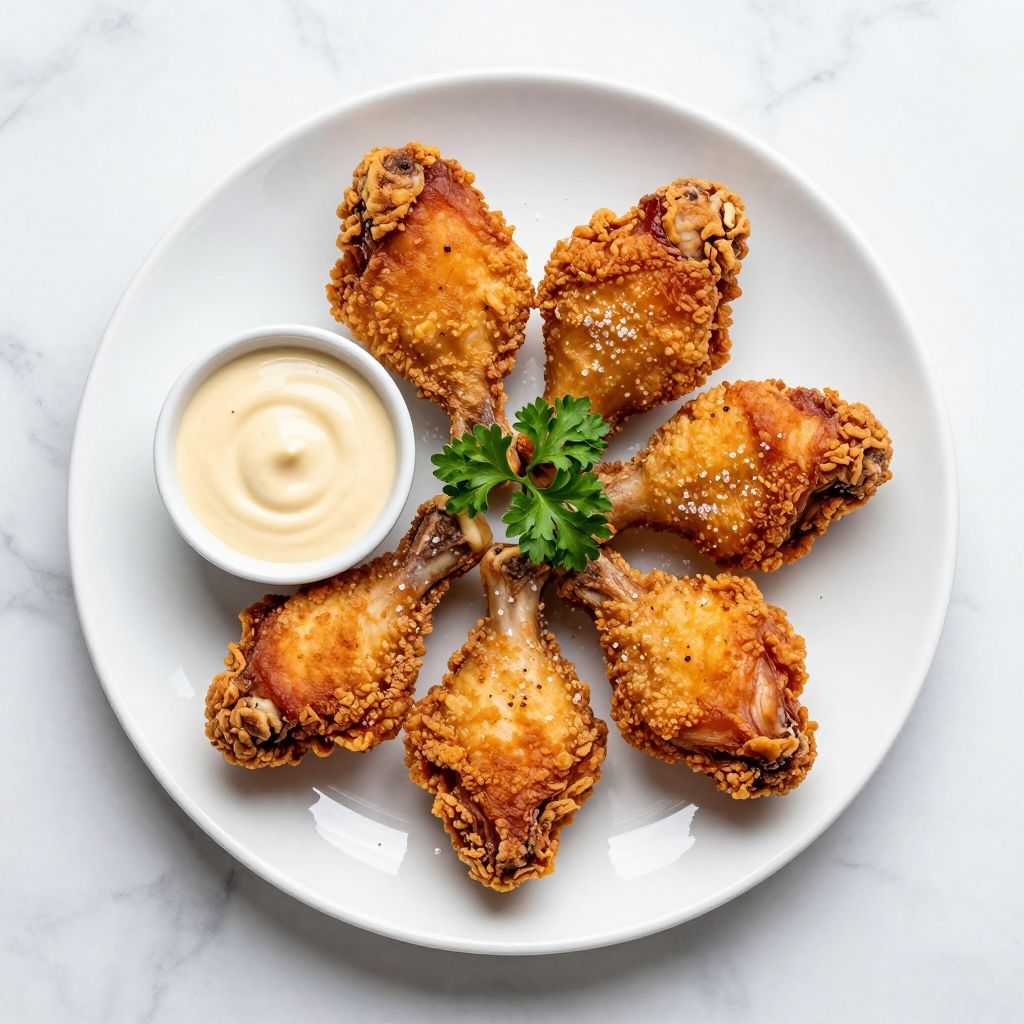
There’s nothing quite like the sound of chicken sizzling in hot oil, that golden-brown crust crackling under your teeth, and the juicy meat falling off the bone inside. Fried chicken thighs are the ultimate comfort food, and honestly, they’re easier to nail than you’d think.
Thighs are forgiving, flavorful, and they stay moist even when you’re learning the ropes. This recipe delivers restaurant-quality results at home without any fussy techniques or mysterious ingredients. You’ll master crispy skin, tender meat, and a savory coating that tastes like it took hours to develop when you actually spent minimal time prepping.
Why You’ll Love This Recipe
This approach to fried chicken thighs gives you everything you want in one plate. The thighs cook faster than breasts, stay juicier, and cost less, making them the smart choice for weeknight dinners and casual entertaining.
- Crispy, golden exterior with a tender, juicy interior every single time
- Ready to eat in under 45 minutes from start to finish
- Budget-friendly compared to chicken breasts or wings
- Forgiving cut that’s hard to overcook or dry out
- Perfect for meal prep, picnics, or feeding a crowd
My Experience Making This Recipe
The first time I made this at home, I was nervous. I’d eaten incredible fried chicken at restaurants and wasn’t sure I could recreate it in my kitchen.
I prepped the thighs the night before, let them marinate in buttermilk, and watched the magic happen. The acid in the buttermilk tenderized the meat while the seasonings soaked in, and the next day when I fried them, they came out with a shatteringly crisp crust and meat so tender it practically melted on my tongue.
My partner actually asked if I’d secretly ordered takeout. That’s the moment I knew I’d nailed it, and now I make this every other week because it’s become a household favorite.
Recipe Overview
- Recipe Name: Fried Chicken Thighs
- Servings: 4 servings (8 thighs)
- Prep Time: 15 minutes (plus 4 hours or overnight marinating)
- Cook Time: 20 minutes
- Total Time: 4 hours 35 minutes (mostly hands-off marinating)
- Course: Main Course
- Cuisine: American
- Calories per Serving: 520 calories
Equipment You Will Need
- Large mixing bowl
- Shallow dish or baking pan for marinating
- Shallow bowl for the flour mixture
- Paper towels
- Heavy-bottomed pot or Dutch oven
- Candy or deep-fry thermometer
- Slotted spoon or tongs
- Wire rack or paper towel-lined plate
- Measuring cups and spoons
Ingredients for Fried Chicken Thighs
For the Marinade
- 2 cups buttermilk
- 8 boneless, skinless chicken thighs (about 2 pounds)
- 2 teaspoons salt
- 1 teaspoon black pepper
- 1 teaspoon garlic powder
- 1 teaspoon paprika
- 1/2 teaspoon cayenne pepper (optional, for heat)
For the Flour Coating
- 2 cups all-purpose flour
- 2 teaspoons salt
- 1 teaspoon black pepper
- 1 teaspoon garlic powder
- 1 teaspoon paprika
- 1/2 teaspoon onion powder
- 1/2 teaspoon cayenne pepper
For Frying
- Vegetable oil (enough to reach 2 inches up the sides of your pot, roughly 2 to 3 quarts)
Ingredient Notes and Substitutions
- Buttermilk: The acidity tenderizes the chicken and helps the coating stick. You can substitute with regular milk mixed with lemon juice or vinegar (1 cup milk + 1 tablespoon acid), though buttermilk gives superior results.
- Chicken thighs: Dark meat stays juicier than white meat during frying. Bone-in, skin-on thighs work too, but they need 5 to 8 minutes longer to cook through.
- All-purpose flour: This is your coating base and creates the crispy exterior. You can use half all-purpose and half cornstarch for extra crispiness, but all-purpose alone works perfectly.
- Vegetable oil: Use a neutral oil with a high smoke point like canola, peanut, or refined coconut oil. Avoid olive oil, which burns at frying temperatures.
- Paprika: Adds color and mild flavor. Smoked paprika deepens the flavor if you prefer a smokier taste.
How to Make Fried Chicken Thighs
Step 1: Prepare the Buttermilk Marinade
In a large mixing bowl, combine 2 cups buttermilk with 2 teaspoons salt, 1 teaspoon black pepper, 1 teaspoon garlic powder, 1 teaspoon paprika, and 1/2 teaspoon cayenne pepper. Whisk until the salt fully dissolves so the seasonings are evenly distributed throughout the liquid.
Step 2: Marinate the Chicken
Pat 8 chicken thighs dry with paper towels, then place them in a shallow dish or baking pan. Pour the buttermilk mixture over the thighs, making sure each one is fully submerged or at least well coated.
Cover the dish with plastic wrap and refrigerate for at least 4 hours, preferably overnight. The longer marinade time allows the buttermilk’s acidity to penetrate the meat, tenderizing it and infusing flavor from the inside out.
Step 3: Prepare the Flour Coating
In a shallow bowl, combine 2 cups all-purpose flour, 2 teaspoons salt, 1 teaspoon black pepper, 1 teaspoon garlic powder, 1 teaspoon paprika, 1/2 teaspoon onion powder, and 1/2 teaspoon cayenne pepper. Mix everything together with a fork or whisk so the seasonings are evenly distributed throughout the flour.
Step 4: Heat the Oil
Pour 2 to 3 quarts of vegetable oil into a heavy-bottomed pot or Dutch oven, filling it to about 2 inches up the sides. Clip a candy or deep-fry thermometer to the side of the pot and slowly heat the oil to 350 degrees Fahrenheit.
This temperature is crucial: too low and the chicken absorbs oil and becomes greasy; too high and the outside burns before the inside cooks through. Use your thermometer and give it a few minutes to reach a stable temperature before you start frying.
Step 5: Remove and Dry the Chicken
Remove the chicken thighs from the marinade one at a time and place them on a paper towel-lined plate. Pat each thigh dry on both sides, removing excess buttermilk.
This step matters because excess liquid interferes with browning and can cause dangerous splattering in hot oil. A quick, thorough patting ensures your coating adheres properly and fries evenly.
Step 6: Coat the Chicken
Working with one thigh at a time, place it in the shallow bowl with the flour mixture and coat all sides thoroughly, pressing the flour gently onto the meat so it adheres. Shake off excess flour and place the coated thigh on a clean plate or wire rack while you coat the remaining pieces.
Let the coated chicken sit on the rack for about 5 minutes before frying. This resting period allows the flour to adhere even more securely, creating a thicker, crispier crust.
Step 7: Fry the Chicken
Carefully place 3 to 4 coated thighs into the hot oil, being mindful of splattering. Don’t overcrowd the pot, as this drops the oil temperature and makes the chicken release moisture that steams rather than fries.
Fry for 12 to 15 minutes, turning halfway through the cooking time, until the coating is deep golden brown and the internal temperature reaches 165 degrees Fahrenheit when measured at the thickest part of the thigh with a meat thermometer. The dark golden exterior should sound crispy when you tap it with a spoon.
Step 8: Drain and Rest
Using a slotted spoon or tongs, remove the fried chicken thighs from the oil and place them on a wire rack set over a baking sheet (this allows oil to drain from all sides). Alternatively, place them on a plate lined with paper towels.
Let the chicken rest for about 3 to 5 minutes before serving. This resting period allows the exterior to set and the juices to redistribute throughout the meat, keeping it moist when you bite in.
Step 9: Fry Remaining Batches
Repeat steps 7 and 8 with the remaining coated chicken thighs, frying 3 to 4 pieces at a time. Check your oil temperature before each batch to ensure it returns to 350 degrees before adding more chicken.
Pro Tip: Don’t skip the thermometer. The difference between perfectly fried and greasy or burnt chicken comes down to maintaining that 350-degree oil temperature throughout the entire cooking process.
Tips for the Best Fried Chicken Thighs
- Marinate overnight if you have the time. Eight hours or more allows maximum flavor absorption and tenderness, making a real difference in the final result.
- Use a meat thermometer to check for doneness instead of relying on color alone. A golden exterior doesn’t always mean the inside is fully cooked, especially with thicker pieces.
- Keep your oil temperature steady by allowing it to return to 350 degrees between batches. Use your thermometer to check before adding each new batch of chicken.
- Don’t move the chicken around constantly while it fries. Leave each piece alone for at least 5 minutes per side so a crispy crust can develop without interference.
- Season your chicken generously in both the buttermilk and flour mixture. Thighs are flavorful on their own, but seasoning builds layers that make every bite taste incredible.
- Pat the chicken completely dry after marinating. Excess moisture prevents browning and makes the coating soggy instead of crispy.
Common Mistakes to Avoid
- Skipping the marinade or using it for less than an hour. The buttermilk does real work here, tenderizing the meat and allowing seasonings to penetrate. Rushing this step results in dry, bland chicken.
- Frying at the wrong temperature. Too low, and the chicken turns greasy; too high, and the outside burns before the inside cooks. A thermometer is non-negotiable, not optional.
- Overcrowding the pot. Filling it with too much chicken at once drops the oil temperature drastically, causing the chicken to steam instead of fry. Work in smaller batches and be patient.
- Forgetting to let the chicken rest after frying. Cutting into it immediately releases all the hot juices and dries out the meat. Give it 3 to 5 minutes to set.
- Using wet chicken from the marinade. Excess buttermilk creates dangerous splattering and prevents the coating from crisping properly. Always pat the thighs dry before breading.
Serving Suggestions
Fried chicken thighs shine brightest with classic sides that balance the richness of the fried coating. Serve them hot straight from the pan for maximum crispiness, and pair with your favorite accompaniments for a complete meal.
- Creamy coleslaw with a tangy vinegar dressing cuts through the richness of the fried coating perfectly
- Buttered cornbread or buttermilk biscuits soak up the juices and make great vehicles for hot sauce
- Mac and cheese, whether creamy or baked, complements fried chicken like they were made for each other
- Pickled vegetables or a simple green salad provide bright, acidic contrast
- Mashed potatoes with gravy turn this into an indulgent, complete meal
Variations to Try
- Spicy Version: Increase the cayenne pepper to 1 teaspoon in both the marinade and flour coating, and add 1/4 teaspoon of hot sauce powder or additional red pepper flakes for intense heat.
- Herb-Infused: Add 2 teaspoons of dried thyme and 1 teaspoon of dried oregano to the flour coating for a Mediterranean flavor profile that’s still crispy and golden.
- Honey-Hot Glaze: After frying, brush the hot chicken with a mixture of honey, hot sauce, and melted butter for a sticky-crispy exterior with sweet-spicy complexity.
- Buttermilk Ranch: Add 1 teaspoon of dried dill, 1/2 teaspoon of garlic powder, and 1/2 teaspoon of onion powder to both the marinade and coating for a ranch-inspired flavor.
- Korean-Inspired: Marinate in buttermilk with a tablespoon of gochujang and two minced garlic cloves, then toss the fried chicken in a sauce of gochujang, honey, soy sauce, and sesame oil.
Dietary Adaptations
- Gluten-Free: Replace all-purpose flour with a gluten-free flour blend designed for frying. The coating may be slightly less crispy, but it works well when you add a tablespoon of cornstarch to the blend for texture.
- Dairy-Free: Substitute buttermilk with unsweetened almond milk mixed with 1 tablespoon of lemon juice or vinegar per cup. The taste and tenderizing effect remain nearly identical.
- Low-Carb/Keto: Replace all-purpose flour with almond flour mixed with psyllium husk powder in a 3:1 ratio. The coating won’t be quite as crispy, but it creates an acceptable low-carb alternative.
- Vegan/Vegetarian: This recipe is inherently not vegan or vegetarian since it uses chicken. Consider adapting the technique to large mushroom caps or cauliflower florets for a plant-based version of fried coating.
Storage and Reheating
Refrigerator
Store leftover fried chicken thighs in an airtight container on the lowest shelf of your refrigerator. They keep for up to 4 days and taste great cold the next day or reheated.
- Let them cool completely before storing to avoid condensation that softens the crust
- Store in a single layer if possible, or separate layers with parchment paper
Freezer
Fried chicken thighs freeze remarkably well for up to 3 months. Freeze them in a single layer on a baking sheet first, then transfer to freezer bags to save space.
- This prevents them from sticking together and makes reheating individual pieces possible
- Label your container with the date so you know how long they’ve been frozen
Reheating
To restore crispiness, reheat fried chicken thighs in a 350-degree oven for about 10 minutes, or in an air fryer at 350 degrees for 5 to 7 minutes. Avoid the microwave, which turns the coating soggy.
- The oven method produces the crispiest results and heats the chicken evenly
- Place thighs on a wire rack over a baking sheet so air circulates underneath
- Air fryers are fast and produce excellent texture restoration in minimal time
Nutrition Information
| Nutrient | Amount |
|---|---|
| Calories | 520 |
| Total Fat | 28g |
| Saturated Fat | 7g |
| Carbohydrates | 24g |
| Fiber | 1g |
| Sugar | 1g |
| Protein | 38g |
| Sodium | 480mg |
| Cholesterol | 95mg |
These values are based on 2 thighs per serving and assume vegetable oil for frying. Actual numbers may vary slightly based on your specific ingredients and how much oil the chicken absorbs during frying.
Frequently Asked Questions
Can I use bone-in, skin-on chicken thighs instead of boneless, skinless?
Yes, you can, though they’ll need 5 to 8 minutes longer to fry since they’re thicker. The crispy skin is actually a bonus, though the flour coating may not stick as well to existing skin, so you might get a mix of textures.
Fried Chicken Thighs
Ingredients
Equipment
Method
- In a large mixing bowl, combine 2 cups buttermilk with 2 teaspoons salt, 1 teaspoon black pepper, 1 teaspoon garlic powder, 1 teaspoon paprika, and 1/2 teaspoon cayenne pepper. Whisk until the salt fully dissolves.
- Pat 8 chicken thighs dry with paper towels, then place them in a shallow dish or baking pan. Pour the buttermilk mixture over the thighs, making sure each one is fully submerged or well coated. Cover with plastic wrap and refrigerate for at least 4 hours, preferably overnight.
- In a shallow bowl, combine 2 cups all-purpose flour, 2 teaspoons salt, 1 teaspoon black pepper, 1 teaspoon garlic powder, 1 teaspoon paprika, 1/2 teaspoon onion powder, and 1/2 teaspoon cayenne pepper. Mix everything together with a fork or whisk.
- Pour 2 to 3 quarts of vegetable oil into a heavy-bottomed pot or Dutch oven, filling it to about 2 inches up the sides. Clip a candy or deep-fry thermometer to the side of the pot and heat the oil to 350 degrees Fahrenheit.
- Remove the chicken thighs from the marinade one at a time and place them on a paper towel-lined plate. Pat each thigh dry on both sides, removing excess buttermilk.
- Working with one thigh at a time, place it in the shallow bowl with the flour mixture and coat all sides thoroughly, pressing the flour gently onto the meat. Shake off excess flour and place the coated thigh on a clean plate or wire rack. Let the coated chicken sit for about 5 minutes before frying.
- Carefully place 3 to 4 coated thighs into the hot oil at 350 degrees Fahrenheit. Fry for 12 to 15 minutes, turning halfway through the cooking time, until the coating is deep golden brown and the internal temperature reaches 165 degrees Fahrenheit.
- Using a slotted spoon or tongs, remove the fried chicken thighs from the oil and place them on a wire rack set over a baking sheet or on a plate lined with paper towels. Let the chicken rest for 3 to 5 minutes before serving.
- Repeat the frying process with the remaining coated chicken thighs, frying 3 to 4 pieces at a time. Check your oil temperature before each batch to ensure it returns to 350 degrees Fahrenheit before adding more chicken.