
There’s something almost magical about biting into a slice of warm date cake, watching the sticky sweetness melt on your tongue while the crumb practically dissolves before you swallow. This cake has been gracing British tea tables and Middle Eastern celebrations for generations, and once you taste it, you’ll understand why it deserves a permanent spot in your baking rotation.
What makes this recipe special is how dates transform into a luscious, naturally sweet filling that keeps the cake impossibly moist without any refined sugar overload. The result is a tender crumb, rich flavor, and a dessert that works just as well for afternoon tea as it does for holiday gatherings.
Why You’ll Love This Recipe
This date cake delivers serious comfort with minimal fuss, and it tastes far more impressive than the short ingredient list suggests. The dates do the heavy lifting, so you get natural sweetness paired with subtle caramel notes that feel indulgent without tasting artificial.
- Naturally sweet filling made entirely from dates and hot water
- Moist, tender crumb that stays fresh for days
- Requires simple pantry staples you likely already have
- Works beautifully as a casual dessert or elegant centerpiece
- Freezes exceptionally well for stress-free ahead-of-time baking
My Experience Making This Recipe
I first made this cake on a rainy Sunday afternoon when I found a bag of medjool dates at the back of my pantry, and I haven’t looked back since. The moment I poured the batter into the tin, my kitchen filled with this warm, honeyed aroma that had everyone asking what was baking.
What surprised me most was how the cake tasted even better on day two, the flavors deepening and the texture becoming almost fudgy. My partner, who typically reaches for chocolate desserts, asked for a second slice before the cake had cooled to room temperature.
The best part? I’ve made it for colleagues, at potlucks, and for family gatherings, and it consistently disappears faster than anything else on the table. People genuinely cannot believe how simple it is to throw together, which means you get to look like a baking wizard without actually spending hours in the kitchen.
Recipe Overview
- Recipe Name: Date Cake
- Servings: 8 to 10 servings
- Prep Time: 15 minutes
- Cook Time: 45 minutes
- Total Time: 1 hour (plus cooling)
- Course: Dessert
- Cuisine: British and Middle Eastern inspired
- Calories per Serving: approximately 285 calories
Equipment You Will Need
- 8-inch round cake tin or 7×11-inch rectangular tin
- Parchment paper
- Mixing bowls (two medium or one large)
- Electric mixer or whisk
- Measuring cups and spoons
- Kettle for boiling water
- Fork or spoon for mashing dates
- Rubber spatula
- Wooden skewer or cake tester
- Wire cooling rack
Ingredients for Date Cake
- Pitted dates, 1 1/2 cups (about 250 grams)
- Boiling water, 3/4 cup
- Unsalted butter, 1/2 cup (115 grams), softened
- Light brown sugar, 3/4 cup (150 grams)
- Large eggs, 2 room temperature
- All-purpose flour, 1 3/4 cups (220 grams)
- Baking soda, 1 teaspoon
- Fine sea salt, 1/2 teaspoon
- Vanilla extract, 1 teaspoon
- Ground cinnamon, 1/2 teaspoon
- Walnuts or pecans, 1/2 cup (optional, chopped)
Ingredient Notes and Substitutions
- Dates: Medjool dates are naturally soft and sweet, making them ideal for creating a smooth paste that hydrates the cake batter. If you only have Deglet Noor dates, increase the soaking time to 15 minutes and mash them thoroughly to break down any remaining texture.
- Butter: Use unsalted butter so you control the salt level and taste the pure, rich dairy flavor without interference. Coconut oil works as a one-to-one swap, though it will mute some of the cake’s warmth and add a subtle tropical note.
- Brown sugar: Light brown sugar adds moisture and a deeper molasses undertone compared to white sugar. You can substitute white granulated sugar, but you’ll lose some of the caramel complexity and the cake will be slightly less moist.
- Eggs: Room temperature eggs emulsify better with the butter and create a lighter, airier crumb. Cold eggs from the fridge will make the batter break, requiring more mixing and potentially resulting in a denser cake.
- Flour: All-purpose flour gives you reliable structure without being heavy, though whole wheat pastry flour adds nuttiness at the cost of a slightly denser texture. Do not use cake flour, as it will make the cake too tender and prone to collapse.
How to Make Date Cake
Step 1: Prepare Your Dates
Place your pitted dates in a mixing bowl and pour 3/4 cup of boiling water over them. Let them soak for 10 minutes until they become very soft and plump.
The heat breaks down the date fibers and allows them to absorb water, creating a naturally sweet paste that will distribute moisture throughout your cake. This step is what transforms simple dates into a luscious filling that keeps the crumb tender without adding extra liquid later.
Step 2: Mash the Dates
After soaking, use a fork or the back of a spoon to mash the dates into a chunky paste right in the water. You want some texture remaining, not a completely smooth puree.
This semi-chunky texture creates little pockets of sweetness that surprise you in each bite, while the soaking water incorporates directly into your batter. The result is a cake that stays impossibly moist for days without any added moisture like oil or applesauce.
Step 3: Cream Butter and Sugar
In a separate bowl, beat the softened butter and brown sugar together with an electric mixer for 3 to 4 minutes until the mixture is pale and fluffy. Stop occasionally to scrape down the bowl with a spatula.
This creaming process incorporates air into the butter, which helps the cake rise and creates a fine, even crumb structure. Rushing this step or using cold butter will give you a dense, sunken cake with a gritty texture.
Step 4: Add Eggs One at a Time
Add the first egg to the butter mixture and beat for about 1 minute until fully incorporated. Then add the second egg and beat again for 1 minute.
Adding eggs separately instead of all at once prevents the batter from breaking, which would force you to overmix and overdevelop the gluten, making the cake tough. Taking your time here guarantees a silky, cohesive batter.
Step 5: Stir in the Date Mixture
Pour the mashed dates and their soaking water directly into the butter and egg mixture, then fold gently with a spatula until just combined. Don’t overmix at this stage.
The dates are your secret weapon for moisture, so incorporating them thoroughly ensures every slice gets an even distribution. However, overmixing now would overdevelop the gluten and make the cake dense, so fold with a gentle hand.
Step 6: Combine Dry Ingredients
In a separate bowl, whisk together the flour, baking soda, salt, cinnamon, and vanilla extract. Give the mixture a good stir so the leavening agents are evenly distributed throughout.
Whisking instead of just stirring aerates the flour slightly and ensures the baking soda doesn’t clump, which would create bitter pockets in your cake. The cinnamon and vanilla add warmth and depth that makes people ask what spice they’re tasting.
Step 7: Fold Dry and Wet Together
Add the dry ingredients to the wet ingredients and fold gently with a spatula until just combined, about 10 to 15 strokes. Stop as soon as you see no white flour streaks.
Once more, overmixing is the enemy of tender crumb, so be patient and deliberate with your folding motions. A slightly lumpy batter will give you a softer cake than one that’s been overworked, even for just a few extra strokes.
Step 8: Add Nuts (Optional)
If using walnuts or pecans, fold them in now as the final step. They’ll add a pleasant textural contrast and subtle earthiness that complements the sweet dates.
Walnuts bring a gentle bitterness that balances the cake’s natural sweetness, while pecans add a buttery warmth. Either choice works beautifully, though nuts are entirely optional if you prefer a pure date flavor or have nut allergies at the table.
Step 9: Bake Until Golden
Pour the batter into your prepared tin and smooth the top gently with a spatula. Bake in a preheated 350-degree Fahrenheit oven for 45 to 50 minutes, until a wooden skewer inserted in the center comes out with just a few moist crumbs attached.
The cake will look golden brown on top and spring back gently when you tap it, but the inside should still feel slightly soft because dates create a naturally fudgy texture. Overbaking will dry it out, so don’t wait for a completely clean skewer.
Step 10: Cool Completely
Let the cake cool in the tin for 10 minutes, then turn it out onto a wire rack to cool completely, about 1 to 2 hours. Resist the urge to slice it while warm, or it will fall apart.
Cooling allows the crumb to set and firm up slightly, making slicing clean and easy. The flavors also mellow and deepen as it cools, so you’ll get the best taste once it reaches room temperature.
Pro Tip: Make the date paste a day ahead and store it in the fridge, then bring it to room temperature before mixing with the butter and eggs, this saves time on bake day and actually gives you better flavor development.
Tips for the Best Date Cake
- Use the freshest dates you can find, as older dates become harder and won’t soften as easily even with boiling water, affecting both texture and sweetness.
- Don’t skip the soaking step, the moisture from the dates is crucial to keeping the cake tender and preventing it from drying out over time.
- Measure your flour by spooning it into the measuring cup and leveling off with a knife, not by scooping directly from the bag, which packs down the flour and makes the cake dense.
- Room temperature ingredients mix together more evenly and create a better emulsion, so let your eggs and butter sit on the counter for 30 minutes before starting.
- If your cake dome excessively in the center, reduce your oven temperature by 25 degrees next time, as a too-hot oven causes the edges to set before the center rises.
- Once baked, store the cake covered in plastic wrap at room temperature for up to three days, the crumb actually improves as the moisture redistributes throughout the cake.
Common Mistakes to Avoid
- Using cold eggs straight from the fridge breaks the batter emulsion and creates a grainy, curdled mixture that bakes into a dense, unpleasant cake with an uneven crumb.
- Overmixing the batter after adding flour overdevelops the gluten network, turning your tender cake into a tough, rubbery disc that no amount of frosting can save.
- Skipping the soaking step or using too little water means your dates stay dry and hard, resulting in a grainy, less moist cake that goes stale quickly.
- Baking at too high a temperature causes the outside to brown too fast while the inside stays raw, so stick to 350 degrees and use an oven thermometer to confirm accuracy.
- Slicing the cake while it’s still warm causes it to crumble and fall apart because the crumb hasn’t fully set, making plating a frustrating mess.
Serving Suggestions
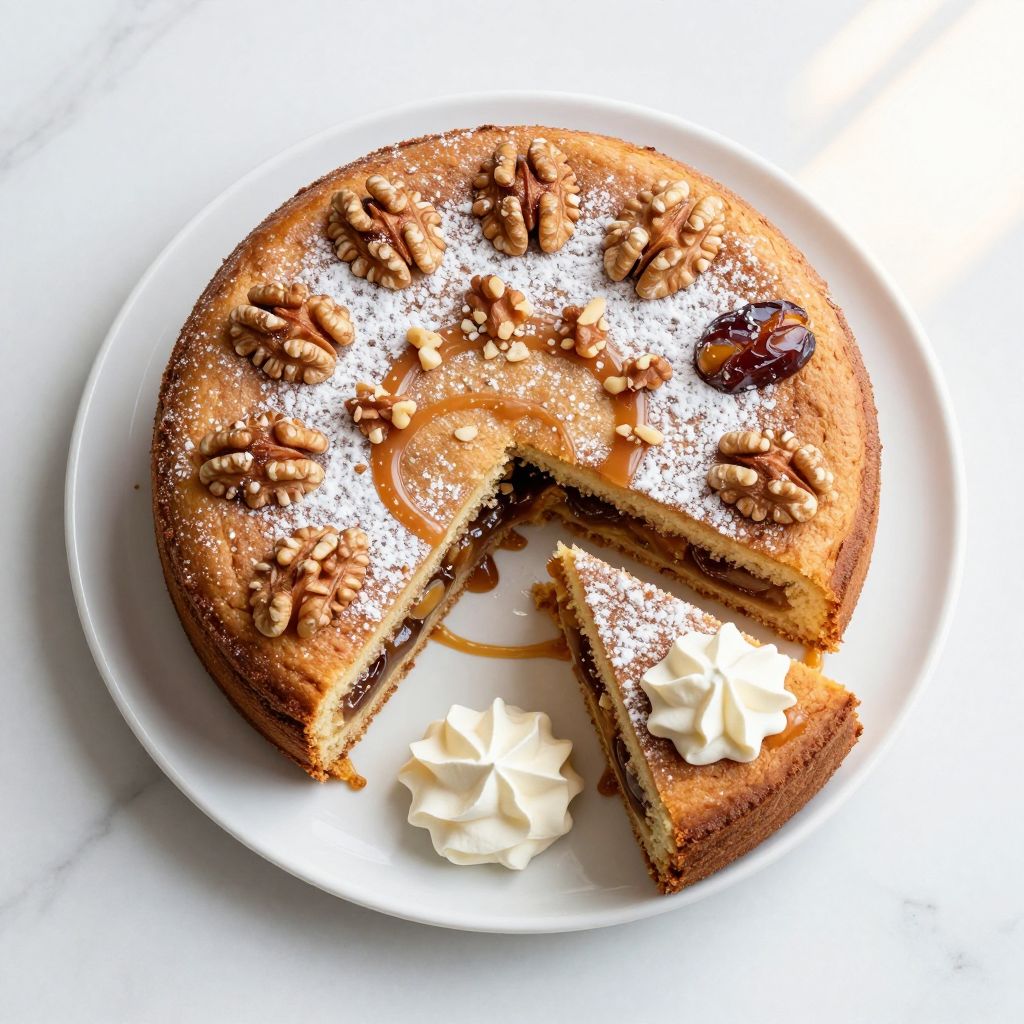
This date cake shines on its own, but a few simple accompaniments take it from homey to elegant. A dollop of whipped cream, a dusting of cinnamon, or a drizzle of caramel sauce transforms it into something special.
- Serve with unsweetened whipped cream or mascarpone for richness that lets the date flavor shine
- Pair with strong black tea or coffee, the tannins cut through the sweetness beautifully
- Top with a spoonful of sticky toffee sauce for a dessert that feels decadent
- Accompany with Greek yogurt mixed with honey for a lighter, tangy contrast
- Dust the top with powdered sugar just before serving for a simple, elegant finish
Variations to Try
- Sticky Toffee Date Cake: Add 2 tablespoons of black treacle or molasses to the date paste before mixing, then top the warm cake with a warm toffee sauce made from butter, cream, and dark brown sugar for an over-the-top indulgent version.
- Spiced Date Cake: Double the cinnamon to 1 teaspoon and add 1/4 teaspoon each of ground ginger, nutmeg, and cloves for a warming, chai-like complexity that makes the cake taste like autumn in every bite.
- Orange Date Cake: Add the zest of one orange and 1 tablespoon of fresh orange juice to the date paste, the citrus brightness cuts through the richness and adds a sophisticated flavor dimension.
- Coconut Date Cake: Replace 1/2 cup of the flour with unsweetened coconut flour and add 1/2 cup of shredded coconut to the batter, this creates a nuttier, more tropical version with a slightly denser, more fudgy crumb.
- Vegan Date Cake: Swap the butter for coconut oil and replace the two eggs with two flax eggs (2 tablespoons ground flax mixed with 5 tablespoons water), the cake will be slightly less tender but still delicious and entirely plant-based.
Dietary Adaptations
- Gluten-Free: Replace the all-purpose flour with a one-to-one gluten-free blend and add 1/2 teaspoon of xanthan gum to improve binding, the texture will be slightly less tender but still moist and delicious.
- Dairy-Free: Use coconut oil or dairy-free butter in place of regular butter, the flavor will shift slightly but the cake will bake up beautifully moist and tender.
- Vegan: Use flax eggs instead of regular eggs, coconut oil instead of butter, and ensure your sugar is vegan, the final cake will be wonderfully moist though slightly less tender than the original.
- Low-Carb or Keto: Swap the dates for allulose or erythritol and the flour for almond flour, keep in mind the texture will be more crumbly and the baking time may decrease slightly.
Storage and Reheating
Refrigerator
Wrap the cooled cake tightly in plastic wrap or store it in an airtight container, it will keep for up to five days in the fridge. The cake actually tastes better on day two or three as the flavors meld together and the texture becomes even more moist and fudgy.
- Keep away from strong-smelling foods, as the cake can absorb odors from the fridge
- Remove from the fridge 20 minutes before serving for the best flavor and texture
Freezer
Wrap the cooled cake in plastic wrap, then in foil to prevent freezer burn, it will freeze beautifully for up to three months. Thaw it in the fridge overnight before serving, and you’ll swear it just came out of the oven.
- Freeze individual slices wrapped in plastic wrap for grab-and-go desserts
- Do not try to slice the cake while frozen, wait for complete thawing
Reheating
Place a slice in the microwave for 15 to 20 seconds, or wrap it in foil and warm it in a 300-degree oven for 10 to 15 minutes. A quick warm-up brings back that fresh-baked softness and enhances the date sweetness.
- Avoid overheating, which will dry out the crumb and make it tough
- Add a small pat of butter on top before reheating for extra moisture
Nutrition Information
| Nutrient | Amount |
|---|---|
| Calories | 285 |
| Total Fat | 10 grams |
| Saturated Fat | 6 grams |
| Carbohydrates | 46 grams |
| Fiber | 2 grams |
| Sugar | 32 grams |
| Protein | 3 grams |
| Sodium | 215 milligrams |
| Cholesterol | 40 milligrams |
These values are estimates based on the ingredients and serving size of eight portions, your actual nutrition will vary slightly based on the brands you choose and how you measure.
Frequently Asked Questions
Can I make this cake without eggs?
Yes, flax eggs or applesauce work as replacements, though the texture will be slightly less tender and more cake-like rather than moist and fudgy. Two flax eggs made from 2 tablespoons of ground flax mixed with 5 tablespoons of water is the best swap for keeping moisture intact.
How far ahead can I make this cake?
You can bake it three days ahead and store it covered at room temperature, or freeze it for up to three months. The flavor actually deepens after a day, so making it ahead is highly recommended for entertaining.
Why is my cake sinking in the middle?
The center collapses when the oven temperature is too high or the cake is underbaked, so verify your oven temperature with a thermometer and bake until a skewer comes out with just a few moist crumbs. If it’s still happening, reduce the oven temperature by 25 degrees for your next bake.
Can I use pitted dates or do they need to be unpitted?
Always use pitted dates unless you enjoy biting into date pits while eating your cake, pre-pitted dates save you time and the frustration of pits lodged in your teeth. If you only have unpitted dates on hand, pit them before soaking or you’ll regret it.
What if my dates are very dry and hard?
Use boiling water and let them soak for 15 minutes instead of 10, then mash them more vigorously to break them down completely. If they still won’t soften, blend the soaked dates with the water into a smooth puree before adding to the batter.
Can I add frosting to this cake?
Absolutely, cream cheese frosting or buttercream pairs beautifully with the warm date flavor. Keep the frosting simple so the date flavor stays the star, not a supporting actor.
Final Thoughts
This date cake is the kind of recipe that rewards you over and over, from the moment you smell it baking all the way through to the last crumb enjoyed three days later. It’s simple enough for a weeknight bake when you crave something special, yet impressive enough to bring to any gathering without apology.
Give this cake a try and watch how quickly it becomes a favorite in your regular rotation, once people taste how tender and moist it is, they’ll stop believing you when you tell them how easy it actually is to make.
If you loved this recipe, explore more wonderful options like our date nut bread recipe for a morning treat, or satisfy your chocolate cravings with our heaven on earth cake recipe for even more dessert inspiration.
Date Cake
Ingredients
Equipment
Method
- Place the pitted dates in a mixing bowl and pour 3/4 cup boiling water over them; let soak for 10 minutes.
- Mash the soaked dates and their water with a fork or spoon into a chunky paste, leaving some texture.
- In a separate bowl, cream the softened butter and light brown sugar with an electric mixer on medium speed for 3 to 4 minutes until pale and fluffy.
- Add the eggs one at a time to the butter mixture, beating for about 1 minute after each addition until fully incorporated.
- Pour the mashed date mixture into the butter and egg mixture and fold gently with a spatula until just combined.
- In another bowl, whisk together the all-purpose flour, baking soda, fine sea salt, ground cinnamon, and vanilla extract until evenly distributed.
- Add the dry ingredients to the wet ingredients and fold gently with a spatula until no white flour streaks remain, about 10 to 15 strokes.
- Fold in the chopped walnuts or pecans if using as the final ingredient.
- Preheat the oven to 350°F (175°C). Line the cake tin with parchment paper and pour in the batter, smoothing the top.
- Bake the cake for 45 to 50 minutes, or until a wooden skewer inserted into the center comes out with just a few moist crumbs attached.
- Let the cake cool in the tin for 10 minutes, then turn out onto a wire rack and cool completely for 1 to 2 hours before slicing.