
Imagine biting into a soft, chewy exterior that gently gives way to a sweet, flavorful filling. That’s the magic of Daifuku, a beloved Japanese treat that combines the delightful texture of mochi with a variety of delicious fillings, typically sweetened red bean paste or ice cream. This recipe is perfect for those who enjoy a unique dessert experience, offering a fun way to impress family and friends with your culinary skills. With its chewy texture and versatile fillings, Daifuku is sure to become a favorite in your home. Let’s gather our ingredients and get started!
Why You’ll Love This Recipe
This Daifuku recipe is a delightful fusion of texture and flavor that everyone will love.
- Simple to make with just a few ingredients.
- Customizable fillings to suit your taste.
- Perfect for special occasions or a sweet treat any time.
- Chewy texture that is addictively satisfying.
My Experience Making This Recipe
When I first tried making Daifuku, I was nervous. Would the mochi turn out too sticky or chewy? Luckily, my first attempt was a hit, and I couldn’t stop raving about how soft and delicious they were.
Each bite was a little piece of heaven, and my friends were amazed when I shared them at a gathering. The joy of watching everyone savor these treats made the effort worth every minute.
Recipe Overview
- Recipe Name: Daifuku
- Servings: 8 pieces
- Prep Time: 30 minutes
- Cook Time: 10 minutes
- Total Time: 40 minutes
- Course: Dessert
- Cuisine: Japanese
- Calories per Serving: 120
Equipment You Will Need
- Mixing bowl
- Microwave-safe dish
- Plastic wrap
- Rolling pin
- Cookie cutter or glass
Ingredients for Daifuku
- 1 cup sweet rice flour (mochi flour)
- 1/4 cup sugar
- 1 cup water
- 1 cup red bean paste (or your choice of filling)
- Potato starch for dusting
Ingredient Notes and Substitutions
- Sweet rice flour: This gives Daifuku its signature chewiness. You can use regular rice flour, but the texture will differ.
- Sugar: Offers sweetness to the dough. You can substitute with honey or agave syrup for a different flavor.
- Red bean paste: A traditional filling that adds sweetness. Feel free to use fruit preserves, chocolate, or ice cream as alternatives.
How to Make Daifuku
Step 1: Mix the Ingredients
In a mixing bowl, combine the sweet rice flour, sugar, and water. Stir until you achieve a smooth batter, as this will ensure even cooking.
Step 2: Microwave the Mixture
Pour the mixture into a microwave-safe dish and cover it with plastic wrap. Microwave on high for 1 minute, then stir. Repeat this process two more times until the mixture becomes thick and sticky.
Step 3: Prepare the Surface
Dust a clean surface with potato starch to prevent sticking. This makes it easier to roll out the Daifuku later and keeps it from becoming a gooey mess.
Step 4: Transfer the Dough
Once the dough is ready, carefully transfer it onto the dusted surface. Be cautious, as it will be hot; using a spatula can help.
Step 5: Roll Out the Dough
Using a rolling pin, gently roll out the dough to about 1/4 inch thick. The thickness matters for the perfect chewy texture.
Step 6: Cut the Dough
Use a cookie cutter or glass to cut out rounds from the rolled dough. Aim for about 3-4 inches in diameter, allowing enough space for the filling.
Step 7: Fill the Daifuku
Place a spoonful of red bean paste in the center of each round. Carefully fold the edges over the filling and pinch them together to seal.
Step 8: Shape the Daifuku
Roll the filled Daifuku gently in your hands to form a smooth ball. This helps ensure that the filling is well-enclosed and gives it a nice shape.
Pro Tip: Make sure to dust your hands and the dough with potato starch to prevent sticking!
Tips for the Best Daifuku
- Use fresh ingredients for the best flavor and texture.
- Don’t rush the microwave steps; they are crucial for the dough consistency.
- Experiment with different fillings to find your favorite combination.
- Keep a bowl of potato starch nearby while working to minimize sticking.
- Serve chilled for a refreshing treat, especially if using ice cream filling.
Common Mistakes to Avoid
- Using regular rice flour instead of sweet rice flour can result in a different texture.
- Microwaving for too long can lead to a tough dough.
- Not dusting enough potato starch can cause the dough to stick.
- Overfilling can cause the Daifuku to burst open while shaping.
Serving Suggestions
Daifuku can be enjoyed on its own, but pairing it with tea enhances the experience. Here are some great suggestions:
- Matcha tea for a traditional touch.
- Fruit-flavored teas for a refreshing contrast.
- Vanilla ice cream for an indulgent dessert.
- Fresh fruit like strawberries or mango for a bright addition.
Variations to Try
- Use ice cream instead of red bean paste for a frozen treat.
- Incorporate fruit fillings like strawberry or custard for a twist.
- Mix in matcha powder into the dough for a unique flavor.
- Add a chocolate filling for a richer dessert.
Dietary Adaptations
- Gluten-free: This recipe is naturally gluten-free, thanks to the sweet rice flour.
- Dairy-free: Ensure your fillings are dairy-free, like fruit preserves or vegan ice cream.
- Vegan: All ingredients used are vegan-friendly; just check your filling.
- Low-carb/keto: Consider using erythritol instead of sugar and a keto-friendly filling.
Storage and Reheating
Refrigerator
Store Daifuku in an airtight container in the fridge. They can last up to a week.
- Place parchment paper between layers to prevent sticking.
- Keep away from strong odors, as they can absorb flavors.
Freezer
Daifuku can also be frozen for up to a month. Wrap each piece individually in plastic wrap.
- Place them in a freezer-safe bag or container.
- Thaw in the refrigerator for a few hours before serving.
Reheating
For a warm treat, microwave each piece for about 10-15 seconds. This helps restore some of the original texture.
- Be careful not to overheat them, as they can become tough.
Nutrition Information
| Nutrient | Amount |
|---|---|
| Calories | 120 |
| Total Fat | 0.5g |
| Saturated Fat | 0g |
| Carbohydrates | 28g |
| Fiber | 1g |
| Sugar | 10g |
| Protein | 2g |
| Sodium | 1mg |
| Cholesterol | 0mg |
This nutrition information is an estimate and may vary based on specific ingredients used.
Frequently Asked Questions
Can I use regular rice flour instead of sweet rice flour?
No, sweet rice flour is crucial for the chewy texture of Daifuku.
Can I make Daifuku ahead of time?
Yes, you can prepare them a day in advance and store them in the refrigerator.
How do I store leftover Daifuku?
Store them in an airtight container in the fridge or freeze them for longer storage.
Why is my Daifuku too sticky?
Too much moisture in the dough can cause stickiness; ensure proper measurements and dusting.
What other fillings can I use?
You can use fruit preserves, chocolate, or even ice cream for a fun twist on traditional Daifuku.
Final Thoughts
Making your own Daifuku is a rewarding experience that brings a slice of Japan into your kitchen. With a little practice, you will be crafting perfect little treats that are sure to impress.
So why not give this delightful recipe a try? You might just find your new favorite dessert. And while you’re at it, check out my other recipes like mochi waffles or chia pudding for more delicious ideas!
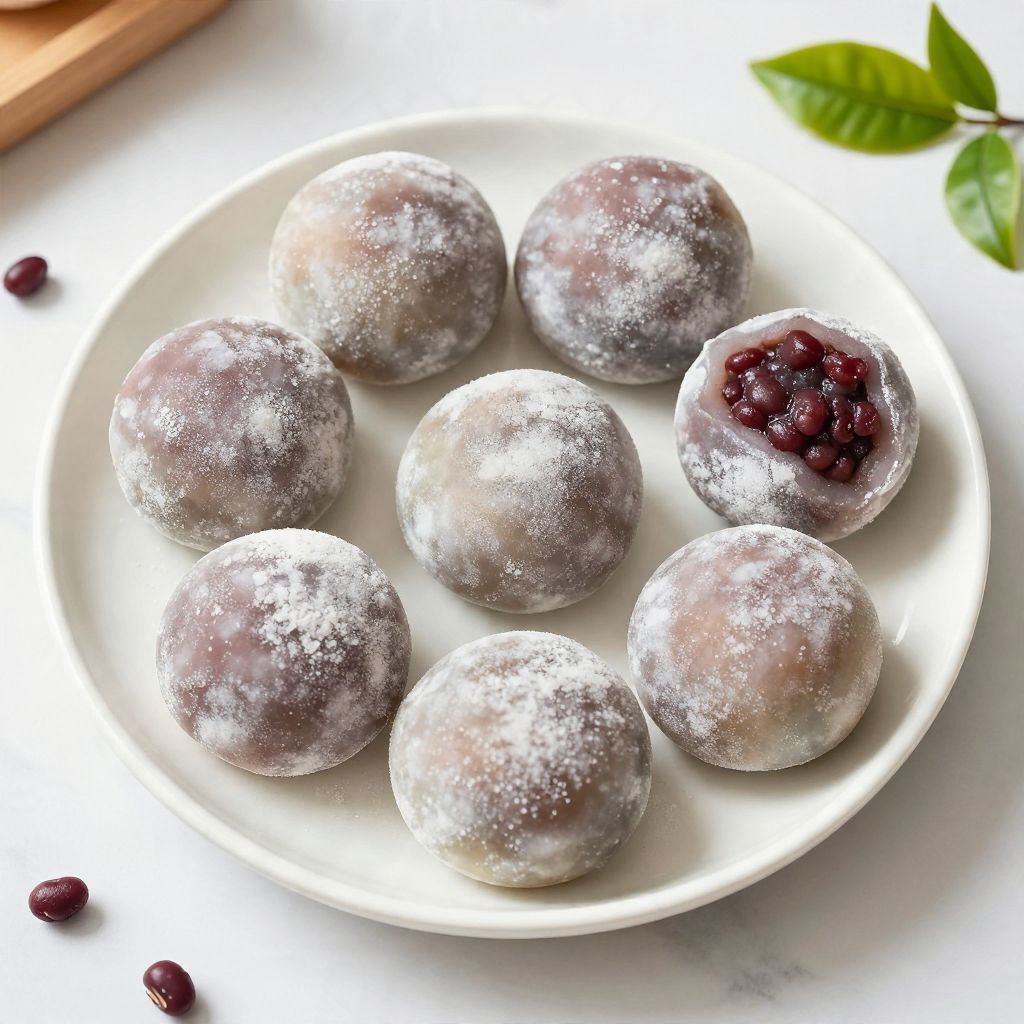
Daifuku
Ingredients
Equipment
Method
- In a mixing bowl, combine the sweet rice flour, sugar, and water. Stir until you achieve a smooth batter.
- Pour the mixture into a microwave-safe dish and cover it with plastic wrap. Microwave on high for 1 minute, then stir. Repeat this process two more times.
- Dust a clean surface with potato starch to prevent sticking.
- Once the dough is ready, carefully transfer it onto the dusted surface.
- Using a rolling pin, gently roll out the dough to about 1/4 inch thick.
- Use a cookie cutter or glass to cut out rounds from the rolled dough, about 3-4 inches in diameter.
- Place a spoonful of red bean paste in the center of each round. Carefully fold the edges over the filling and pinch them together to seal.
- Roll the filled Daifuku gently in your hands to form a smooth ball.