
Picture this: a creamy, dreamy dessert that looks like a garden but tastes like a chocolate lover’s dream. The Dirt Dessert is not just a fun treat; it’s a nostalgic experience that brings back memories of childhood parties and backyard barbecues.
This delightful dessert combines layers of chocolate pudding, whipped cream, and crushed cookies, making it a texture lover’s paradise. It’s versatile enough for any gathering and incredibly simple to whip up, which is a win-win in my book!
Why You’ll Love This Recipe
This dessert is a hit for all ages, combining fun with flavor.
- Quick to prepare with no baking required.
- Perfect for parties, picnics, or a cozy night in.
- Customizable with your favorite candies or toppings.
- A fun way to introduce kids to cooking.
- Decadent chocolate flavor with a satisfying crunch.
My Experience Making This Recipe
Making the Dirt Dessert is always a joyful event in my kitchen. The moment I crush the cookies, a wave of nostalgia hits me, reminding me of my youth.
When I served it at a recent gathering, the smiles on everyone’s faces were priceless. The kids loved digging into it, and the adults appreciated the rich chocolate flavor.
Recipe Overview
- Recipe Name: Dirt Dessert
- Servings: 8
- Prep Time: 20 minutes
- Cook Time: 0 minutes
- Total Time: 20 minutes
- Course: Dessert
- Cuisine: American
- Calories per Serving: 250
Equipment You Will Need
- Mixing bowls
- Whisk
- Spatula
- 9×13 inch baking dish or individual cups
- Plastic bag for crushing cookies
Ingredients for Dirt Dessert
- 1 package (3.9 oz) chocolate instant pudding mix
- 2 cups cold milk
- 1 container (8 oz) whipped topping (thawed)
- 16 oz chocolate sandwich cookies (crushed)
- Gummy worms (for garnish)
Ingredient Notes and Substitutions
- Chocolate instant pudding mix: This gives the dessert its rich chocolate flavor. You can substitute vanilla pudding for a different taste.
- Cold milk: Essential for preparing the pudding. Almond milk works as a dairy-free option.
- Whipped topping: Adds creaminess and lightness. Heavy cream can be whipped as a substitute for a richer texture.
- Chocolate sandwich cookies: They create the “dirt” layer. Any chocolate cookie will do if you want a different flavor.
How to Make Dirt Dessert
Step 1: Prepare the Pudding
In a large mixing bowl, whisk together the chocolate pudding mix and cold milk for about 2 minutes. This step is crucial as it activates the pudding mix and ensures a smooth texture.
Step 2: Fold in Whipped Topping
Gently fold the thawed whipped topping into the pudding mixture until well combined. This adds a light, fluffy texture that balances the richness of the pudding.
Step 3: Crush the Cookies
Place the chocolate sandwich cookies in a plastic bag and crush them with a rolling pin or your hands until they resemble dirt. This step adds the iconic crunch and visual appeal to your dessert.
Step 4: Layer the Ingredients
In a 9×13 inch baking dish or individual cups, start by spreading half of the pudding mixture as the first layer. This creates a solid base for your dessert.
Step 5: Add the Cookie Layer
Sprinkle half of the crushed cookies over the pudding layer. This will provide that delicious crunch and the “dirt” effect.
Step 6: Repeat the Layers
Add the remaining pudding mixture as the next layer, followed by the rest of the crushed cookies. This layering creates a beautiful presentation and ensures every bite is delightful.
Step 7: Chill the Dessert
Cover the dish with plastic wrap and refrigerate for at least 2 hours. Chilling is essential as it helps the layers set and the flavors meld together.
Step 8: Garnish and Serve
Before serving, top with gummy worms for a fun touch. It not only looks cute but adds a playful element that everyone loves!
Pro Tip: For a more intense chocolate flavor, consider using double-stuffed cookies for the crunch layer.
Tips for the Best Dirt Dessert
- Use cold milk for the pudding to achieve the best consistency.
- Let the dessert chill for longer if possible; overnight is ideal.
- Feel free to mix in some mini chocolate chips for extra texture.
- Customize the toppings with other candies for a personal touch.
- Keep it covered in the fridge to maintain freshness.
Common Mistakes to Avoid
- Not chilling long enough can lead to a runny dessert.
- Using warm milk can cause the pudding to clump.
- Skipping the folding step makes the dessert dense instead of fluffy.
- Not crushing the cookies finely enough may make it hard to layer.
Serving Suggestions
This dessert pairs wonderfully with a scoop of vanilla ice cream or fresh fruit. Here are some ideas to elevate your serving:
- Serve with whipped cream on top.
- Pair with fresh strawberries or raspberries for a fruity balance.
- Offer alongside a rich chocolate cake.
- Enjoy with a cup of coffee or hot chocolate for a cozy treat.
Variations to Try
- Try vanilla pudding and crushed vanilla wafers for a different flavor profile.
- Add layers of fruit for a refreshing twist.
- Incorporate peanut butter cookies for a nutty flavor.
- Use mint chocolate cookies for a cool taste.
Dietary Adaptations
- Gluten-free: Use gluten-free chocolate cookies.
- Dairy-free: Substitute with almond or coconut milk and dairy-free whipped topping.
- Vegan: Use vegan pudding mix and whipped topping for a fully plant-based option.
- Low-carb/keto: Opt for sugar-free pudding and keto-friendly cookies.
Storage and Reheating
Refrigerator
Store any leftovers in the refrigerator in an airtight container. This will keep it fresh and delicious for a few days.
- Best enjoyed within 3 days.
- Keep covered to avoid drying out.
Freezer
While not ideal, you can freeze the dessert for up to a month. Just be aware that the texture may change once thawed.
- Wrap tightly to prevent freezer burn.
- Thaw in the refrigerator before serving.
Reheating
This dessert is best served cold and does not require reheating. Enjoy it straight from the fridge!
Nutrition Information
| Nutrient | Amount |
|---|---|
| Calories | 250 |
| Total Fat | 12g |
| Saturated Fat | 5g |
| Carbohydrates | 33g |
| Fiber | 1g |
| Sugar | 20g |
| Protein | 3g |
| Sodium | 210mg |
| Cholesterol | 15mg |
This is a general estimate and can vary based on specific ingredients used.
Frequently Asked Questions
Can I make this dessert ahead of time?
Yes, this dessert is perfect for making a day in advance. Just keep it covered in the refrigerator until serving.
What can I use instead of cookies?
You can substitute crushed graham crackers or any chocolate-flavored snack. Just keep the texture in mind.
How do I store leftovers?
Store leftovers in an airtight container in the refrigerator. It will stay fresh for about 3 days.
Why is my pudding not thickening?
Make sure to use cold milk and whisk it for the full 2 minutes. This activates the pudding mix properly.
Can I customize the flavors?
Absolutely! Feel free to experiment with different cookie flavors and pudding types. The options are endless!
Final Thoughts
The Dirt Dessert is a delightful treat that brings joy to any occasion. Easy to make and fun to eat, it’s guaranteed to be a crowd-pleaser.
So gather your ingredients, channel your inner child, and whip up this dessert for your next gathering. You won’t regret it!
If you enjoyed this recipe, explore more delicious ideas like this Biscoff Banana Pudding Recipe or try making a Churro Cheesecake Recipe for something extra sweet!
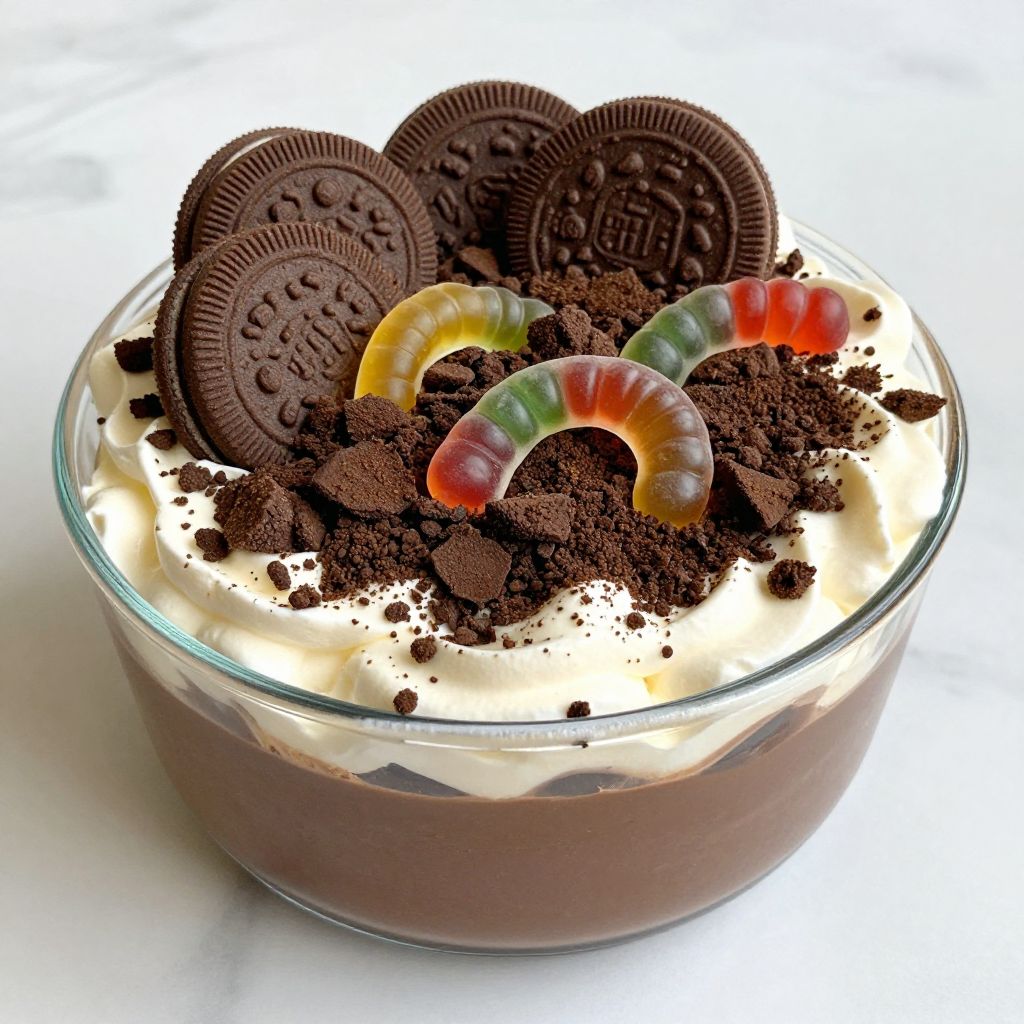
Dirt Dessert
Ingredients
Equipment
Method
- In a large mixing bowl, whisk together the chocolate pudding mix and cold milk for about 2 minutes.
- Gently fold the thawed whipped topping into the pudding mixture until well combined.
- Place the chocolate sandwich cookies in a plastic bag and crush them with a rolling pin or your hands until they resemble dirt.
- In a 9x13 inch baking dish or individual cups, spread half of the pudding mixture as the first layer.
- Sprinkle half of the crushed cookies over the pudding layer.
- Add the remaining pudding mixture as the next layer, followed by the rest of the crushed cookies.
- Cover the dish with plastic wrap and refrigerate for at least 2 hours.
- Before serving, top with gummy worms for garnish.