
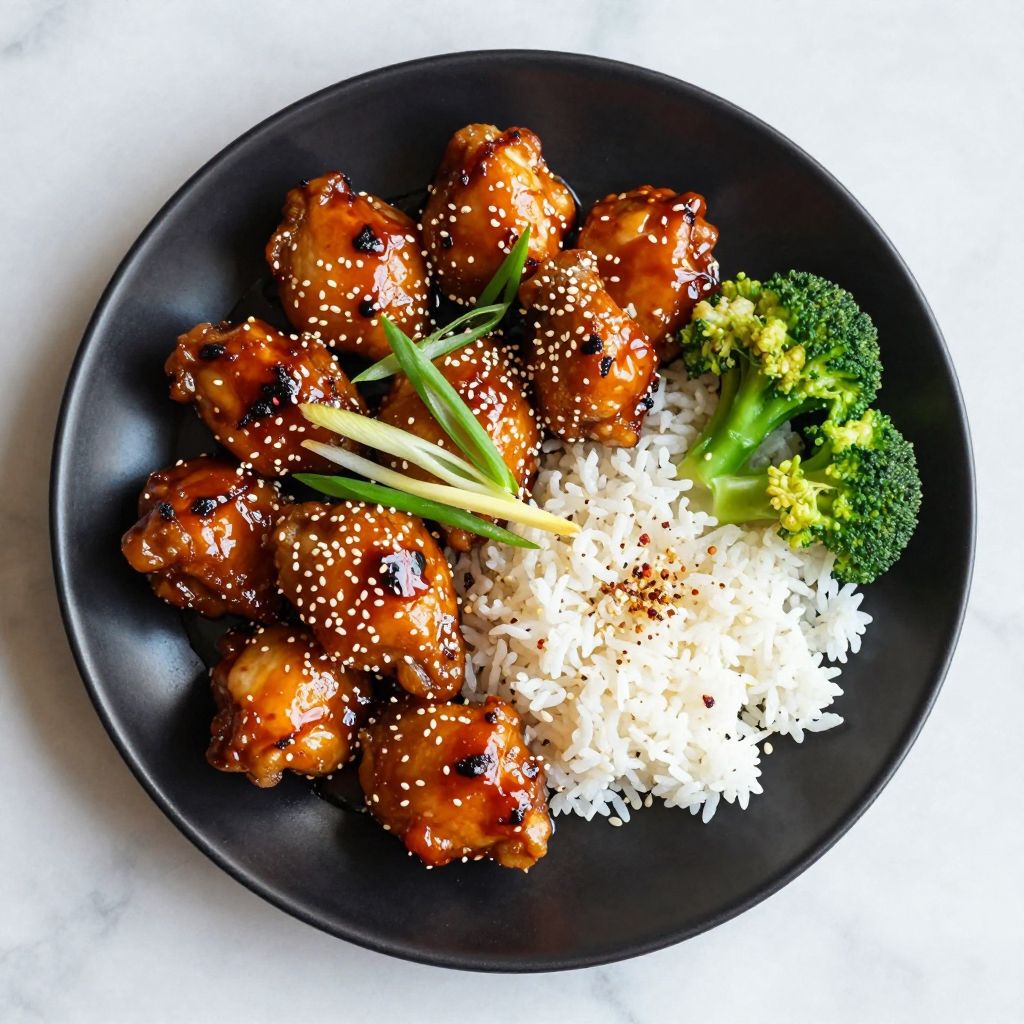
The smell of caramelized honey and soy sauce hitting hot chicken is something special, isn’t it? Sticky chicken delivers that restaurant-quality glaze right in your own kitchen without fussy techniques or hard-to-find ingredients.
This recipe combines sweet, savory, and tangy flavors into a dish that works for weeknight dinners, meal prep, or impressing guests. The chicken stays tender while the sauce clings to every bite, creating layers of flavor that keep people reaching for seconds.
Why You’ll Love This Recipe
This dish hits multiple boxes at once: it’s quick enough for busy weeknights, impressive enough for company, and flexible enough to adapt to whatever proteins or sides you have on hand.
- Ready in under 30 minutes from start to finish
- Uses pantry staples you likely already have at home
- Works with chicken breasts, thighs, or drumsticks
- Doubles easily for meal prep or feeding a crowd
- Creates its own flavorful pan sauce with minimal cleanup
My Experience Making This Recipe
The first time I made this, I was skeptical about how simple the ingredient list looked. Then I tasted that first bite and understood why sticky chicken shows up on restaurant menus everywhere.
My family went from “what’s for dinner?” to “can we have that chicken again?” faster than I expected. The sauce caramelizes beautifully in the pan, and the kitchen smells incredible within minutes.
I’ve made this with both thin-sliced breasts and thicker thighs, and each variation has its charm. The thighs stay juicier, but the breasts cook faster if you’re really pressed for time.
Recipe Overview
- Recipe Name: Sticky Chicken
- Servings: 4
- Prep Time: 10 minutes
- Cook Time: 18 minutes
- Total Time: 28 minutes
- Course: Main Course
- Cuisine: Asian-inspired
- Calories per Serving: 285
Equipment You Will Need
- Large skillet or wok
- Cutting board
- Sharp knife
- Measuring spoons and cups
- Small bowl for mixing sauce
- Whisk or fork
- Tongs or spatula
- Meat thermometer (optional but recommended)
Ingredients for Sticky Chicken
For the Chicken and Main Cook
- 1.5 pounds boneless, skinless chicken breasts or thighs, cut into bite-sized pieces
- 2 tablespoons vegetable oil
- 1/4 teaspoon salt
- 1/4 teaspoon black pepper
For the Sticky Sauce
- 1/4 cup soy sauce
- 3 tablespoons honey
- 2 tablespoons rice vinegar
- 1 tablespoon sesame oil
- 3 cloves garlic, minced
- 1 teaspoon fresh ginger, grated
- 1/4 teaspoon red pepper flakes
- 1 teaspoon cornstarch
- 2 tablespoons water
For Serving
- 2 tablespoons sliced green onions
- 1 tablespoon sesame seeds
Ingredient Notes and Substitutions
- Soy sauce: Provides the salty umami backbone that makes this dish crave-worthy. Swap with tamari for a gluten-free option, or use coconut aminos if avoiding soy entirely.
- Honey: Creates the signature sticky caramelization without overwhelming the dish. Maple syrup works in a pinch, though it adds its own distinct flavor.
- Rice vinegar: Adds brightness and cuts through the sweetness to balance the sauce. White vinegar works but tastes more harsh; use slightly less and taste as you go.
- Sesame oil: Brings toasted, aromatic depth that transforms the entire dish. This is worth buying if you don’t have it; regular oil won’t deliver the same flavor impact.
- Cornstarch: Thickens the sauce so it clings to the chicken instead of running off. Arrowroot powder or tapioca starch work as one-to-one swaps.
How to Make Sticky Chicken
Step 1: Prepare Your Ingredients
Slice your chicken into bite-sized pieces, about one to two inches each. Uniform sizing ensures everything cooks at the same rate without some pieces drying out while others stay raw.
Step 2: Combine the Sauce
In a small bowl, whisk together soy sauce, honey, rice vinegar, and sesame oil until the honey fully dissolves. Add your minced garlic, grated ginger, and red pepper flakes, stirring well to combine.
Step 3: Make the Cornstarch Slurry
Mix cornstarch with water in a small dish until smooth and no lumps remain. This slurry will thicken your sauce once the chicken finishes cooking.
Step 4: Heat Your Skillet
Place a large skillet over medium-high heat and add vegetable oil, letting it warm for about one minute. You want the oil shimmering but not smoking; this temperature sears the chicken properly without burning the pan.
Step 5: Season and Sear the Chicken
Season your chicken pieces with salt and pepper, then carefully add them to the hot skillet in a single layer. Let them sit undisturbed for two to three minutes so they develop a golden crust, creating deeper flavor through the Maillard reaction.
Step 6: Cook the Chicken Through
Stir the chicken and continue cooking for another six to eight minutes until the internal temperature reaches 165 degrees Fahrenheit. The chicken should be mostly cooked through at this point, with just a touch of pink still acceptable.
Step 7: Add the Sauce
Pour your prepared sauce mixture directly over the chicken, stirring well to coat every piece. The sauce will sizzle as it hits the hot pan, filling your kitchen with an incredible aroma.
Step 8: Thicken and Caramelize
Reduce heat to medium and let the sauce bubble gently for two to three minutes, allowing flavors to meld. Then give your cornstarch slurry a final stir and pour it into the pan, stirring constantly until the sauce thickens and turns glossy, about one minute.
Step 9: Final Cook and Glaze
Continue cooking for another two to three minutes, stirring occasionally, until the sauce has reduced and coats the chicken thickly. You’ll see the sauce become more concentrated and sticky, clinging to each piece.
Step 10: Taste and Adjust
Taste a piece and adjust seasonings if needed. Add a splash more vinegar if you want more tang, a drizzle of honey if it tastes too savory, or a pinch of salt if it needs more depth.
Step 11: Plate and Garnish
Transfer the chicken to a serving plate and scatter sliced green onions and sesame seeds over top. This adds a fresh crunch and visual appeal that makes the dish feel restaurant-quality.
Pro Tip: Don’t skip the cornstarch slurry; it transforms a thin, watery sauce into a proper sticky glaze that hugs the chicken and looks impressive on the plate.
Tips for the Best Sticky Chicken
- Cut your chicken into uniform pieces so nothing overcooks while waiting for larger chunks to finish. Smaller pieces also absorb the sticky sauce better and cook faster overall.
- Use a meat thermometer to verify doneness without cutting into the chicken, which releases precious juices. Aim for exactly 165 degrees Fahrenheit for safe, juicy results.
- Don’t rush the searing step; those golden bits stuck to the pan are flavor gold. Scrape them up as you add the sauce for deeper, more complex taste.
- Mix your cornstarch with cold water, not hot, to prevent clumping when you add it to the hot pan. A smooth slurry thickens evenly and creates a silky sauce.
- Keep your heat at medium once you add the sauce to prevent the honey from burning and the sauce from reducing too fast. A gentle bubble lets flavors develop without scorching anything.
- Have all ingredients prepped and within arm’s reach before you start cooking. This 30-minute recipe moves fast, and scrambling for minced garlic mid-sear breaks your flow.
Common Mistakes to Avoid
- Crowding the pan with too much chicken at once prevents proper searing and causes steaming instead. Work in batches if needed, or use a larger skillet to maintain enough space.
- Skipping the initial sear leads to pale, bland chicken that tastes boiled. That crust creates flavor and texture contrast that makes the whole dish better.
- Adding the sauce too early causes the chicken to finish cooking before the sauce has time to caramelize and concentrate. Always let the chicken cook most of the way through before introducing the liquid.
- Using regular soy sauce that’s already opened for months can taste flat and off. Fresh soy sauce makes a noticeable difference in the final dish.
- Forgetting to stir while the cornstarch thickens causes lumps and uneven consistency in your sauce. Constant gentle stirring ensures a smooth, glossy finish.
Serving Suggestions
Sticky chicken pairs beautifully with light, clean sides that let the flavorful sauce shine. Rice soaks up every bit of that sticky goodness, while fresh vegetables add texture and nutrition.
- Steamed jasmine rice or coconut rice to catch every drop of sauce
- Stir-fried broccoli or snap peas for crisp vegetable texture
- Cucumber salad with rice vinegar for cool, refreshing contrast
- Steamed bok choy or gai lan tossed with garlic and oil
- Cauliflower rice if you’re keeping things lower-carb
Variations to Try
- Spicy Sticky Chicken: Increase red pepper flakes to one-half teaspoon and add one tablespoon of sriracha to the sauce for serious heat. The sauce becomes deeper and more complex with layered spice.
- Orange Sticky Chicken: Replace rice vinegar with fresh orange juice and add one-half teaspoon of orange zest to the sauce for brightness. The citrus adds a lighter, more aromatic quality to the sticky glaze.
- Pineapple Sticky Chicken: Use one-quarter cup pineapple juice instead of water in your cornstarch slurry for tropical sweetness. Add fresh pineapple chunks during the final cooking minute for texture and flavor bursts.
- Teriyaki Sticky Chicken: Increase soy sauce to one-third cup and reduce honey to two tablespoons, then add one-half teaspoon of mirin if you have it. This creates a more savory, umami-forward profile that feels authentically Japanese.
- Sticky Chicken with Vegetables: Add bell pepper chunks, onion, and mushrooms during the searing step, cooking them alongside the chicken for a complete one-pan meal. Everything absorbs the sticky sauce and you save on cleanup.
Dietary Adaptations
- Gluten-free: Use tamari instead of regular soy sauce to eliminate wheat entirely. The flavor profile remains virtually identical while accommodating gluten sensitivities.
- Dairy-free: This recipe is naturally dairy-free already, so no changes needed. Every component works perfectly for anyone avoiding dairy.
- Vegan or Vegetarian: Swap chicken for extra-firm tofu cubes or seitan chunks, reducing initial cook time to five minutes. The sauce works beautifully on plant-based proteins and creates the same sticky, flavorful coating.
- Low-carb or Keto: Replace honey with erythritol or monk fruit sweetener at three-quarters the amount, as these are sweeter than honey. Serve over cauliflower rice instead of regular rice to keep carbs minimal while maintaining satisfaction.
Storage and Reheating
Refrigerator
Store leftover sticky chicken in an airtight container for up to four days. The sauce thickens further as it cools, which is actually ideal for meal prep.
- Let the chicken cool to room temperature before transferring to containers
- Keep sauce and chicken together for maximum flavor retention
- Use within four days for best quality and food safety
Freezer
Freeze sticky chicken in freezer-safe containers or bags for up to three months. The chicken stays tender and the sauce maintains its sticky coating beautifully.
- Cool completely before freezing to prevent condensation and ice crystals
- Leave one inch of headspace if using containers for expansion
- Label with the date so you know how long it’s been frozen
Reheating
Reheat gently to prevent the sauce from breaking down or separating. A low, slow approach keeps everything tender and glossy.
- Thaw frozen chicken overnight in the refrigerator before reheating
- Reheat in a skillet over medium heat for three to five minutes, stirring occasionally
- Add a splash of water if the sauce seems too thick after storing
- Microwave on fifty percent power for two to three minutes for quick reheating, though stovetop tastes better
Nutrition Information
| Nutrient | Amount |
|---|---|
| Calories | 285 |
| Total Fat | 10g |
| Saturated Fat | 2g |
| Carbohydrates | 18g |
| Fiber | 0g |
| Sugar | 14g |
| Protein | 32g |
| Sodium | 580mg |
| Cholesterol | 85mg |
These values are approximate and based on standard ingredient sizes. Nutritional content varies slightly depending on specific brands and portion sizes you use.
Frequently Asked Questions
Can I use chicken thighs instead of breasts?
Absolutely, and many people prefer them for this recipe. Thighs stay juicier and more forgiving during cooking, though they may take an extra three to five minutes to reach 165 degrees Fahrenheit.
How far ahead can I prep this dish?
You can cut your chicken and mix your sauce up to one day ahead, storing both separately in the refrigerator. Keeping them separate prevents the chicken from getting waterlogged before cooking.
What if my sauce breaks or looks separated?
Whisk in a tablespoon of water and lower your heat, stirring gently until it comes back together. This usually happens from too-high heat, so reducing temperature typically fixes it.
Can I make this in a slow cooker?
You can, but you’ll miss the caramelized crust that makes this dish special. If using a slow cooker, sear the chicken first in a skillet, then transfer everything to cook on low for four to five hours.
Is the red pepper flakes actually spicy?
One-quarter teaspoon creates barely noticeable heat, more of a subtle warmth. Most people don’t find it spicy at this level, so feel free to increase it if you prefer more kick.
What’s the best rice to serve with this?
Jasmine rice and sticky rice are both excellent choices that soak up the sauce beautifully. White jasmine rice gives you aromatic, fluffy grains, while sticky rice creates a more cohesive dish.
Can I use store-bought minced garlic?
Fresh minced garlic tastes noticeably better, but jarred works in a pinch. Use one teaspoon of jarred instead of three fresh cloves, and expect slightly less vibrant flavor.
Final Thoughts
Sticky chicken proves that restaurant-quality meals don’t require hours in the kitchen or mysterious ingredients you can’t pronounce. This dish brings together simple components in a way that creates something genuinely impressive and deeply satisfying.
Make it this week and watch how quickly it becomes a regular in your dinner rotation. Your family will be asking for seconds, and you’ll love how easy it actually is to deliver something this flavorful.
Sticky Chicken
Ingredients
Equipment
Method
- Slice your chicken into bite-sized pieces, about one to two inches each. Uniform sizing ensures everything cooks at the same rate without some pieces drying out while others stay raw.
- In a small bowl, whisk together soy sauce, honey, rice vinegar, and sesame oil until the honey fully dissolves. Add your minced garlic, grated ginger, and red pepper flakes, stirring well to combine.
- Mix cornstarch with water in a small dish until smooth and no lumps remain. This slurry will thicken your sauce once the chicken finishes cooking.
- Place a large skillet over medium-high heat and add vegetable oil, letting it warm for about one minute. You want the oil shimmering but not smoking.
- Season your chicken pieces with salt and pepper, then carefully add them to the hot skillet in a single layer. Let them sit undisturbed for 2 to 3 minutes so they develop a golden crust.
- Stir the chicken and continue cooking for another 6 to 8 minutes until the internal temperature reaches 165 degrees Fahrenheit. The chicken should be mostly cooked through at this point.
- Pour your prepared sauce mixture directly over the chicken, stirring well to coat every piece. The sauce will sizzle as it hits the hot pan.
- Reduce heat to medium and let the sauce bubble gently for 2 to 3 minutes, allowing flavors to meld. Then give your cornstarch slurry a final stir and pour it into the pan, stirring constantly until the sauce thickens and turns glossy, about 1 minute.
- Continue cooking for another 2 to 3 minutes, stirring occasionally, until the sauce has reduced and coats the chicken thickly. You'll see the sauce become more concentrated and sticky, clinging to each piece.
- Taste a piece and adjust seasonings if needed. Add a splash more vinegar if you want more tang, a drizzle of honey if it tastes too savory, or a pinch of salt if it needs more depth.
- Transfer the chicken to a serving plate and scatter sliced green onions and sesame seeds over top.