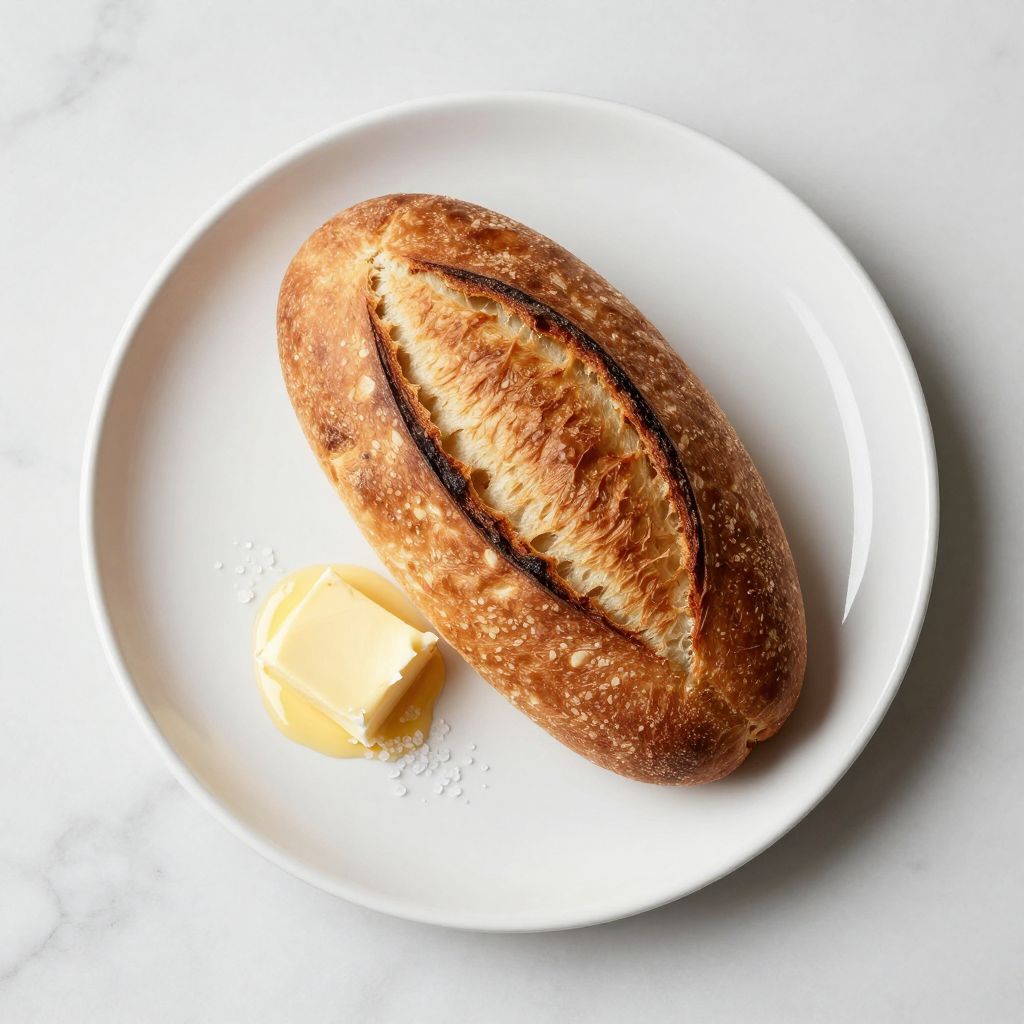
The smell of Cuban bread fresh from the oven is pure magic, filling your kitchen with that warm, yeasty aroma that makes everyone pause mid-conversation. This crusty-outside, pillowy-inside bread is a staple of Cuban cuisine and deserves a permanent spot in your baking rotation.
What makes Cuban bread special is its simplicity paired with bold results: a few pantry ingredients transform into a loaf with a crispy exterior and an airy crumb structure that’s perfect for sandwiches, toast, or just tearing off warm chunks slathered with butter. You’ll love how forgiving this dough is, and the payoff in flavor and texture makes the minimal effort feel like a steal.
Why You’ll Love This Recipe
Cuban bread delivers restaurant-quality results at home without requiring special equipment or fancy techniques. The dough comes together quickly, and the baking process is straightforward enough for beginners yet satisfying for experienced bakers.
- Crispy, golden crust that shatters satisfyingly when you bite into it
- Light, airy crumb perfect for absorbing flavors in sandwiches or soaking up butter
- Minimal ingredients mean you probably have everything on hand right now
- Ready in under three hours from start to finish, no overnight fermentation needed
- Versatile enough for breakfast toast, lunch sandwiches, or dinner bread service
My Experience Making This Recipe
I started making Cuban bread after falling in love with it at a small bakery in Miami, and my first attempt shocked me with how simple it actually was. The dough is forgiving, the rise is predictable, and within hours you’re pulling a professional-looking loaf from your oven.
The real magic happens when you score the top and watch it split open in the oven, creating those signature crispy edges. My family demolished the first loaf before it fully cooled, which told me everything I needed to know about whether this recipe deserved a permanent spot in my weekly baking schedule.
What surprised me most was how the bread evolved from day one to day three, developing more complex flavors as the crumb structure settled. Even on day two, when toasted, it was restaurant-quality good.
Recipe Overview
- Recipe Name: Cuban Bread
- Servings: 1 loaf, 10-12 slices
- Prep Time: 15 minutes
- Rise Time: 1.5 hours
- Cook Time: 25-30 minutes
- Total Time: 2 hours 20 minutes
- Course: Bread
- Cuisine: Cuban
- Calories per Serving: 145
Equipment You Will Need
- Large mixing bowl
- Stand mixer with dough hook (or mixing by hand)
- Kitchen scale (optional but helpful)
- Proofing basket or bowl lined with a floured kitchen towel
- Baking sheet or Dutch oven
- Bread lame or sharp knife for scoring
- Spray bottle for creating steam
- Instant-read thermometer
- Cooling rack
Ingredients for Cuban Bread
- All-purpose flour: 3 1/4 cups (about 405 grams)
- Warm water: 1 1/4 cups (300 milliliters)
- Instant yeast: 1 1/2 teaspoons
- Salt: 1 1/2 teaspoons
- Lard or vegetable shortening: 1 tablespoon (optional but traditional)
Ingredient Notes and Substitutions
- All-purpose flour is the backbone of this bread, providing the right balance of protein for structure without making the crumb dense. If you can’t find all-purpose, you can swap in bread flour, though your loaf will be slightly chewier and require a touch less water.
- Instant yeast works faster than active dry yeast and gives more predictable rise times in this recipe. Active dry yeast works fine as a one-to-one swap, but you may need to add an extra 10-15 minutes to rise time.
- Lard is traditional in Cuban bread and contributes to that signature tender crumb and subtle richness. Vegetable shortening or even butter works as a substitute, though lard gives the most authentic flavor and texture.
- Water temperature matters more than you might think: too hot and you kill the yeast, too cold and fermentation stalls. Aim for 110 to 115 degrees Fahrenheit, or test it with your wrist like you’re checking a baby’s bath.
How to Make Cuban Bread
Step 1: Combine Your Dry Ingredients
Pour 3 1/4 cups flour and 1 1/2 teaspoons salt into your mixing bowl and whisk them together for about 10 seconds. This distributes the salt evenly throughout the dough, preventing any salty pockets later.
Step 2: Activate Your Yeast
Pour 1 1/4 cups warm water into a small bowl and sprinkle 1 1/2 teaspoons instant yeast over the top, letting it sit for 1-2 minutes before stirring. This gives the yeast time to wake up and begin releasing the enzymes that will ferment your dough.
Step 3: Mix the Dough
Pour the yeast mixture into your flour bowl and mix on low speed for 2 minutes with a stand mixer, or stir vigorously by hand until the flour is fully incorporated and no dry bits remain. Add 1 tablespoon lard and mix for another 3-4 minutes on medium speed until the dough comes together into a cohesive, slightly tacky mass.
Step 4: Knead for Structure
Continue kneading for 8-10 minutes on medium speed, or 10-12 minutes by hand, until the dough becomes smooth and elastic and springs back when you poke it. This develops the gluten network that traps gas bubbles and creates that airy crumb you’re after.
Step 5: Bulk Fermentation
Lightly oil your mixing bowl, transfer the dough to it, and cover with a damp kitchen towel or plastic wrap, then let it rest at room temperature for 45-60 minutes until it roughly doubles in size. The dough should feel puffy and airy when you gently poke it, with your finger leaving a slight indent that doesn’t spring back completely.
Step 6: Shape Your Loaf
Turn the dough out onto a lightly floured surface and gently pat it into a rough rectangle about 12 inches long and 4 inches wide, being careful not to deflate the bubbles you’ve developed. Roll it tightly from one long side, pinching the seam closed with your fingers, and place it seam-side up in a proofing basket or bowl lined with a floured towel.
Step 7: Final Proof
Cover your shaped dough loosely and let it rise for 30-45 minutes at room temperature until it’s noticeably puffy but still holds a slight indentation when poked. You’re aiming for about 75-80 percent of full volume here, not a complete double, to prevent the bread from overproofing and collapsing in the oven.
Step 8: Prepare for Baking
Preheat your oven to 425 degrees Fahrenheit and place a small baking pan on the bottom rack for creating steam, filling it with hot water just before baking. If using a Dutch oven, preheat that too, as the trapped steam will create a crispier crust.
Step 9: Score and Bake
Turn your dough out seam-side down onto a parchment-lined baking sheet and use a bread lame or sharp knife to score a long, shallow cut down the center at a slight angle. Place the loaf in the oven, immediately spray the sides and top with water 3-4 times in the first minute, then bake for 25-30 minutes until the crust is deep golden brown and the internal temperature reads 205-210 degrees Fahrenheit.
Step 10: Cool Completely
Remove the bread from the oven and transfer it to a cooling rack, resisting the urge to slice into it for at least 20 minutes. The crumb continues to set as it cools, and cutting too early will compress the structure and create a gummy texture.
Pro Tip: The key to Cuban bread’s signature crust is steam in the oven during the first few minutes of baking, so don’t skip the water spray or the pan of steam.
Tips for the Best Cuban Bread
- Use a kitchen scale for flour measurements if you have one, since scooping flour directly into a measuring cup can pack it down and throw off your hydration ratio. A scale takes the guesswork out of consistency from batch to batch.
- Keep your water temperature between 110 and 115 degrees Fahrenheit: colder and fermentation drags, hotter and you risk killing the yeast. An instant-read thermometer takes the anxiety out of this step.
- Watch the dough rather than the clock during rises, as room temperature, humidity, and even the altitude where you live affect fermentation speed. Poke the dough gently; if your finger leaves an indent that springs back halfway, you’re right on schedule.
- Score your loaf at a shallow angle just before it goes into the oven to control where the steam escapes and create those beautiful crispy edges Cubans are famous for. A sharp blade or lame makes this easier and gives cleaner results than a dull knife.
- Create steam by placing a small pan of hot water on the bottom rack of your preheated oven before baking, or invest in a Dutch oven if you bake bread regularly. The moisture transforms the crust from pale to crackling-crispy.
- Let the bread cool fully before slicing, even though it smells amazing and you’re tempted to tear into it warm. The interior needs time to set up properly, and cutting too early releases steam trapped in the crumb.
Common Mistakes to Avoid
- Overshooting your rise times: If your dough doubles too quickly and you bake it overproofed, the structure collapses in the oven and you get a dense, gummy loaf. Poke the dough often during the final proof to catch it at the right stage.
- Forgetting to score before baking: Without a score, steam escapes randomly and the loaf develops an uneven crust with less of that signature crispy bite. A single score down the center controls the expansion and creates that beautiful ear.
- Skipping the steam: Baking Cuban bread without humidity in the oven gives you a thicker, chewier crust instead of that thin, crackling shell you want. The water pan or Dutch oven is not optional if you’re after authentic results.
- Using water that’s too hot: Yeast dies at around 140 degrees Fahrenheit, so if your water is much hotter than 115 degrees, you’ll kill the yeast and get minimal rise. Test it on your wrist; it should feel warm but not hot.
- Cutting into the bread too early: Slicing while the crumb is still steaming compresses the internal structure and creates a dense, gummy texture that ruins the whole loaf. Wait at least 20-30 minutes after the bread comes out of the oven.
Serving Suggestions
Cuban bread shines in almost any setting, from breakfast through dinner, and tastes best served warm or toasted within the first day of baking. The mild flavor and sturdy crumb make it the perfect canvas for toppings and fillings.
- Toast it warm and spread with butter and a sprinkle of sea salt for a simple side to soups or stews
- Use it for pressed Cuban sandwiches filled with roasted pork, ham, Swiss cheese, and pickles
- Slice it lengthwise and layer it with cheese and herbs for a quick garlic bread at dinner
- Tear it into chunks for bread salads or panzanella mixed with fresh vegetables and vinaigrette
- Serve sliced with breakfast alongside eggs, black beans, and fresh fruit for an authentic Cuban morning
Variations to Try
- Whole Wheat Cuban Bread: Replace up to 25 percent of the all-purpose flour with whole wheat flour for a nuttier flavor and denser crumb. Your rise time may increase slightly since whole wheat absorbs more water and ferments differently.
- Herb-Infused Cuban Bread: Add 1 tablespoon of finely chopped fresh oregano or cilantro to the dough after the initial mix for subtle herbal notes. These herbs pair beautifully with the bread’s mild, buttery crumb.
- Garlic Cuban Bread: Brush the shaped loaf with a mixture of melted butter and minced garlic just before the final proof, creating a savory top layer. This version is killer for sandwiches or served warm alongside Cuban black bean soup.
- Sesame Seed Crust: Brush the shaped loaf with water and roll it lightly in sesame seeds before the final proof for a toasted, nutty flavor and interesting texture contrast. The seeds toast beautifully in the oven and add visual appeal.
- Smaller Rolls: Divide the shaped dough into 8-10 smaller portions instead of making one large loaf, reducing the baking time to 18-22 minutes. These dinner rolls bake faster and are perfect for individual sandwiches or breadbaskets.
Dietary Adaptations
- Gluten-Free: Use a high-quality gluten-free bread flour blend with xanthan gum and increase the water to 1 3/8 cups, as gluten-free doughs are wetter. The crumb will be denser and the crust less crispy, but the bread still works well toasted or for sandwiches.
- Dairy-Free: Skip the lard entirely or substitute with dairy-free butter or coconut oil at the same ratio. The bread will be slightly less rich but still tender and flavorful.
- Vegan: Omit the lard and use vegetable oil or vegan butter instead, and double-check your yeast is vegan certified. The texture and flavor remain nearly identical to the original.
- Low-Carb or Keto: This recipe doesn’t adapt well to low-carb flour blends due to the structure Cuban bread requires, so I’d recommend seeking out a specific low-carb bread recipe instead. The traditional version relies on regular flour’s gluten development.
Storage and Reheating
Refrigerator
Store your cooled loaf in a paper bag inside the fridge for up to 5 days, as paper allows the crust to breathe while keeping the crumb fresh. Avoid plastic bags, which trap moisture and soften the crust quickly.
- For longer storage, slice the bread first before refrigerating, so you can toast individual pieces as needed
- The bread will firm up when cold, which is actually perfect for toasting
Freezer
Wrap your cooled loaf tightly in plastic wrap and then foil before freezing for up to 3 months, which protects it from freezer burn. Slicing before freezing lets you pull out just what you need without thawing the whole loaf.
- Thaw at room temperature for 2-3 hours before serving for the best texture
- Frozen slices can go straight into the toaster without thawing
Reheating
Toast slices in a toaster or toaster oven for the crispiest results, or wrap the whole loaf in foil and warm it at 350 degrees Fahrenheit for 10-15 minutes. Microwaving will soften the crust and ruin the texture, so avoid that method.
- For a sandwich, skip reheating altogether and use the bread cold or at room temperature
- Spritz the loaf with water before foil-wrapping it in the oven to recreate some of the original crust texture
Nutrition Information
| Nutrient | Amount |
|---|---|
| Calories | 145 |
| Total Fat | 2 grams |
| Saturated Fat | 0.5 grams |
| Carbohydrates | 28 grams |
| Fiber | 1 gram |
| Sugar | 0 grams |
| Protein | 4 grams |
| Sodium | 290 milligrams |
| Cholesterol | 1 milligram |
These values are approximate and based on serving 12 slices per loaf using the ingredients listed in the recipe. Individual slices may vary slightly depending on how you divide the loaf and exact ingredient brands used.
Frequently Asked Questions
Can I Make Cuban Bread Without Lard?
Absolutely, yes. Vegetable shortening, butter, or even olive oil work as replacements at the same 1-tablespoon ratio. Lard is traditional because it creates a subtly richer flavor and tender crumb, but the bread is still delicious without it.
How Do I Know When My Dough Is Properly Proofed?
Gently poke the dough with a floured finger. If the indentation springs back halfway and slowly fills in, it’s ready to bake. If it springs back completely, it needs more time; if it doesn’t spring back at all, it’s overproofed.
Can I Make This Dough Ahead of Time
Cuban Bread
Ingredients
Equipment
Method
- Pour 3 1/4 cups flour and 1 1/2 teaspoons salt into your mixing bowl and whisk them together for about 10 seconds to distribute the salt evenly throughout the dough.
- Pour 1 1/4 cups warm water into a small bowl and sprinkle 1 1/2 teaspoons instant yeast over the top, letting it sit for 1-2 minutes before stirring.
- Pour the yeast mixture into your flour bowl and mix on low speed for 2 minutes with a stand mixer, or stir vigorously by hand until the flour is fully incorporated and no dry bits remain. Add 1 tablespoon lard and mix for another 3-4 minutes on medium speed until the dough comes together into a cohesive, slightly tacky mass.
- Continue kneading for 8-10 minutes on medium speed, or 10-12 minutes by hand, until the dough becomes smooth and elastic and springs back when you poke it.
- Lightly oil your mixing bowl, transfer the dough to it, and cover with a damp kitchen towel or plastic wrap, then let it rest at room temperature for 45-60 minutes until it roughly doubles in size.
- Turn the dough out onto a lightly floured surface and gently pat it into a rough rectangle about 12 inches long and 4 inches wide. Roll it tightly from one long side, pinching the seam closed with your fingers, and place it seam-side up in a proofing basket or bowl lined with a floured towel.
- Cover your shaped dough loosely and let it rise for 30-45 minutes at room temperature until it's noticeably puffy but still holds a slight indentation when poked.
- Preheat your oven to 425 degrees Fahrenheit and place a small baking pan on the bottom rack for creating steam, filling it with hot water just before baking.
- Turn your dough out seam-side down onto a parchment-lined baking sheet and use a bread lame or sharp knife to score a long, shallow cut down the center at a slight angle. Place the loaf in the oven, immediately spray the sides and top with water 3-4 times in the first minute, then bake for 25-30 minutes until the crust is deep golden brown and the internal temperature reads 205-210 degrees Fahrenheit.
- Remove the bread from the oven and transfer it to a cooling rack, letting it cool for at least 20 minutes before slicing.