
Picture a tower of golden, caramelized cream puffs glistening under the light, each one crispy and delicate enough to shatter on your tongue. A croquembouche is not just dessert; it’s the ultimate centerpiece that makes any celebration feel genuinely French and impossibly sophisticated.
This recipe deserves a spot on your table because it looks far more intimidating than it actually is, and the payoff is pure magic. The combination of light, airy choux pastry, silky pastry cream, and shiny caramel coating creates layers of texture that few desserts can match.
Why You’ll Love This Recipe
A croquembouche delivers restaurant-quality drama without requiring professional training. The individual cream puffs can be made ahead, and assembly is surprisingly straightforward once you understand the technique.
- Stunning presentation that impresses every single time
- Crispy exterior gives way to creamy, tender interior
- Make-ahead friendly since you can prep components days in advance
- Works for weddings, holidays, or any occasion that needs a wow factor
- Once you master the choux pastry base, endless flavor variations open up
My Experience Making This Recipe
The first time I made a croquembouche, I was terrified. I thought caramel work required a steady hand I didn’t possess, and stacking tiny cream puffs on top of each other sounded like a recipe for disaster.
What surprised me most was how forgiving the process turned out to be. The warm caramel acts like edible glue, and even if a puff shifts slightly, nobody notices once the whole tower is done.
When guests arrived and saw that towering golden creation sitting on my table, their jaws actually dropped. The moment someone bit into their first puff and tasted the crispy-then-creamy contrast, I knew this recipe was worth every ounce of effort.
Recipe Overview
- Recipe Name: Croquembouche
- Servings: 12 to 16 people
- Prep Time: 45 minutes
- Cook Time: 45 minutes
- Total Time: 90 minutes (plus chilling time)
- Course: Dessert
- Cuisine: French
- Calories per Serving: 285
Equipment You Will Need
- Piping bags and round tips (size 10 or 12)
- Large and small saucepans
- Wooden spoon
- Candy or digital thermometer
- Large mixing bowls
- Electric mixer or whisk
- Baking sheets and parchment paper
- Cooling racks
- Offset spatula
- Cone mold or cardboard cone
Ingredients for Croquembouche
For the Choux Pastry
- 1 cup water
- 1/2 cup butter
- 1/4 teaspoon salt
- 1 cup all-purpose flour
- 4 large eggs
For the Pastry Cream Filling
- 1 cup whole milk
- 1 vanilla bean (or 1 teaspoon vanilla extract)
- 4 egg yolks
- 1/4 cup granulated sugar
- 2 tablespoons cornstarch
- 2 tablespoons all-purpose flour
- 2 tablespoons butter
For the Caramel Coating and Assembly
- 2 cups granulated sugar
- 1/2 cup water
- Pinch of cream of tartar
- 2 tablespoons unsalted butter
- Powdered sugar for dusting (optional)
- Spun sugar for decoration (optional)
Ingredient Notes and Substitutions
- Eggs: Eggs provide the structure in choux pastry and richness in pastry cream. If you need to avoid raw yolks, use pasteurized eggs, though the flavor will remain nearly identical.
- Butter: Unsalted butter gives you control over the salt level and prevents the pastry cream from tasting too salty. Salted butter works in a pinch if you reduce added salt slightly.
- Vanilla bean: Fresh vanilla bean delivers superior flavor and those beautiful specks throughout the cream. Vanilla extract is convenient and tastes great; use it at a ratio of one teaspoon per one whole bean.
- Cornstarch and flour: These thickeners keep the pastry cream stable and prevent it from breaking when piped. Tapioca starch works as a swap, though the texture becomes slightly more translucent.
- Cream of tartar: This ingredient prevents sugar crystallization during caramel cooking and ensures a smooth, glossy result. Lemon juice or a clean copper pot can substitute in a tight spot.
How to Make Croquembouche
Step 1: Make the Choux Pastry Base
Combine water, butter, and salt in a saucepan and bring to a boil over medium-high heat. The butter needs to fully melt and the mixture needs to come to a rolling boil so the water hydrates the flour evenly.
Remove from heat and stir in the flour until the mixture forms a thick paste. This step cooks the flour slightly, which helps the pastry puff properly during baking.
Step 2: Add the Eggs to the Choux Paste
Let the paste cool for about two minutes, then add eggs one at a time, stirring vigorously after each addition until fully incorporated. The paste will look slick and slightly separated after each egg, but keep stirring; it will come together.
The eggs create steam during baking, which causes the pastry to rise and hollow out inside. Thorough mixing ensures even distribution and consistent puff development.
Step 3: Pipe the Cream Puffs
Transfer the choux paste to a piping bag fitted with a size 10 or 12 round tip. Pipe small mounds (about the size of a walnut) onto parchment-lined baking sheets, leaving about two inches between each puff.
Small, uniform puffs make stacking easier and ensure they cook evenly. Dip your finger in water and smooth any peaks on top so they bake into rounded domes.
Step 4: Bake the Puffs Until Golden
Preheat your oven to 400 degrees Fahrenheit. Bake the puffs for 25 to 30 minutes until they turn deep golden brown and feel light and crispy when you pick one up.
Resist the urge to open the oven door during the first 20 minutes; the temperature drop will deflate your puffs. They need high, steady heat to rise properly and develop that characteristic hollow interior.
Step 5: Cool the Puffs Completely
Transfer the baked puffs to a cooling rack and let them cool to room temperature. Once cool, you can gently poke a small hole in the bottom of each puff using a skewer or small knife.
Cooling stops the cooking process and allows steam to escape, which gives you that crispy texture. The small hole at the bottom makes piping the cream filling much easier.
Step 6: Prepare the Pastry Cream Filling
Heat the milk in a saucepan and add the vanilla bean (split lengthwise and seeds scraped out) or vanilla extract. Let it heat until steaming, then remove from heat and let it infuse for about five minutes for deeper flavor.
In a separate bowl, whisk together egg yolks, sugar, cornstarch, and flour until pale and thick. Whisking the yolks and sugar together increases volume slightly and ensures the cornstarch and flour distribute evenly.
Step 7: Temper the Egg Mixture
Slowly pour about one-third of the hot milk into the egg mixture while whisking constantly. This gradual temperature increase prevents the eggs from scrambling, which would create lumps you cannot remove.
Pour the tempered egg mixture back into the saucepan with the remaining milk and whisk constantly over medium heat. Cook for about two minutes until the cream thickens and reaches 170 degrees Fahrenheit on a thermometer.
Step 8: Finish the Pastry Cream
Remove from heat and whisk in the butter until melted and fully incorporated. Strain the pastry cream through a fine-mesh sieve into a bowl to ensure a silky, lump-free texture.
Press plastic wrap directly onto the surface of the cream to prevent a skin from forming. Chill the pastry cream for at least 30 minutes before filling the puffs.
Step 9: Fill the Cream Puffs
Transfer the chilled pastry cream to a piping bag fitted with a small round tip. Pipe pastry cream into the hole at the bottom of each puff until it feels slightly full but not leaking.
You can fill these up to a few hours ahead, and they actually taste better if you let the cream soak into the pastry slightly. Overfilling causes cream to squeeze out when you assemble the tower, so fill with confidence but not excess.
Step 10: Cook the Caramel
Combine sugar, water, and cream of tartar in a heavy-bottomed saucepan. Stir until combined, then stop stirring entirely; just let it cook over medium-high heat without touching it.
Not stirring prevents crystallization and gives you a perfectly smooth caramel. Swirl the pan gently if needed, but never use a spoon once the sugar starts cooking.
Step 11: Monitor the Caramel Temperature
Insert a candy thermometer and watch as the sugar melts and turns amber. When it reaches 350 degrees Fahrenheit, remove it from heat immediately and add the butter, stirring just until combined.
Caramel continues cooking from residual heat, so pulling it at exactly the right temperature prevents it from burning. The butter adds richness and helps the caramel stick to the puffs.
Step 12: Assemble the Croquembouche Tower
Place your cone mold on a serving plate or cake board. Work quickly while the caramel is still warm by dipping the bottom of each filled puff into the caramel and then pressing it gently onto the cone, starting with the bottom ring.
Work in circular rows from bottom to top, layering puffs snugly together and rotating the cone as you go. The warm caramel acts like glue, so do not worry if a puff shifts slightly.
Once the tower is built, remove the cone mold gently by twisting and lifting. Drizzle any remaining caramel over the tower or decorate with spun sugar if desired.
Pro Tip: Keep your caramel warm but not piping hot by placing the pan over a bowl of warm water; this keeps it at the perfect dipping consistency for the entire assembly process.
Tips for the Best Croquembouche
- Make the choux pastry and bake the puffs a full day ahead; they stay crispy and fresh in an airtight container. This removes the time pressure from assembly day and lets you focus on caramel work and stacking.
- Fill the puffs no more than two hours before serving to prevent the pastry cream from making the shells soggy. If you must prepare further ahead, fill them just before guests arrive.
- Use a candy thermometer for the caramel; eyeballing the color alone can lead to burning or underdone caramel that will not set properly. The difference between 340 and 360 degrees is the difference between silky caramel and burnt sugar.
- Invest in a cone mold or construct one from thick cardboard and tape; it makes assembly infinitely easier and ensures an even, professional-looking tower. A cone gives you structure and makes the whole project less stressful.
- Work in a cool kitchen on a dry day if possible; humidity can soften the pastry and make caramel work trickier. High humidity makes caramel sticky and the choux pastry absorbs moisture from the air.
Common Mistakes to Avoid
- Opening the oven door too early causes the puffs to collapse and never puff properly. Wait until at least 20 minutes have passed before even peeking.
- Filling warm puffs with hot cream causes the pastry to soften immediately and the tower to become fragile. Always let both the puffs and the pastry cream cool completely first.
- Stirring the sugar while caramel cooks causes crystallization and grainy texture that makes assembly frustrating. Once the sugar hits the pan, you are done stirring; just let heat do the work.
- Making the caramel too dark creates a bitter flavor that overpowers the delicate cream puffs. Pull it off the heat at 350 degrees, not 360.
- Trying to work with cold caramel results in puffs that will not stick to each other and a tower that topples. Keep the caramel warm by setting the pan over a bowl of warm water.
Serving Suggestions
A croquembouche is fancy enough to be the only dessert you need, but pairing it with other elements makes the whole spread feel complete. Serve it at room temperature so the caramel stays glossy and snaps delightfully when bitten.
- Serve with a cup of strong black coffee or espresso to cut through the richness of the cream
- Place alongside fresh berries and a drizzle of berry coulis for brightness and color contrast
- Pair with a chilled glass of champagne or sparkling wine for an elegant, celebratory feeling
- Offer whipped cream or creme fraiche on the side for those who want extra richness
- Add a small dessert plate and napkins; eating a croquembouche is messy in the best possible way
Variations to Try
- Chocolate Croquembouche: Fill the puffs with chocolate pastry cream (add two ounces of melted dark chocolate to the pastry cream base) and dip in dark chocolate caramel instead of plain sugar caramel for a richer, more indulgent dessert.
- Pistachio Version: Replace half the pastry cream with pistachio pastry cream by whisking in two tablespoons of pistachio paste. The nutty flavor pairs beautifully with the caramel and feels slightly less heavy than vanilla.
- Coffee-Flavored Filling: Dissolve one tablespoon of instant espresso powder into the warm milk before making the pastry cream, creating an elegant mocha version that coffee lovers adore.
- Smaller Mini Croquembouche: Pipe pea-sized puffs instead of walnut-sized ones to create an individual-sized croquembouche that serves eight to ten people; bake for only 15 to 18 minutes and assemble on small cone molds.
- Flavored Caramel: Stir in half a teaspoon of sea salt, a quarter teaspoon of cinnamon, or a splash of bourbon into the finished caramel for unexpected flavor depth that makes your tower unique.
Dietary Adaptations
- Gluten-Free: Replace all-purpose flour with a one-to-one gluten-free flour blend in both the choux pastry and the pastry cream; the results are nearly identical and nobody will notice the swap.
- Dairy-Free: Use vegetable shortening or coconut oil in place of butter, unsweetened plant milk instead of dairy milk, and coconut cream in place of egg yolks (one tablespoon cornstarch mixed with two tablespoons coconut cream per yolk); the texture becomes slightly less rich but still delicious.
- Vegan: Use aquafaba (chickpea liquid) in place of eggs in the choux pastry and a combination of cornstarch and plant milk for the cream filling; the puffs will be slightly less crispy but the overall result remains impressive.
- Low-Carb: Replace the sugar in both the caramel and pastry cream with a one-to-one sugar substitute like erythritol; reduce the baking temperature by 25 degrees as substitutes brown faster than real sugar.
Storage and Reheating
Refrigerator
Store the fully assembled croquembouche in an airtight container for up to two days. The caramel stays glossy and the puffs remain crispy if you do not expose them to humidity.
- Keep in the coldest part of your refrigerator, away from the door
- Do not stack anything on top of the tower
- Remove from the fridge 15 minutes before serving to let it come to room temperature
Freezer
Unfilled baked puffs freeze beautifully for up to three months in an airtight container. Filled croquembouche does not freeze well since the pastry becomes tough and the cream separates, so freeze components separately if you want to prep ahead.
- Layer puffs between parchment paper to prevent sticking
- Thaw baked puffs at room temperature for 30 minutes before filling
- Freeze pastry cream in an airtight container and thaw overnight in the refrigerator
Reheating
Reheat unfilled puffs in a 300-degree Fahrenheit oven for five to seven minutes to restore crispness if they soften. Do not reheat filled puffs, as the cream will become too warm and the pastry will turn tough.
- Place puffs on a baking sheet lined with parchment paper
- Watch carefully so they warm through without browning further
- Cool for a minute before serving
Nutrition Information
| Nutrient | Amount |
|---|---|
| Calories | 285 |
| Total Fat | 18g |
| Saturated Fat | 11g |
| Carbohydrates | 28g |
| Fiber | 0g |
| Sugar | 24g |
| Protein | 4g |
| Sodium | 95mg |
| Cholesterol | 65mg |
These values are approximate and based on standard ingredients and serving sizes. Individual nutritional content may vary depending on specific brands and preparation methods.
Frequently Asked Questions
Can I make the croquembouche a day ahead?
Yes, you can bake the puffs a full day ahead and store them in an airtight container. Assemble the tower no more than four hours before serving to keep the caramel glossy and the pastry crispy.
What if my choux pastry does not puff?
This usually happens if the oven door opened too early or the mixture was not mixed thoroughly enough. Make sure you add eggs one at a time and stir well after each addition so the paste is smooth and glossy.
Can I use store-bought cream instead of making pastry cream?
Whipped cream or french meringue based fillings work, but they are less stable than pastry cream and may weep during assembly. For the best results, make the pastry cream from scratch.
How do I prevent the caramel from crystallizing?
Use cream of tartar in the caramel mixture, never stir once the sugar starts cooking, and use a clean pan with no sugar crystals stuck to the sides. Swirl gently if needed, but do not let a spoon touch the sugar.
Can I make mini croquembouches for individual servings?
Absolutely; just pipe smaller puffs and assemble them on smaller cone molds or even cone-shaped paper cups. Mini versions take only 15 to 18 minutes to bake and look absolutely charming on individual dessert plates.
What should I do if the caramel hardens before I finish assembly?
Place the pan back over low heat or set it over a bowl of warm water to soften the caramel. Keep it at a warm but not hot temperature throughout assembly so it stays at the perfect dipping consistency.
Final Thoughts
Making a croquembouche teaches you skills you will use in countless other French desserts. Once you master choux pastry, pastry cream, and caramel, a whole world of elegant baking opens up to you.
Do not let the fancy appearance intimidate you; every step is manageable and the reward is a dessert that will have people talking about your kitchen skills for months. Give this recipe a try at your next celebration and watch how quickly it becomes your signature dish.
Explore More French Desserts
If you loved making this croquembouche, you might also enjoy exploring other classic French desserts and pastry techniques on the site. Expand your pastry skills and impress your loved ones with more elegant treats.
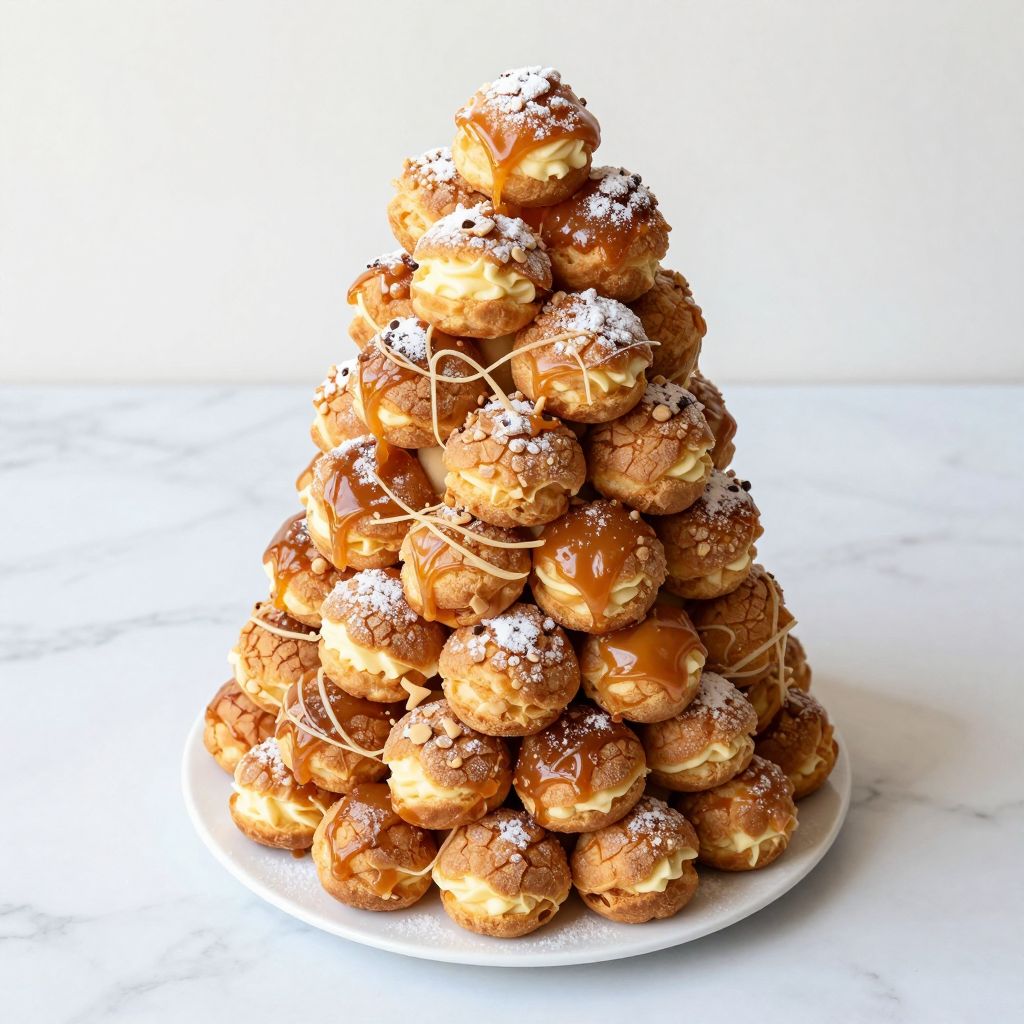
Croquembouche
Ingredients
Equipment
Method
- Preheat oven to 400°F (200°C) and line baking sheets with parchment paper.
- Combine 1 cup water, 1/2 cup butter, and 1/4 teaspoon salt in a saucepan and bring to a rolling boil over medium-high heat.
- Remove from heat and stir in 1 cup flour until a thick paste forms; return to low heat for 1 minute, stirring to dry slightly.
- Transfer paste to a mixing bowl and let cool for 2 minutes; beat in 4 eggs one at a time, stirring vigorously until smooth and glossy.
- Pipe walnut-sized mounds onto prepared sheets, spacing 2 inches apart, and smooth peaks with a wet fingertip.
- Bake puffs for 25–30 minutes until deep golden brown and crisp; do not open oven the first 20 minutes to prevent collapse.
- Cool puffs on a rack to room temperature; poke a small hole in the bottom of each to prepare for filling.
- Heat 1 cup milk with vanilla bean seeds and pod over medium until steaming; remove from heat and infuse for 5 minutes.
- Whisk 4 yolks, 1/4 cup sugar, 2 tablespoons cornstarch, and 2 tablespoons flour in a bowl until pale.
- Temper yolk mixture by whisking in one-third of hot milk, then return to saucepan with remaining milk and cook over medium, whisking until thick at 170°F (about 2 minutes).
- Remove from heat, stir in 2 tablespoons butter, strain into a bowl, cover surface with plastic wrap, and chill at least 30 minutes.
- Fill a piping bag with chilled pastry cream and pipe into the bottom of each puff until just filled without leaking.
- In a clean saucepan, combine 2 cups sugar, 1/2 cup water, and cream of tartar; heat over medium-high without stirring until syrup reaches 350°F on thermometer.
- Remove from heat, stir in 2 tablespoons butter, and keep warm over a bowl of warm water to maintain dipping consistency.
- Dip base of each filled puff into caramel and assemble on a cone mold in concentric rings from bottom up, using caramel as glue.
- Allow tower to set, dust with powdered sugar, and decorate with spun sugar if desired before serving.