There’s something almost magical about biting into a perfectly crispy Chick-fil-A chicken sandwich, the way the golden breading shatters between your teeth while the tender chicken inside stays juicy and flavorful. What if you could recreate that exact experience in your own kitchen, without the drive-thru line or the price tag?
This Chick-fil-A chicken recipe captures the signature taste and texture that has made the chain famous, and it’s surprisingly achievable at home. The key lies in a simple pressure-cooking method combined with a perfectly seasoned coating that delivers that iconic crispy exterior and tender, pickle-brined interior.
You’ll have restaurant-quality chicken ready in under an hour, and your family won’t believe you made it yourself.
Why You’ll Love This Recipe
This recipe delivers authentic Chick-fil-A flavors without leaving home, and the technique is forgiving enough for any home cook to master.
- Tastes nearly identical to the restaurant version with that signature tender, juicy chicken
- Quick and easy using a pressure cooker or Instant Pot for hands-off cooking
- Uses simple, pantry-friendly ingredients you likely already have
- Versatile enough for sandwiches, salads, nuggets, or meal prep
- Budget-friendly compared to buying from the restaurant multiple times
My Experience Making This Recipe
The first time I made this at home, I was skeptical that I could actually replicate the magic of a Chick-fil-A sandwich. I followed the pressure cooker method, and honestly, the smell alone had my skepticism melting away within minutes.
What surprised me most was how juicy the chicken stayed even after breading and frying, which is the hardest part to nail. My kids devoured the sandwiches without realizing they weren’t from the restaurant, and the cost was a fraction of what we usually spend.
The second time I made it, I shaved a few minutes off the process and had perfectly seasoned chicken ready for meal prep bowls, wraps, and salads all week. This recipe has become a weekly staple in our house because it hits that craving without the guilt or expense.
Recipe Overview
- Recipe Name: Chick-fil-A Chicken Sandwich
- Servings: 4
- Prep Time: 15 minutes
- Cook Time: 30 minutes
- Total Time: 45 minutes
- Course: Main Dish
- Cuisine: American
- Calories per Serving: 420
Equipment You Will Need
- Instant Pot or pressure cooker
- Meat mallet or heavy pan
- Three shallow bowls or plates
- Cast-iron skillet or heavy-bottomed pan
- Meat thermometer
- Paper towels
- Tongs
- Measuring cups and spoons
Ingredients for Chick-fil-A Chicken
For the Pressure-Cooked Chicken
- 4 boneless, skinless chicken breasts, about 6 to 8 ounces each
- 2 cups water
- 2 tablespoons apple cider vinegar
- 1 teaspoon salt
- 1/2 teaspoon black pepper
- 1/2 teaspoon garlic powder
- 1/4 teaspoon onion powder
For the Breading and Frying
- 1 cup all-purpose flour
- 1 teaspoon salt
- 1/2 teaspoon black pepper
- 1/2 teaspoon garlic powder
- 1/4 teaspoon paprika
- 2 eggs
- 2 tablespoons milk or water
- Vegetable oil for frying, about 2 cups
For Assembly
- 4 buttered buns
- 8 dill pickle chips
Ingredient Notes and Substitutions
- Boneless chicken breasts are essential because they cook evenly in the pressure cooker and stay moist. You can substitute with boneless, skinless thighs for extra juiciness, though cooking time may vary slightly.
- Apple cider vinegar adds subtle tang and helps tenderize the chicken. Regular white vinegar works as a substitute but use only 1 tablespoon since it’s more acidic.
- All-purpose flour is the standard choice for a light, crispy coating. You can swap it for rice flour for extra crispness, though the texture will be slightly different.
- Vegetable oil is ideal for high-heat frying, but canola oil or peanut oil work just as well. Avoid olive oil since it has a lower smoke point.
- Buttered buns are crucial for authenticity, so toast them lightly in a skillet or oven. Regular untoasted buns will absorb moisture and become soggy.
How to Make Chick-fil-A Chicken
Step 1: Prepare the Chicken Breasts
Remove the chicken breasts from the refrigerator and pat them dry with paper towels, as excess moisture prevents proper breading. Using a meat mallet or the bottom of a heavy pan, gently pound each chicken breast to an even thickness of about three-quarters of an inch, which ensures they cook evenly in the pressure cooker.
Step 2: Pressure Cook the Chicken
Pour 2 cups of water into your pressure cooker and add 2 tablespoons of apple cider vinegar, 1 teaspoon of salt, 1/2 teaspoon of black pepper, 1/2 teaspoon of garlic powder, and 1/4 teaspoon of onion powder. Place the trivet inside the pressure cooker and arrange the flattened chicken breasts on top, stacking them if necessary.
Close the lid and cook on high pressure for 8 minutes, which is enough time to cook the chicken through while keeping it incredibly tender. The vinegar in the liquid mimics the pickling brine used in the actual Chick-fil-A chicken, giving it that signature subtle tang.
Step 3: Release the Pressure
Once the cooking time is complete, carefully quick-release the pressure by turning the vent valve to the release position. Allow the steam to escape for about 30 seconds before opening the lid fully, as this prevents splattering and burns.
Step 4: Cool and Prepare for Breading
Remove the chicken breasts with tongs and place them on a clean cutting board to cool for about 5 minutes. Once cool enough to handle, pat the chicken dry again with paper towels to remove any excess moisture, which is crucial for the breading to adhere properly and fry up crispy.
Step 5: Set Up Your Breading Station
Combine 1 cup of all-purpose flour, 1 teaspoon of salt, 1/2 teaspoon of black pepper, 1/2 teaspoon of garlic powder, and 1/4 teaspoon of paprika in a shallow bowl. In a second shallow bowl, whisk together 2 eggs and 2 tablespoons of milk to create an egg wash that binds the flour coating to the chicken.
Step 6: Bread the Chicken
Working with one chicken breast at a time, dip it into the egg wash until fully coated, then dredge it in the seasoned flour mixture, pressing gently so the coating adheres evenly. Shake off any excess flour and place the breaded chicken on a clean plate, making sure the pieces don’t touch each other.
Step 7: Heat the Oil and Fry
Pour about 2 cups of vegetable oil into a cast-iron skillet or heavy-bottomed pan and heat it to 350 degrees Fahrenheit, which you can check using a meat thermometer or by dropping a small piece of bread into the oil. The oil should sizzle immediately around the bread without smoking, indicating the temperature is just right.
Carefully place the breaded chicken breasts into the hot oil and fry for 3 to 4 minutes on the first side until golden brown, then flip and fry for another 3 to 4 minutes until the second side is equally golden. The entire breading should be crispy and the internal temperature should reach 165 degrees Fahrenheit.
Step 8: Drain and Rest
Remove the fried chicken from the oil using tongs and place it on a plate lined with paper towels to drain excess oil. Let the chicken rest for 2 to 3 minutes while you toast the buns, which allows the coating to crisp up further and the juices to redistribute inside.
Step 9: Toast the Buns and Assemble
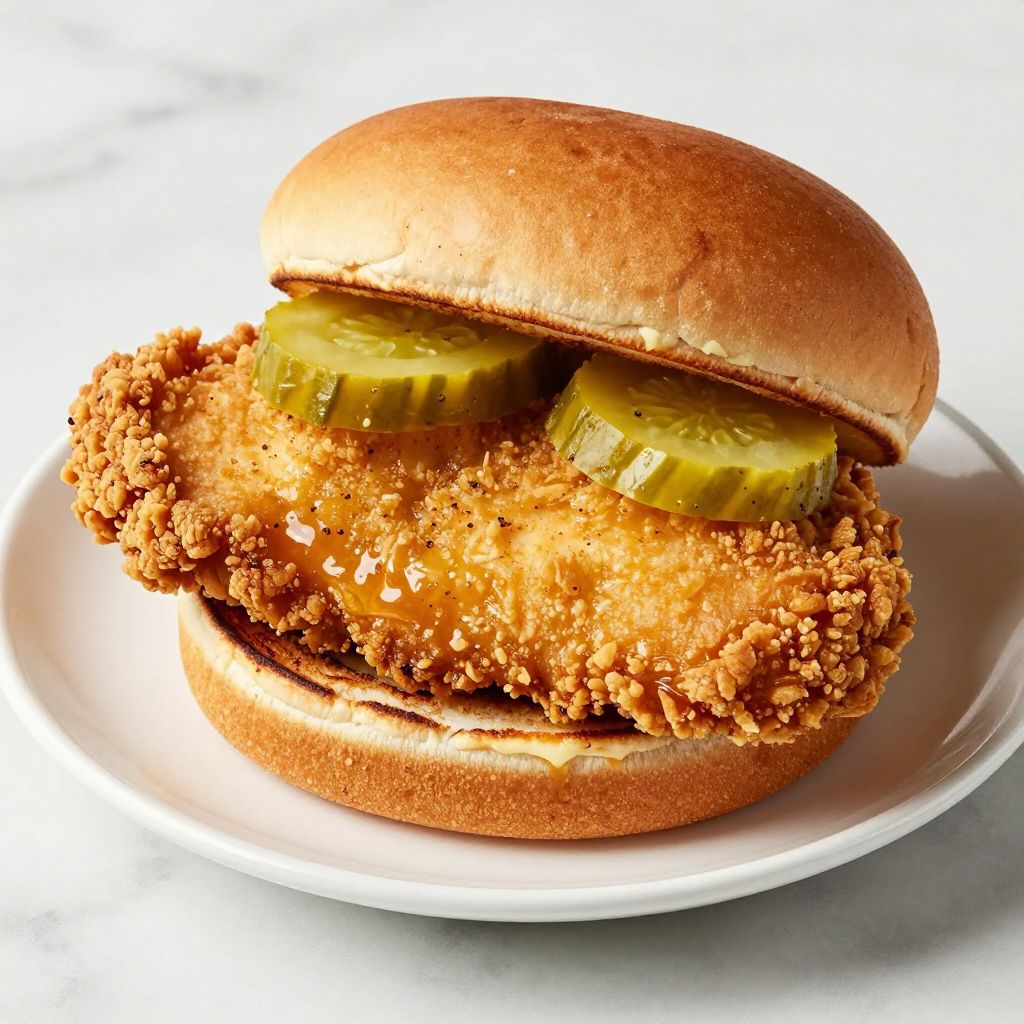
Place your buttered buns on a skillet or griddle over medium heat for about 1 minute per side until they’re lightly golden and warm. Place one chicken breast on each bun, add two dill pickle chips on top, and serve immediately while everything is still warm.
Pro Tip: The secret to keeping the chicken juicy is not to overcook it in the pressure cooker and to ensure it cools slightly before breading, so the coating seals in the moisture during frying.
Tips for the Best Chick-fil-A Chicken
- Pat your chicken completely dry before both pressure cooking and breading, since moisture is the enemy of a crispy crust and even cooking.
- Don’t skip the pressure cooking step even if you want to fry the chicken raw, because the brining liquid creates the tender, juicy texture that defines the recipe.
- Use a meat thermometer to confirm the internal temperature reaches 165 degrees Fahrenheit, which guarantees the chicken is fully cooked without being overdone.
- Keep your oil temperature consistent at 350 degrees Fahrenheit by monitoring it with a thermometer and adjusting the heat as needed between batches.
- Pound the chicken to even thickness before cooking so all pieces finish at the same time and stay juicy throughout.
- Toast the buns with butter to add flavor and prevent them from becoming soggy when the warm chicken sits on top.
Common Mistakes to Avoid
- Skipping the apple cider vinegar in the pressure cooking liquid removes the signature pickle brine flavor that makes this recipe taste like the real thing.
- Using wet chicken for breading causes the flour coating to become pasty and fail to crisp up properly during frying.
- Frying at too high a temperature burns the outside before the inside finishes cooking, resulting in a crispy crust but dried-out chicken.
- Overcrowding the pan when frying drops the oil temperature too much and causes the coating to absorb oil instead of crisping up.
- Stacking the cooked chicken on top of itself before serving causes steam to soften the bottom of the crust and ruins the texture.
Serving Suggestions
This chicken shines on a toasted buttered bun with pickles, but it’s equally delicious in so many other ways that you’ll find yourself making it constantly. Pair it with your favorite sides and sauces to create meals that rival any restaurant version.
- Classic sandwich with pickles, buttered bun, and a drizzle of honey mustard
- Chopped over a fresh green salad with ranch dressing for a lighter meal
- Sliced and served in a wrap with lettuce, tomato, and your favorite sauce
- Diced and mixed into chicken salad with mayo, celery, and grapes
- Served atop mac and cheese for a comforting twist on a classic
Variations to Try
- Spicy version: Add cayenne pepper and hot sauce to the flour mixture and breading for a kick that still maintains the signature flavor profile.
- Breaded nuggets: Cut the pressure-cooked chicken into bite-sized pieces before breading and frying for 2 minutes per side, creating perfect nuggets for dipping.
- Grilled version: Skip the frying and grill the pressure-cooked chicken over medium-high heat for 2 minutes per side for a lighter option.
- Chicken tenders: Cut the flattened chicken into strips before breading and frying for 2 to 3 minutes per side for restaurant-style tenders.
- Buffalo style: Toss the fried chicken in buffalo sauce and serve on a bun with blue cheese dressing and celery for a spicy alternative.
Dietary Adaptations
- Gluten-free: Replace all-purpose flour with a one-to-one gluten-free flour blend and use gluten-free buns for a full gluten-free meal without sacrificing texture.
- Dairy-free: Omit the butter on the buns and use dairy-free milk in the egg wash for a completely dairy-free version that tastes just as good.
- Vegan: Substitute the chicken with extra-firm tofu pressed and sliced, using aquafaba mixed with a tablespoon of cornstarch instead of eggs, though the texture will differ slightly.
- Low-carb/Keto: Skip the bun entirely or use lettuce wraps, and the chicken itself remains completely keto-friendly as is.
Storage and Reheating
Refrigerator
Store cooked chicken in an airtight container on the bottom shelf of your refrigerator for up to 4 days. You can also refrigerate the unbreaded pressure-cooked chicken before frying if you prefer to fry it fresh later.
- Keep unbreaded cooked chicken in an airtight container for up to 3 days
- Store breaded uncooked chicken on a parchment-lined plate in the fridge for up to 24 hours before frying
Freezer
Freeze unbreaded pressure-cooked chicken in a freezer-safe container or bag for up to 3 months, or freeze breaded uncooked pieces on a baking sheet before transferring to a freezer bag for up to 2 months. Freezing the breaded uncooked chicken makes it convenient to fry fresh whenever you want.
- Flash freeze breaded pieces on a baking sheet for 2 hours before transferring to a freezer bag
- Thaw pressure-cooked chicken in the refrigerator overnight before breading and frying
Reheating
To restore crispiness to leftover fried chicken, reheat it in a 350-degree Fahrenheit oven for 5 to 8 minutes rather than using the microwave. You can also reheat it in an air fryer at 350 degrees for 3 to 5 minutes for excellent results.
- Oven method: Place on a baking sheet and heat at 350 degrees for 5 to 8 minutes until warmed through
- Air fryer method: Cook at 350 degrees for 3 to 5 minutes for maximum crispiness
- Stovetop method: Reheat gently in a covered skillet over low heat for 2 to 3 minutes to avoid splattering
Nutrition Information
| Nutrient | Amount |
|---|---|
| Calories | 420 |
| Total Fat | 18g |
| Saturated Fat | 4g |
| Carbohydrates | 28g |
| Fiber | 1g |
| Sugar | 2g |
| Protein | 38g |
| Sodium | 680mg |
| Cholesterol | 125mg |
Nutrition information is calculated based on standard ingredients and serving sizes, but actual values may vary depending on your specific ingredients and preparation methods.
Frequently Asked Questions
Can I make this recipe without a pressure cooker?
Yes, you can boil the chicken in a pot of salted water with apple cider vinegar for 12 to 15 minutes until fully cooked, though the texture may not be quite as tender. The pressure cooker speeds up the process and creates extra tenderness, but boiling still produces good results.
How can I make this ahead of time?
Pressure cook and cool the chicken up to 2 days ahead, then bread and fry it fresh when you’re ready to eat. You can also bread the chicken and freeze it for up to a month before frying straight from the freezer, adding just 1 to 2 minutes to the frying time.
What’s the best way to store leftover chicken?
Store it in an airtight container in the refrigerator for up to 4 days, or freeze it for up to 3 months for later use. Reheat it in the oven or air fryer to restore crispiness instead of using the microwave.
Why is my chicken coming out dry?
You’re likely overcooking it in the pressure cooker or frying it too long at too high a temperature. Set the pressure cooker to exactly 8 minutes and keep the oil at 350 degrees for perfectly moist chicken.
Can I use frozen chicken breasts?
Yes, increase the pressure cooking time to 10 to 12 minutes if cooking from frozen, making sure the breasts are still even in thickness. Thawing the
Chick-fil-A Chicken Sandwich
Ingredients
Equipment
Method
- Remove the chicken breasts from the refrigerator and pat them dry with paper towels. Using a meat mallet or the bottom of a heavy pan, gently pound each chicken breast to an even thickness of about three-quarters of an inch.
- Pour 2 cups of water into your pressure cooker and add 2 tablespoons of apple cider vinegar, 1 teaspoon of salt, 1/2 teaspoon of black pepper, 1/2 teaspoon of garlic powder, and 1/4 teaspoon of onion powder. Place the trivet inside the pressure cooker and arrange the flattened chicken breasts on top.
- Close the lid and cook on high pressure for 8 minutes. Once the cooking time is complete, carefully quick-release the pressure by turning the vent valve to the release position. Allow the steam to escape for about 30 seconds before opening the lid fully.
- Remove the chicken breasts with tongs and place them on a clean cutting board to cool for about 5 minutes. Once cool enough to handle, pat the chicken dry again with paper towels to remove any excess moisture.
- Combine 1 cup of all-purpose flour, 1 teaspoon of salt, 1/2 teaspoon of black pepper, 1/2 teaspoon of garlic powder, and 1/4 teaspoon of paprika in a shallow bowl. In a second shallow bowl, whisk together 2 eggs and 2 tablespoons of milk.
- Working with one chicken breast at a time, dip it into the egg wash until fully coated, then dredge it in the seasoned flour mixture, pressing gently so the coating adheres evenly. Shake off any excess flour and place the breaded chicken on a clean plate.
- Pour about 2 cups of vegetable oil into a cast-iron skillet or heavy-bottomed pan and heat it to 350 degrees Fahrenheit. Carefully place the breaded chicken breasts into the hot oil and fry for 3 to 4 minutes on the first side until golden brown, then flip and fry for another 3 to 4 minutes until the second side is equally golden and the internal temperature reaches 165 degrees Fahrenheit.
- Remove the fried chicken from the oil using tongs and place it on a plate lined with paper towels to drain excess oil. Let the chicken rest for 2 to 3 minutes.
- Place your buttered buns on a skillet or griddle over medium heat for about 1 minute per side until lightly golden and warm. Place one chicken breast on each bun, add two dill pickle chips on top, and serve immediately.