The first time I scraped the seeds from a vanilla bean, I felt like I was holding something precious. That deep, floral aroma hit me instantly, and I understood why real vanilla costs more than silver by weight.
Vanilla bean paste gives you that same luxurious experience without the fuss of splitting pods every time you bake. Those gorgeous black specks throughout your custards and cakes tell everyone you mean business.
Making your own paste at home costs a fraction of store-bought versions and lets you control the intensity. The process takes minimal effort but rewards you with a pantry staple that transforms ordinary desserts into something extraordinary. Ready to turn a handful of vanilla beans into liquid gold?
Why You’ll Love This Recipe
This homemade vanilla bean paste delivers professional results with surprisingly little hands-on time. Once you taste the difference, those tiny bottles at the grocery store will never tempt you again.
- Costs roughly one-third the price of premium store-bought paste
- Takes under 30 minutes of active preparation time
- Stores beautifully for up to two years in your refrigerator
- Contains no artificial thickeners, corn syrup, or mystery ingredients
- Makes an impressive homemade gift for any baker in your life
My Experience Making This Recipe
I started making my own vanilla bean paste three years ago after spending an embarrassing amount on a tiny jar that lasted exactly two baking sessions. The first batch taught me patience, and the second batch taught me that more beans always equals better results.
The aroma that fills your kitchen while the paste simmers is honestly intoxicating. My neighbors have knocked on my door asking what perfume I was wearing, only to learn it was vanilla steam wafting through the windows.
Every batch I make now gets divided into small jars for holiday gifts. Friends who bake have literally offered to pay me for refills, which tells you everything about how this compares to commercial options.
Recipe Overview
- Recipe Name: Homemade Vanilla Bean Paste
- Servings: Approximately 1 cup (48 teaspoons)
- Prep Time: 20 minutes
- Cook Time: 25 minutes
- Total Time: 45 minutes plus cooling
- Course: Pantry Staple, Baking Essential
- Cuisine: International
- Calories per Serving: 15 calories per teaspoon
Equipment You Will Need
- Sharp paring knife
- Cutting board
- Small heavy-bottomed saucepan
- Wooden spoon or silicone spatula
- Fine-mesh strainer (optional)
- Glass jar with tight-fitting lid
- Measuring cups and spoons
- Blender or food processor (optional for smoother paste)
Ingredients for Vanilla Bean Paste
- 10 vanilla beans, Grade B preferred
- 1 cup granulated sugar
- 3/4 cup water
- 2 tablespoons light corn syrup or golden syrup
- 1 teaspoon pure vanilla extract
- Pinch of salt
Ingredient Notes and Substitutions
- Vanilla beans: Grade B beans (also called extract grade) work perfectly here because appearance matters less than flavor. Madagascar Bourbon beans offer classic vanilla taste, while Tahitian beans provide floral notes.
- Granulated sugar: Creates the syrupy base and acts as a natural preservative. Substitute with coconut sugar for a deeper, almost caramel undertone.
- Corn syrup: Prevents crystallization and adds smooth texture. Golden syrup, agave nectar, or honey all work as replacements.
- Vanilla extract: Boosts the vanilla flavor during cooking. Skip it if you want a purely bean-based paste, though the result will be slightly less intense.
- Water: Filtered water produces the cleanest taste. Tap water works fine if yours tastes neutral.
How to Make Vanilla Bean Paste
Step 1: Prepare Your Vanilla Beans
Lay each vanilla bean flat on your cutting board and slice it lengthwise with a sharp paring knife. Hold the bean steady and run the back of your knife along the inside to scrape out all those precious seeds.
Collect the seeds in a small bowl and set the scraped pods aside. Those empty pods contain tons of flavor and will simmer in your syrup, so do not throw them away.
Step 2: Chop the Empty Pods
Cut the scraped vanilla bean pods into small pieces, roughly half-inch segments. Smaller pieces release more flavor into your syrup during cooking.
The pods might feel leathery and tough, which is completely normal. They will soften considerably as they simmer.
Step 3: Create the Sugar Syrup Base
Combine the sugar, water, and corn syrup in your saucepan over medium heat. Stir gently until the sugar dissolves completely, which takes about three to four minutes.
Avoid stirring vigorously once the sugar dissolves, as this can cause crystallization on the sides of the pan. A gentle swirl of the pan works better than aggressive stirring.
Step 4: Add the Vanilla Components
Drop the chopped vanilla pods into the sugar syrup and add all the scraped seeds. Stir gently to distribute the seeds throughout the liquid.
The seeds will float initially but will disperse as the mixture heats. Add your pinch of salt now to round out the sweetness.
Step 5: Simmer Until Thickened
Reduce the heat to low and let the mixture simmer gently for 20 to 25 minutes. Stir occasionally to prevent the bottom from scorching.
The syrup should reduce by about one-third and coat the back of a spoon. Low heat matters here because high heat can caramelize the sugar and change your flavor profile.
Step 6: Add the Vanilla Extract
Remove the saucepan from heat and stir in the vanilla extract. The extract boosts the vanilla intensity and adds complexity to your paste.
Adding it off heat preserves the delicate alcohol-based flavor compounds that would evaporate if added during active cooking.
Step 7: Process to Your Desired Consistency
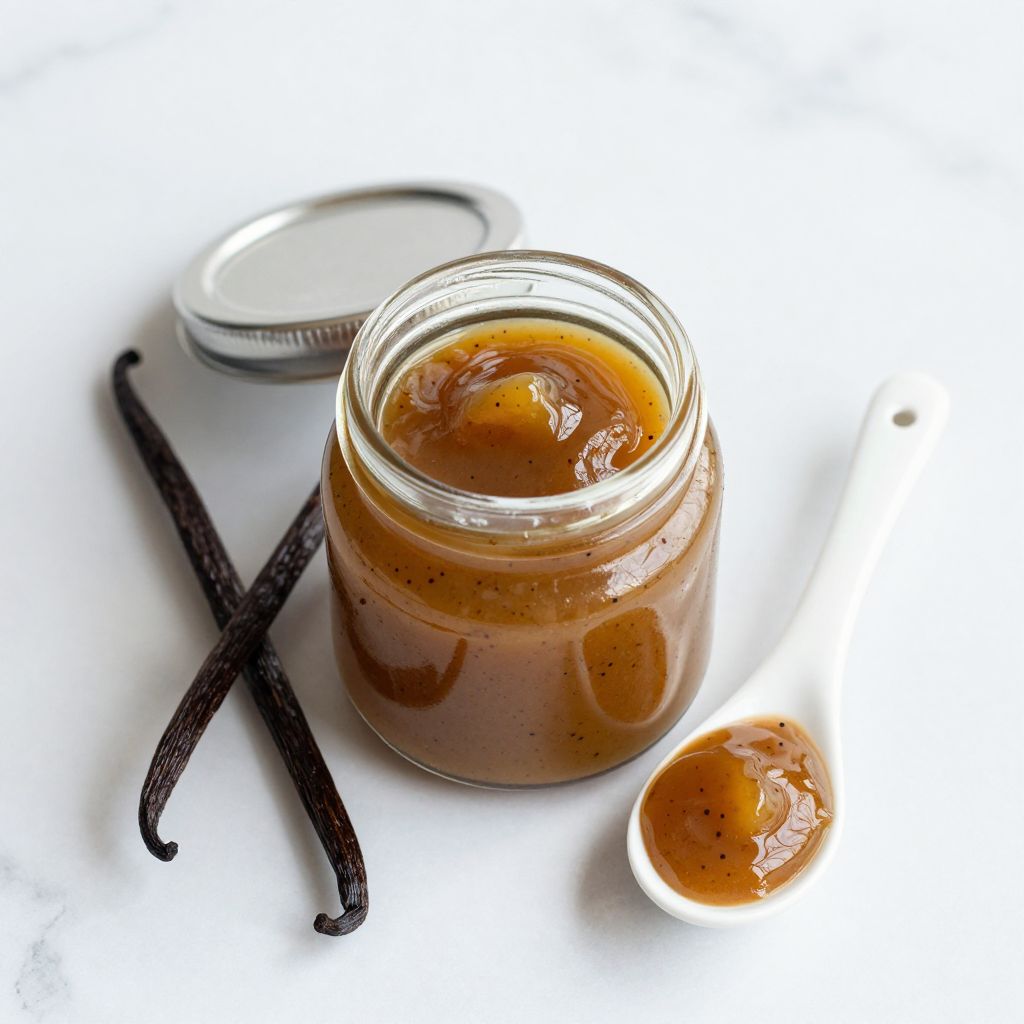
For a chunkier paste with visible pod pieces, simply let the mixture cool as is. For a smoother consistency, transfer everything to a blender once cooled slightly and pulse until you reach your preferred texture.
Some bakers strain out the pod pieces entirely, though I prefer leaving them in for maximum flavor extraction during storage.
Step 8: Cool and Store Properly
Let the paste cool completely to room temperature before transferring to a clean glass jar. The paste will thicken significantly as it cools.
Seal the jar tightly and store in your refrigerator. The paste actually improves over the first week as the flavors meld and intensify.
Pro Tip: Save any vanilla beans that seem too dry or old for other uses. They work beautifully in this paste because the simmering process rehydrates them and extracts every last bit of flavor.
Tips for the Best Vanilla Bean Paste
- Buy vanilla beans in bulk online where prices drop dramatically compared to grocery store packages of two or three beans.
- Use Grade B beans specifically for paste making since they contain more moisture and flavor compounds than Grade A display beans.
- Keep your heat genuinely low during simmering because even medium heat can push the syrup toward caramelization.
- Store your paste in the coldest part of your refrigerator, not the door where temperatures fluctuate.
- Use a clean, dry spoon every time you dip into your paste to prevent introducing bacteria or moisture.
- Make a double batch once you realize how quickly you go through it in cookies, cakes, and custards.
Common Mistakes to Avoid
- Using high heat: Rushing the process with high heat caramelizes the sugar, turning your vanilla paste brown and giving it a butterscotch flavor instead of pure vanilla.
- Skipping the corn syrup: Without an invert sugar, your paste will crystallize in the jar and become grainy within weeks.
- Scraping beans carelessly: Leaving seeds behind in the pods wastes the most valuable part. Take your time and scrape thoroughly.
- Storing while still warm: Condensation forms inside warm jars, introducing moisture that can promote mold growth.
- Using old, dried-out beans without adjusting: Extremely desiccated beans need a longer simmer time to release their flavor fully.
Serving Suggestions
This vanilla bean paste substitutes one-to-one for vanilla extract in any recipe, though it shines brightest in applications where you want visible vanilla specks. Use it anywhere you want that unmistakable vanilla punch.
- Swirl into buttercream frosting for speckled vanilla cupcakes
- Stir into homemade ice cream base before churning
- Add to whipped cream for an elegant dessert topping
- Mix into pancake or waffle batter for weekend breakfast upgrades
- Blend into smoothies or milkshakes for authentic vanilla flavor
Variations to Try
- Bourbon vanilla paste: Replace two tablespoons of water with actual bourbon whiskey for a deeper, more complex adult version perfect for holiday baking.
- Tahitian floral paste: Use Tahitian vanilla beans exclusively for a lighter, more perfumed paste ideal for fruit desserts and delicate pastries.
- Mexican vanilla paste: Mexican beans add a slightly spicy, woody character that pairs beautifully with chocolate recipes.
- Honey vanilla paste: Substitute honey for corn syrup and reduce sugar by one-quarter cup for a paste with natural sweetness and floral undertones.
- Coffee vanilla paste: Add one tablespoon of espresso powder during simmering for a mocha-influenced paste that elevates brownies and chocolate cakes.
Dietary Adaptations
- Gluten free: This recipe is naturally gluten-free as written with no modifications needed.
- Dairy free: Contains no dairy ingredients whatsoever, making it safe for dairy-free diets.
- Vegan: Substitute agave nectar or maple syrup for corn syrup to ensure completely plant-based ingredients.
- Low carb or keto: Replace sugar with allulose or a monk fruit blend, and use sugar-free syrup alternatives, though texture may differ slightly.
Storage and Reheating
Refrigerator
Properly stored vanilla bean paste keeps for up to two years in the refrigerator. The high sugar content acts as a natural preservative.
- Store in a glass jar with an airtight seal
- Keep away from strong-smelling foods
- Always use clean, dry utensils when scooping
Freezer
Freezing extends shelf life indefinitely, though refrigeration works perfectly for most home bakers. Frozen paste thaws quickly at room temperature.
- Freeze in ice cube trays for portioned amounts
- Transfer frozen cubes to freezer bags
- Thaw in refrigerator overnight before using
Reheating
Vanilla bean paste rarely needs reheating, though cold paste can thicken considerably. Gentle warming restores a more pourable consistency.
- Set the jar in warm water for five minutes
- Microwave in short five-second bursts if needed
- Stir well after warming to redistribute seeds
Nutrition Information
| Nutrient | Amount |
|---|---|
| Calories | 15 |
| Total Fat | 0g |
| Saturated Fat | 0g |
| Carbohydrates | 4g |
| Fiber | 0g |
| Sugar | 4g |
| Protein | 0g |
| Sodium | 1mg |
| Cholesterol | 0mg |
Nutritional values are estimates based on one-teaspoon serving size. Actual values may vary based on specific ingredients used and exact measurements.
Frequently Asked Questions
Can I use vanilla extract instead of vanilla bean paste in recipes?
Absolutely, they substitute one-to-one in most recipes. The main difference is visual since paste contains those beautiful vanilla specks that extract lacks.
How far in advance can I make vanilla bean paste?
You can make it months or even a year ahead since it actually improves with age. The flavors continue melding and deepening during storage.
Why did my paste crystallize in the jar?
Crystallization usually happens when corn syrup or another invert sugar gets skipped. Adding a tablespoon of corn syrup when remaking prevents this issue.
Can I use dried out vanilla beans for this recipe?
Dried beans work wonderfully here because the simmering rehydrates them. Just extend your cooking time by five to ten minutes to extract full flavor.
What causes vanilla paste to turn brown during cooking?
Brown paste indicates your heat was too high and the sugar began caramelizing. Use genuinely low heat and watch carefully during the final ten minutes of simmering.
Final Thoughts
Making your own vanilla bean paste feels like a small act of kitchen rebellion against overpriced specialty ingredients. The process takes less than an hour, and the results genuinely outperform anything you can buy.
Once you stock your refrigerator with a jar of homemade paste, every baking project gets an instant upgrade. Give this recipe a try and taste what real vanilla should be.
Homemade Vanilla Bean Paste
Ingredients
Equipment
Method
- Lay each vanilla bean flat on your cutting board and slice it lengthwise with a sharp paring knife. Hold the bean steady and run the back of your knife along the inside to scrape out all the seeds. Collect the seeds in a small bowl and set the scraped pods aside.
- Cut the scraped vanilla bean pods into small pieces, roughly half inch segments. Smaller pieces release more flavor into your syrup during cooking.
- Combine the sugar, water, and corn syrup in your saucepan over medium heat. Stir gently until the sugar dissolves completely, about 3 to 4 minutes. Avoid stirring vigorously once the sugar dissolves.
- Drop the chopped vanilla pods into the sugar syrup and add all the scraped seeds. Stir gently to distribute the seeds throughout the liquid. Add your pinch of salt now to round out the sweetness.
- Reduce the heat to low and let the mixture simmer gently for 20 to 25 minutes, stirring occasionally to prevent the bottom from scorching. The syrup should reduce by about one third and coat the back of a spoon.
- Remove the saucepan from heat and stir in the vanilla extract. Adding it off heat preserves the delicate alcohol based flavor compounds.
- For a chunkier paste with visible pod pieces, let the mixture cool as is. For a smoother consistency, transfer everything to a blender once cooled slightly and pulse until you reach your preferred texture.
- Let the paste cool completely to room temperature before transferring to a clean glass jar. The paste will thicken significantly as it cools. Seal the jar tightly and store in your refrigerator.