
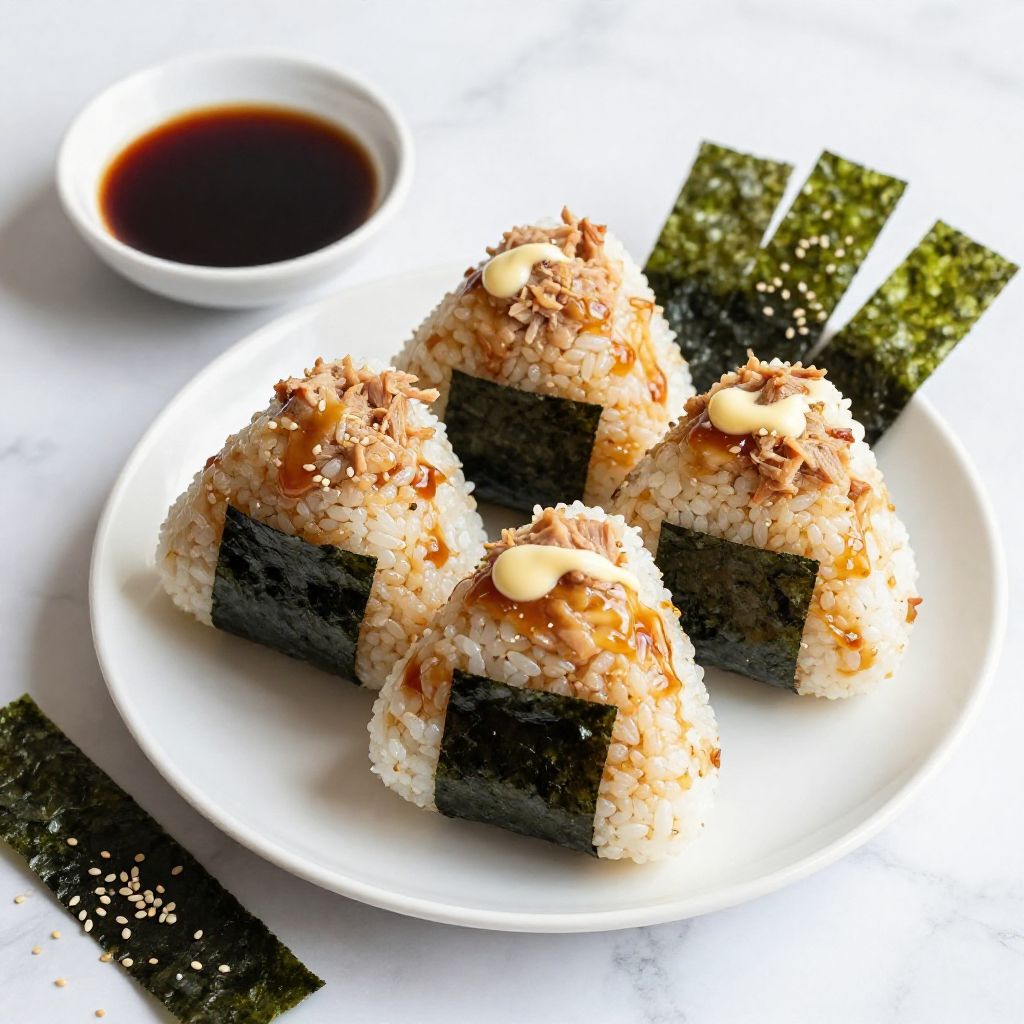
Picture this: you’re sitting on a picnic blanket, the sun shining down, and you take a bite of a perfectly shaped rice ball filled with savory tuna. That’s the magic of Tuna Onigiri. This Japanese treat is not just delicious; it’s also versatile, easy to make, and perfect for any occasion. Whether you’re packing lunch for work or planning a fun family meal, these rice balls deliver on flavor and texture, making them a delightful addition to your culinary repertoire. Let’s get started with the ingredients and steps you need to create your own little bundles of joy!
Why You’ll Love This Recipe
This recipe is a must-try for anyone who loves simple yet flavorful meals.
- Quick to prepare, making it perfect for busy weeknights.
- Customizable filling options to suit your taste.
- Great for lunchboxes or as a snack on the go.
- Offers a delightful mix of flavors and textures.
My Experience Making This Recipe
When I first made Tuna Onigiri, I was immediately drawn to the satisfying feel of molding the rice into those perfect triangles. The aroma of the seasoned rice combined with the tuna filling took me back to my favorite Japanese restaurant.
My family couldn’t get enough of these rice balls. They were gone in minutes, and I found myself happily making a second batch. The joy of watching everyone enjoy each bite was the icing on the cake!
Recipe Overview
- Recipe Name: Tuna Onigiri
- Servings: 4
- Prep Time: 15 minutes
- Cook Time: 20 minutes
- Total Time: 35 minutes
- Course: Snack, Lunch
- Cuisine: Japanese
- Calories per Serving: Approximately 250
Equipment You Will Need
- Rice cooker or pot
- Bowl for mixing
- Plastic wrap or onigiri molds
- Measuring cups and spoons
- Sharp knife
Ingredients for Tuna Onigiri
- 2 cups short-grain sushi rice
- 2 1/2 cups water
- 1 can (5 oz) tuna, drained
- 2 tablespoons mayonnaise
- 1 tablespoon soy sauce
- 1 teaspoon rice vinegar
- Salt to taste
- Nori sheets (seaweed), cut into strips
Ingredient Notes and Substitutions
- Sushi rice: This rice gives the right stickiness. You can use short-grain brown rice for a healthier option.
- Tuna: Canned tuna is convenient. Substitute with cooked salmon or chicken for a different flavor.
- Mayonnaise: It adds creaminess. Use Greek yogurt for a lighter alternative.
- Rice vinegar: Balances flavors. Apple cider vinegar works as a substitute.
How to Make Tuna Onigiri
Step 1: Rinse the Rice
Start by rinsing the sushi rice under cold water until the water runs clear. This removes excess starch, ensuring fluffy rice.
Step 2: Cook the Rice
Combine the rinsed rice and water in your rice cooker or pot. Cook according to your rice cooker’s instructions or bring to a boil, then simmer on low for about 18 minutes.
Step 3: Prepare the Filling
In a bowl, mix the drained tuna with mayonnaise, soy sauce, and rice vinegar. This creates a creamy, flavorful filling for your onigiri.
Step 4: Season the Rice
Once the rice is cooked, let it cool slightly. Add salt to taste and mix gently to season the rice evenly.
Step 5: Shape the Onigiri
Lay a piece of plastic wrap on your work surface. Scoop a portion of rice (about a handful) onto the wrap, making a small indentation in the center.
Step 6: Add the Filling
Place a spoonful of the tuna mixture into the indentation. This adds a burst of flavor to every bite.
Step 7: Mold the Rice
Wrap the plastic around the rice and press firmly to form a triangle shape. This helps the onigiri hold together while also giving it a nice appearance.
Step 8: Garnish and Serve
Unwrap the onigiri and wrap a strip of nori around each rice ball. This not only adds flavor but also makes them easy to hold.
Pro Tip: Make sure to wet your hands with water when handling the rice to prevent it from sticking to your fingers.
Tips for the Best Tuna Onigiri
- Use fresh sushi rice for the best texture.
- Experiment with different fillings like avocado or pickled vegetables.
- Keep the rice covered with a damp cloth to prevent it from drying out.
- Make a larger batch and refrigerate for easy meals throughout the week.
- Serve with soy sauce and pickled ginger for added flavor.
Common Mistakes to Avoid
- Skipping the rinsing step can lead to gummy rice.
- Not letting the rice cool slightly can make shaping difficult.
- Overfilling the onigiri can cause them to break apart.
- Using long-grain rice will result in a different texture.
Serving Suggestions
Tuna Onigiri pairs beautifully with various sides or drinks, enhancing your meal experience.
- Japanese pickles for a tangy crunch.
- Miso soup for a warm and comforting addition.
- Edamame for a protein-rich side.
- A refreshing salad to balance the meal.
Variations to Try
- Spicy Tuna: Add sriracha to the filling for a spicy kick.
- Vegetable Onigiri: Replace tuna with a mix of sautéed vegetables.
- Salmon Onigiri: Swap tuna for cooked salmon for a different flavor.
- Sesame Onigiri: Mix sesame seeds into the rice for added crunch.
Dietary Adaptations
- Gluten-free: Ensure your soy sauce is gluten-free.
- Dairy-free: Use vegan mayo instead of regular mayonnaise.
- Vegan/Vegetarian: Substitute tuna with tofu or tempeh.
- Low-carb/Keto: Use cauliflower rice instead of sushi rice.
Storage and Reheating
Refrigerator
Store leftover onigiri in an airtight container in the fridge.
- They will last up to 2 days.
- Wrap them individually for easy access.
Freezer
For longer storage, freeze uncooked onigiri.
- Wrap tightly in plastic wrap and place in a freezer bag.
- Thaw in the fridge before serving.
Reheating
Reheat onigiri in a microwave for about 30 seconds.
- Cover with a damp paper towel to keep the rice moist.
Nutrition Information
| Nutrient | Amount |
|---|---|
| Calories | 250 |
| Total Fat | 10g |
| Saturated Fat | 1.5g |
| Carbohydrates | 34g |
| Fiber | 1g |
| Sugar | 1g |
| Protein | 9g |
| Sodium | 350mg |
| Cholesterol | 20mg |
Nutrition values are approximate and may vary based on ingredient brands and preparation methods.
Frequently Asked Questions
Can I use brown rice instead of white rice?
Yes, brown rice can be used, but it may require a longer cooking time and will have a different texture.
How can I make onigiri ahead of time?
Prepare the rice and filling in advance, but mold them into onigiri just before serving to maintain freshness.
Can I freeze onigiri?
Yes, uncooked onigiri can be frozen and thawed before cooking, but they are best enjoyed fresh.
What if my rice is too sticky?
This can happen if the rice is overcooked. Make sure to follow the cooking time and water measurements closely.
Can I add other fillings?
Absolutely! Feel free to experiment with fillings like pickled vegetables or grilled chicken for variety.
Final Thoughts
I hope you give this Tuna Onigiri recipe a try. It’s not just tasty; it’s a fun culinary project that everyone can enjoy.
So gather your ingredients and get rolling! For more delicious ideas, check out my ahi tuna recipe or try my tuna burger recipe.
Tuna Onigiri
Ingredients
Equipment
Method
- Rinse the sushi rice under cold water until the water runs clear.
- Combine the rinsed rice and water in your rice cooker or pot and cook according to the rice cooker's instructions or bring to a boil, then simmer on low for about 18 minutes.
- In a bowl, mix the drained tuna with mayonnaise, soy sauce, and rice vinegar.
- Once the rice is cooked, let it cool slightly, then add salt to taste and mix gently.
- Lay a piece of plastic wrap on your work surface, scoop a portion of rice onto the wrap, and make a small indentation in the center.
- Place a spoonful of the tuna mixture into the indentation.
- Wrap the plastic around the rice and press firmly to form a triangle shape.
- Unwrap the onigiri and wrap a strip of nori around each rice ball.