Crumpet recipe lovers, this one is for you. These golden, spongy British breakfast treats with their signature honeycomb tops are easier to make at home than you might think.
With just a handful of pantry staples and a little patience for the yeast to work its magic, you can create crumpets that rival any bakery. Let me walk you through everything you need to know to nail this classic recipe.
Why You’ll Love This Recipe
Homemade crumpets deliver a satisfaction that store bought versions simply cannot match. Here is what makes this recipe a winner.
- Uses only 6 basic ingredients you probably already have
- Creates that perfect honeycomb texture on top for butter pooling
- Costs a fraction of shop bought crumpets
- Freezes beautifully for quick weekday breakfasts
- Impressive enough for weekend brunch guests
My Experience Making This Recipe
The first time I made crumpets, I honestly expected disaster. The batter looked suspiciously thick, and I questioned everything I knew about breakfast foods.
But then the magic happened. As soon as the batter hit the hot pan, those iconic bubbles started forming and I felt like a proper British grandmother. The smell of warm, yeasty dough filled my kitchen.
My family devoured the entire batch in minutes, and I had to make a second round. The crispy edges and pillowy centers soaked up butter like tiny edible sponges, which is exactly what you want.
Recipe Overview
- Recipe Name: Homemade Crumpets
- Servings: 8 crumpets
- Prep Time: 15 minutes
- Cook Time: 30 minutes
- Total Time: 1 hour 45 minutes (including rising)
- Course: Breakfast, Snack
- Cuisine: British
- Calories per Serving: 142 kcal
Equipment You Will Need
- Large mixing bowl
- Whisk or wooden spoon
- Non stick frying pan or griddle
- Metal crumpet rings or egg rings (3.5 inch diameter)
- Measuring cups and spoons
- Kitchen thermometer (optional but helpful)
- Spatula or palette knife
- Clean kitchen towel
Ingredients for Crumpets
- 225g plain flour (1 and 3/4 cups)
- 1 teaspoon instant yeast
- 1 teaspoon caster sugar
- 1/2 teaspoon fine salt
- 300ml warm milk (about 110F or 43C)
- 1/4 teaspoon bicarbonate of soda dissolved in 2 tablespoons warm water
- Butter or oil for greasing the rings
Ingredient Notes and Substitutions
- Plain flour: Provides the structure and chewiness crumpets need. Self raising flour will not work here since we need yeast for proper fermentation.
- Instant yeast: Creates the fermentation that produces those signature holes. Active dry yeast works too but needs activating in the warm milk first for 5 minutes.
- Warm milk: Activates the yeast and adds richness to the crumpets. Substitute with warm water for a dairy free version, though the flavor will be slightly less rich.
- Caster sugar: Feeds the yeast and adds subtle sweetness. Regular granulated sugar works as a direct substitute.
- Bicarbonate of soda: Creates extra lift and helps form more surface bubbles. Do not skip this as it is key to the texture.
How to Make Crumpets
Step 1: Combine the Dry Ingredients
Add the flour, instant yeast, sugar, and salt to a large mixing bowl. Whisk them together until evenly distributed, which ensures every crumpet has consistent flavor and rise.
Step 2: Add the Warm Milk
Pour the warm milk into the dry ingredients gradually. The milk temperature matters here because too hot kills the yeast and too cold slows it down significantly.
Whisk vigorously until you have a smooth, thick batter with no lumps remaining.
Step 3: Let the Batter Rise
Cover the bowl with a clean kitchen towel or plastic wrap. Leave it in a warm spot for about 1 hour until the batter has doubled in size and looks bubbly on top.
This resting time develops the flavor and creates the air pockets that will become your crumpet holes.
Step 4: Add the Bicarbonate of Soda
Dissolve the bicarbonate of soda in the warm water and stir it into the risen batter. You will see the batter become even more airy and foamy, which is exactly what you want.
Let this mixture rest for another 15 minutes to allow the reaction to complete.
Step 5: Prepare Your Pan and Rings
Place your frying pan over low heat and let it warm up gradually. Grease the inside of your crumpet rings generously with butter or oil.
Low heat is critical here because it allows the crumpets to cook through slowly while forming those beautiful holes on top.
Step 6: Pour the Batter
Place the greased rings in the pan and pour about 2 tablespoons of batter into each ring. The batter should be about 1cm deep.
If the batter is too thick to pour, add a splash of warm water. If it spreads too thin, your batter may have over proofed.
Step 7: Cook Until Holes Form
Cook on low heat for 8 to 10 minutes without touching them. Watch as bubbles rise to the surface and burst, creating the classic crumpet texture.
The top should look dry and set, with plenty of holes dotting the surface. Patience is your friend during this step.
Step 8: Remove the Rings and Flip
Once the top is fully set, carefully remove the rings using a cloth to protect your hands. Flip the crumpets and cook for just 1 to 2 minutes more to lightly brown the top.
The underside should be a gorgeous golden brown while the top stays pale with all those lovely holes intact.
Pro Tip: If your holes are not forming properly, your pan is likely too hot. Reduce the heat and give it a minute to cool down before pouring the next batch.
Tips for the Best Crumpets
- Keep the heat genuinely low. Most people cook crumpets too hot, which seals the surface before bubbles can form.
- Grease your rings between every batch to prevent sticking and heartbreak.
- Let the batter rest the full time. Rushing fermentation gives you dense, hole free disappointments.
- Use a thermometer to check your milk temperature if you have one. The 105F to 115F range is ideal for yeast activation.
- Do not flip too early. The top must be completely set with no wet batter visible.
- Work in batches of 2 to 3 crumpets at a time to maintain consistent pan temperature.
Common Mistakes to Avoid
- Using hot milk: Temperatures above 120F kill yeast instantly, leaving you with flat, dense discs.
- Skipping the bicarbonate of soda: This ingredient creates extra bubbles and lift that yeast alone cannot achieve.
- Cooking on high heat: The surface seals too quickly and prevents those characteristic holes from forming.
- Not greasing the rings enough: Crumpets will stick and tear when you try to remove them, ruining your presentation.
- Flipping too soon: Wet batter on top means an undercooked, gummy center that no amount of toasting will fix.
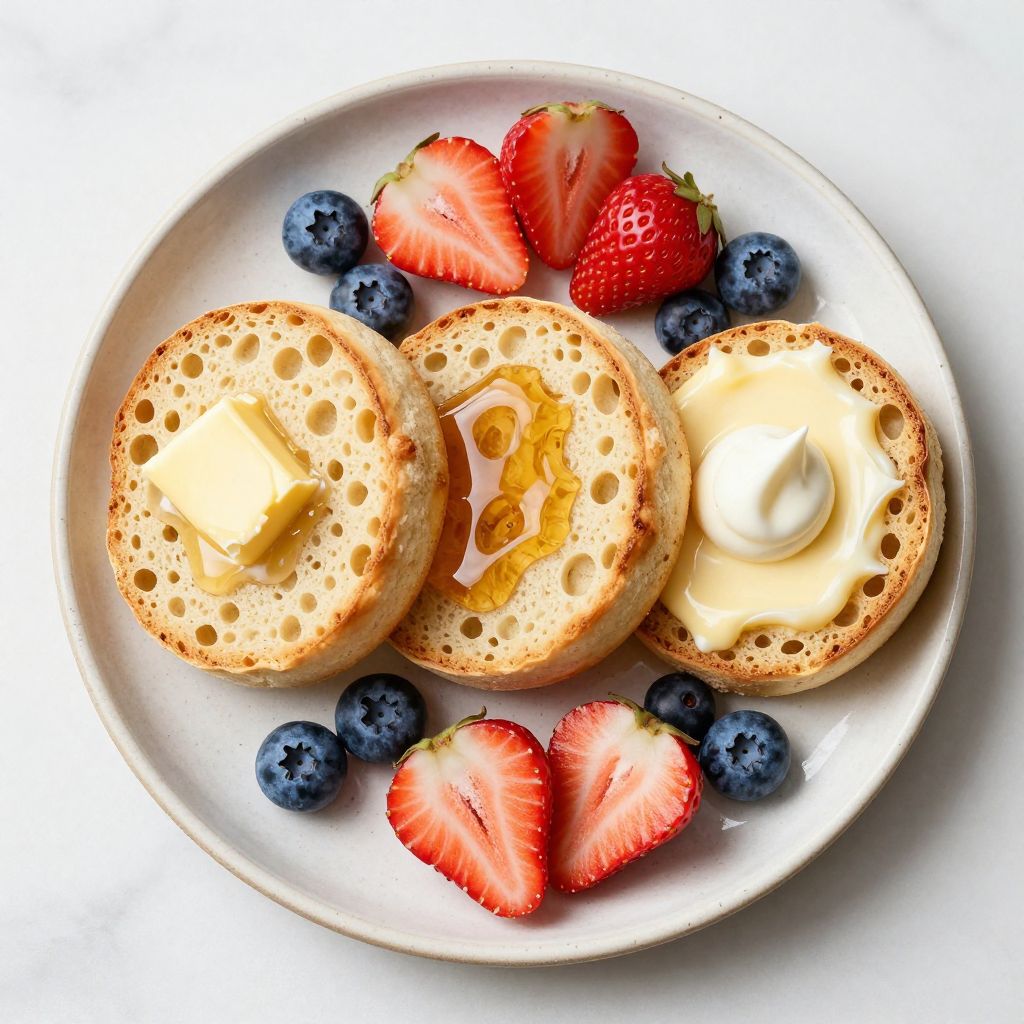
Serving Suggestions
Fresh crumpets deserve proper toppings that soak into all those wonderful holes. Toast them until the edges crisp up and the surface turns golden.
- Generous butter and a drizzle of golden syrup
- Salted butter with Marmite for the adventurous
- Cream cheese and smoked salmon for a savory option
- Lemon curd and clotted cream for afternoon tea
- Peanut butter and sliced banana for a hearty breakfast
Variations to Try
- Cinnamon sugar crumpets: Add 1 teaspoon of ground cinnamon to the batter for a warm, spiced flavor that pairs beautifully with maple syrup.
- Cheese crumpets: Sprinkle grated cheddar on top during the last minute of cooking for a savory twist.
- Sourdough crumpets: Replace half the flour and milk with 150g of sourdough discard for a tangy depth.
- Wholemeal crumpets: Substitute half the plain flour with wholemeal flour for added fiber and a nuttier taste.
- Blueberry crumpets: Drop a few fresh blueberries onto the batter right after pouring for fruity pockets of sweetness.
Dietary Adaptations
- Gluten free: Use a one to one gluten free flour blend, though the texture will be slightly denser and less chewy.
- Dairy free: Replace milk with oat milk or almond milk for a completely dairy free version with minimal taste difference.
- Vegan: Use plant based milk and the recipe is already vegan friendly since there are no eggs involved.
- Lower carb: Unfortunately, crumpets rely heavily on flour for structure, so a true low carb version is not feasible without significant compromise.
Storage and Reheating
Refrigerator
Cooled crumpets keep well in the fridge for up to 5 days.
- Store in an airtight container or sealed plastic bag
- Separate layers with parchment paper to prevent sticking
Freezer
Crumpets freeze beautifully for up to 3 months.
- Freeze individually on a baking sheet first, then transfer to a freezer bag
- No need to thaw before toasting
Reheating
Toast from chilled or frozen until golden and heated through.
- Use a toaster on medium setting for best results
- A dry frying pan over medium heat works equally well
- Microwave for 20 seconds if you want soft rather than crispy
Nutrition Information
| Nutrient | Amount |
|---|---|
| Calories | 142 kcal |
| Total Fat | 1.5g |
| Saturated Fat | 0.8g |
| Carbohydrates | 27g |
| Fiber | 1g |
| Sugar | 2g |
| Protein | 5g |
| Sodium | 198mg |
| Cholesterol | 4mg |
Nutritional values are estimates based on standard ingredients and may vary depending on specific products used.
Frequently Asked Questions
Why did my crumpets not get holes on top?
Your pan was likely too hot, which seals the surface before bubbles can escape. Lower the heat significantly and try again with the next batch.
Can I make the batter the night before?
Yes, you can refrigerate the batter overnight after the first rise. Bring it to room temperature and add the bicarbonate of soda mixture before cooking.
What can I use instead of crumpet rings?
Metal cookie cutters, clean tuna cans with both ends removed, or egg rings all work as substitutes. Just ensure they are at least 1 inch tall to contain the batter.
Why are my crumpets rubbery?
Rubbery crumpets usually result from undercooking or too much batter in the ring. Cook longer on lower heat and use only about 2 tablespoons per crumpet.
Can I make crumpets without yeast?
You can make a quick version using extra baking powder, but they will lack the distinctive tangy flavor and chewy texture that yeast fermentation provides.
Final Thoughts
Making homemade crumpets takes a bit of time, but every minute is worth it when you bite into that first warm, buttery piece. The process is straightforward once you understand the rhythm of it.
Give this crumpet recipe a try this weekend and taste the difference fresh makes. Your breakfast table will never be the same, and you might just become the designated crumpet maker for every family gathering.
Homemade Crumpets
Ingredients
Equipment
Method
- Add the flour, instant yeast, sugar, and salt to a large mixing bowl. Whisk them together until evenly distributed.
- Pour the warm milk into the dry ingredients gradually. Whisk vigorously until you have a smooth, thick batter with no lumps remaining.
- Cover the bowl with a clean kitchen towel or plastic wrap. Leave it in a warm spot for about 1 hour until the batter has doubled in size and looks bubbly on top.
- Dissolve the bicarbonate of soda in the warm water and stir it into the risen batter. Let this mixture rest for another 15 minutes.
- Place your frying pan over low heat and let it warm up gradually. Grease the inside of your crumpet rings generously with butter or oil.
- Place the greased rings in the pan and pour about 2 tablespoons of batter into each ring. The batter should be about 1cm deep.
- Cook on low heat for 8 to 10 minutes without touching them. Watch as bubbles rise to the surface and burst, creating the classic crumpet texture. The top should look dry and set.
- Once the top is fully set, carefully remove the rings using a cloth to protect your hands. Flip the crumpets and cook for just 1 to 2 minutes more to lightly brown the top.
- Repeat with remaining batter, greasing rings between each batch.