
The smell of tocino sizzling in a hot pan is pure morning magic, filling your kitchen with sweet, savory, smoky aromas that pull everyone out of bed before they’ve even had coffee.
Tocino is a Filipino cured meat that sits somewhere between bacon and jerky, offering a unique blend of sweet and savory flavors that transforms breakfast into something special. This recipe walks you through making authentic tocino from scratch at home, where you control the sweetness, spice level, and quality of every ingredient.
Unlike store-bought versions that can taste overly sugary or contain mystery additives, homemade tocino delivers real, balanced flavor with a tender texture that caramelizes beautifully when cooked. Once you make a batch, you’ll understand why Filipino families consider this a breakfast staple worth the effort.
Why You’ll Love This Recipe
Homemade tocino gives you restaurant-quality results with ingredient transparency and flavor control that packaged versions simply can’t match.
- Sweet and savory flavor profile that’s addictive yet balanced
- Tender texture that caramelizes and crisps at the edges when cooked
- Makes enough to freeze for weeks of quick breakfasts
- Naturally gluten-free and keto-friendly
- Impresses guests and makes your home smell incredible
My Experience Making This Recipe
I first made tocino after a Filipino friend brought me a batch of hers, and I was completely hooked by the flavor complexity. Store-bought versions felt one-dimensional in comparison, so I knew I had to nail the recipe myself.
My first attempt was actually too sweet because I wasn’t sure about brown sugar ratios, but by the third batch, I found the perfect balance between caramelized sweetness and savory depth. The curing process fascinates me because you watch pink, raw pork transform into glossy, burgundy strips that smell like breakfast heaven.
Now my freezer always has tocino ready to go, and my kids ask for it more often than regular bacon. When I cook it and hear that sizzle and smell those caramelized edges, I know I nailed it.
Recipe Overview
- Recipe Name: Homemade Filipino Tocino
- Servings: 8 servings (about 24-28 strips)
- Prep Time: 15 minutes
- Curing Time: 5-7 days
- Cook Time: 8-10 minutes per batch
- Total Time: 5-7 days plus cooking
- Course: Breakfast
- Cuisine: Filipino
- Calories per Serving: 245
Equipment You Will Need
- Sharp knife for slicing pork
- Large mixing bowl
- Measuring spoons and cups
- Airtight glass container or zip-lock bags
- Cheesecloth or paper towels
- Large skillet or frying pan
- Tongs or spatula
- Paper towels for draining
Ingredients for Homemade Tocino
- 2 pounds pork shoulder or pork butt, thinly sliced into strips about 1/8 inch thick
- 3/4 cup brown sugar, packed
- 1/4 cup salt
- 2 teaspoons garlic powder
- 1 teaspoon black pepper
- 1 teaspoon pink curing salt (sodium nitrite), optional but recommended for color and food safety
- 1/2 teaspoon paprika
- 1/4 teaspoon cayenne pepper, adjust for heat preference
- 1/4 cup soy sauce
- 2 tablespoons liquid smoke, optional for deeper flavor
- 1 tablespoon whole black peppercorns, for garnish
Ingredient Notes and Substitutions
- Pork shoulder: This cut has enough fat to keep the meat tender during curing and cooking. You can substitute pork belly, but it will be fattier and require trimming of excess fat.
- Brown sugar: It provides sweetness and helps create the signature caramelized flavor when cooked. Light brown sugar works fine if you prefer less molasses flavor; white sugar works but gives less depth.
- Pink curing salt: This preserves the meat and creates the traditional pink-red color Filipino families expect. Regular salt works, but the color will be brownish instead.
- Garlic powder: Fresh minced garlic can replace it at a ratio of 1 teaspoon powder to 1 tablespoon fresh, though the flavor will be slightly sharper.
- Soy sauce: This adds umami depth and saltiness to the cure. Tamari works if you need gluten-free, with identical flavor impact.
How to Make Homemade Tocino
Step 1: Prepare and Slice the Pork
Start with a fully thawed pork shoulder and pat it dry with paper towels, removing excess surface moisture. Slice the pork into strips about 1/8 inch thick, cutting against the grain to keep each piece tender and easy to cook.
Step 2: Mix the Dry Cure Ingredients
In a large bowl, combine brown sugar, salt, garlic powder, black pepper, pink curing salt, paprika, and cayenne pepper, stirring until everything blends evenly. Make sure no brown sugar clumps remain, as lumps won’t distribute the sweetness and salt uniformly.
Step 3: Add Wet Ingredients to the Cure
Pour soy sauce and liquid smoke into the dry mixture, stirring until you have a thick paste that coats the back of a spoon. This paste will cling to the pork and draw out moisture while infusing deep, savory flavor.
Step 4: Coat the Pork Strips
Add the sliced pork to the cure mixture, using your hands or a spatula to massage the paste into every strip so it’s completely coated on both sides. Work in batches if needed to ensure even coverage, pressing the cure directly onto the meat.
Step 5: Pack Into Containers for Curing
Transfer the coated pork into airtight glass containers or heavy-duty zip-lock bags, pressing down so the meat sits in its own juices. Lay the strips in a single layer when possible, or stack them with parchment paper between layers to prevent sticking.
Step 6: Refrigerate and Allow the Cure to Work
Refrigerate the containers for 5 to 7 days, checking every couple of days and stirring gently to redistribute the liquid that pools at the bottom. The meat will darken and become more compact as the salt draws out moisture and the flavors meld together.
Step 7: Pat Dry Before Cooking
Once cured, remove the tocino from the refrigerator and pat each strip dry with paper towels to remove excess moisture on the surface. Drying the surface helps the meat brown and caramelize rather than steam when it hits the hot pan.
Step 8: Cook in a Hot Skillet
Heat a large skillet over medium-high heat and add the tocino strips in a single layer, working in batches so they don’t crowd the pan. Cook for 4 to 5 minutes on the first side until the edges caramelize and turn a deep golden-brown, then flip and cook the other side for another 3 to 5 minutes.
Step 9: Finish and Drain
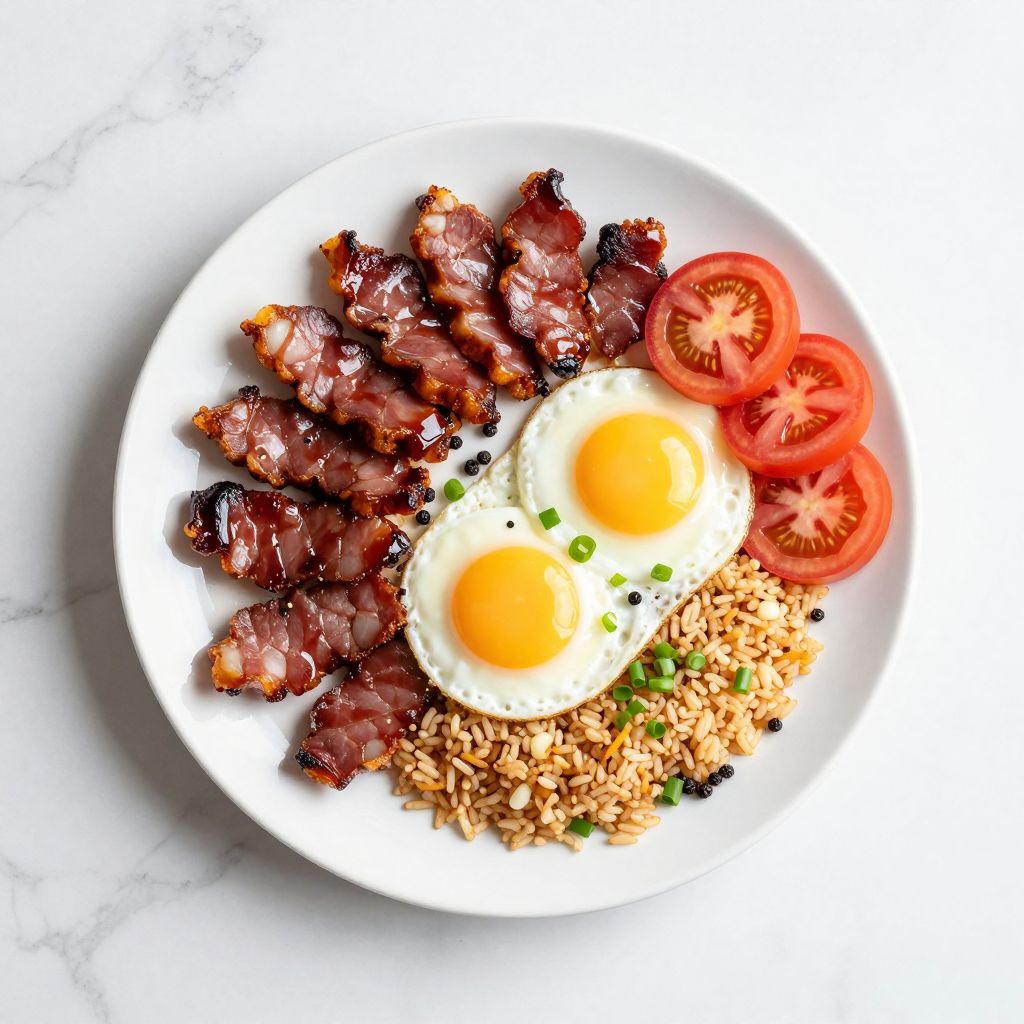
Remove the cooked tocino to a plate lined with paper towels to drain any excess fat, then serve immediately while still warm. The meat should be slightly firm with crispy, caramelized edges and a tender center.
Pro Tip: Save the rendered fat from cooking tocino and use it to fry rice, cook eggs, or sear vegetables for incredible Filipino-inspired breakfast bowls.
Tips for the Best Tocino
- Slice the pork as uniformly thin as possible so every piece cures and cooks at the same rate, preventing some strips from being too salty or undercooked.
- Don’t skip the 5 to 7 day curing period, as this is when the flavors develop and the salt preserves the meat properly.
- Cook on medium-high heat rather than high heat, which prevents burning while allowing proper caramelization of the sugars.
- Pat the tocino dry just before cooking to maximize browning and avoid steaming the meat in its own moisture.
- Make multiple batches and freeze them flat in zip-lock bags so you always have quick breakfasts on hand for months.
- Taste a small piece of cured tocino before cooking to adjust seasoning in your next batch if needed.
Common Mistakes to Avoid
- Slicing the pork too thick prevents proper curing and creates tough, overly chewy cooked meat that won’t caramelize nicely.
- Overcrowding the pan causes the meat to steam instead of sear, resulting in pale, mushy tocino instead of crispy edges.
- Cooking at too high a temperature burns the sugar coating before the inside cooks through, leaving a bitter taste.
- Skipping the pat-dry step traps moisture on the surface, preventing the beautiful caramelization that makes tocino special.
- Not stirring the cure during the curing period allows salt and sugar to settle unevenly, creating some overly salty strips and some bland ones.
Serving Suggestions
Tocino shines as the star of a Filipino breakfast, but it’s versatile enough to work in lunch and dinner dishes too. Serve it warm alongside fried rice, fried eggs, and fresh tomato slices for the classic tocino, itlog, at kamatis combination.
- Tocino and egg fried rice with green onions and a drizzle of sesame oil
- Tocino wrapped in warm flour tortillas with avocado and sriracha mayo for a fusion breakfast burrito
- Crumbled tocino sprinkled over roasted vegetables or in grain bowls for a savory-sweet protein boost
- Tocino sandwiches on toasted pandesal or brioche with pickled vegetables and garlic aioli
- Tocino bits mixed into creamy pasta or scattered over roasted potatoes with rosemary
Variations to Try
- Spicy Tocino: Increase cayenne pepper to 1 teaspoon and add 1/2 teaspoon red pepper flakes to the cure for a kick that builds heat as you eat.
- Maple Tocino: Replace 1/4 cup of the brown sugar with pure maple syrup for a deeper, more complex sweetness that complements the savory elements.
- Pineapple Tocino: Add 1/4 cup pineapple juice to the wet ingredients for tropical sweetness that pairs beautifully with the garlic and soy.
- Honey-Ginger Tocino: Substitute 1/4 cup of brown sugar with honey and add 1 tablespoon minced fresh ginger for warmth and brightness.
- Smoke House Tocino: Increase liquid smoke to 3 tablespoons and add 1 teaspoon smoked paprika for a deeper, barbecue-inspired flavor profile.
Dietary Adaptations
- Gluten-free: This recipe is naturally gluten-free, but verify that your soy sauce is tamari or certified gluten-free, as regular soy sauce contains wheat.
- Low-carb and Keto: Reduce brown sugar to 1/4 cup and add 2 tablespoons monk fruit sweetener or erythritol for a nearly sugar-free version that fits macros perfectly.
- Dairy-free: This recipe contains no dairy, making it safe for dairy-free diets without any modifications.
- Paleo: Skip the pink curing salt and reduce brown sugar to 1/4 cup, adding 1 tablespoon raw honey instead for a Paleo-compliant version.
Storage and Reheating
Refrigerator
Store cooked tocino in an airtight container for up to 5 days, or keep uncured tocino in the cure for up to 2 weeks before cooking.
- Cooked tocino keeps best in a glass container with a tight-fitting lid
- Uncured tocino can stay in the cure longer than 7 days if refrigerated continuously, developing deeper flavor
Freezer
Freeze uncured tocino in the cure for up to 3 months, or freeze cooked tocino in flat layers for up to 4 months.
- Lay uncured tocino flat in zip-lock bags with as much air removed as possible
- Flash-freeze cooked tocino on a baking sheet before transferring to freezer bags to prevent clumping
Reheating
Thaw frozen tocino overnight in the refrigerator, then cook or reheat in a skillet over medium heat until the edges crisp up again, about 2 to 3 minutes per side.
- Microwave reheating works but results in softer texture; skillet reheating restores crispness
- Never refreeze cooked tocino that has been thawed
Nutrition Information
| Nutrient | Amount |
|---|---|
| Calories | 245 |
| Total Fat | 18g |
| Saturated Fat | 7g |
| Carbohydrates | 8g |
| Fiber | 0g |
| Sugar | 7g |
| Protein | 20g |
| Sodium | 1,150mg |
| Cholesterol | 65mg |
Nutrition values are estimated based on standard ingredient data and a serving size of one ounce of cooked tocino, roughly 3 to 4 strips depending on thickness.
Frequently Asked Questions
Can I use pork loin instead of pork shoulder?
Pork loin is much leaner and will become dry and tough during curing and cooking compared to the forgiving fat content of pork shoulder. Pork belly works beautifully as a substitute if you prefer fattier meat.
What is pink curing salt and is it safe?
Pink curing salt, or sodium nitrite, is used in small amounts to prevent harmful bacteria growth and give cured meats their traditional color and flavor. It’s food-safe at the concentrations used in home curing and has been used for centuries in charcuterie.
Can I cure tocino for longer than 7 days?
Yes, tocino can cure for up to 2 weeks in the refrigerator, and the flavor actually deepens with extended time. Just make sure the container stays refrigerated and sealed the entire time.
Why is my tocino mushy instead of firm and tender?
Mushy tocino usually results from overcrowding the pan during cooking or cooking at too low a temperature, which causes the meat to steam. Also, slicing the pork too thick creates a mealy texture that can feel soft rather than tender.
Do I have to use liquid smoke, or can I skip it?
Liquid smoke adds depth but is completely optional if you don’t enjoy smoky flavors. Without it, the tocino will taste more purely savory-sweet, which is authentic to many Filipino family recipes.
Can I make tocino without pink curing salt?
Yes, the recipe works without it, though the finished meat will be brownish instead of the traditional pink-red color and you lose some food-safety preservation benefits. The flavor remains delicious, and many home cooks skip it.
Final Thoughts
Making tocino at home rewards your patience with flavor that’s simply impossible to find in store-bought versions, plus the pride of serving something you cured with your own hands. The first time you cook a batch and smell that irresistible aroma filling your kitchen, you’ll understand why Filipino families cherish this recipe.
Once you master the basic recipe, you have a foundation for endless variations that match your taste preferences and dietary needs. Keep a batch in your freezer, and breakfast becomes a delicious opportunity to celebrate this incredible cured meat tradition.
If you love sweet and savory breakfast meats, explore more amazing recipes that pair wonderfully with tocino. Try candied bacon for maple-glazed breakfast magic, or indulge in bacon wrapped tater tots as a crispy, savory side dish. Each recipe brings its own unique flavor and texture that makes your breakfast table feel special.
Homemade Filipino Tocino
Ingredients
Equipment
Method
- Prepare and Slice the Pork: Start with a fully thawed pork shoulder and pat it dry with paper towels, then slice into 1/8-inch-thick strips against the grain.
- Mix the Dry Cure Ingredients: In a large bowl, combine brown sugar, salt, garlic powder, black pepper, pink curing salt, paprika, and cayenne pepper, stirring until evenly blended.
- Add Wet Ingredients to the Cure: Pour soy sauce and liquid smoke into the dry mixture, stirring to create a thick paste.
- Coat the Pork Strips: Add the pork strips to the paste and massage to coat each strip thoroughly on both sides.
- Pack Into Containers for Curing: Transfer the coated pork into airtight glass containers or zip-lock bags, pressing down to remove air and layering with parchment paper if needed.
- Refrigerate and Cure: Refrigerate for 5 to 7 days, stirring gently every couple of days to redistribute the curing liquids.
- Pat Dry Before Cooking: Remove cured pork and pat each strip dry with paper towels to remove surface moisture.
- Cook in a Hot Skillet: Heat a large skillet over medium-high heat, add tocino strips in a single layer, and cook for 4 to 5 minutes on the first side until caramelized, then flip and cook for 3 to 5 minutes more.
- Finish and Drain: Transfer cooked tocino to a paper-towel-lined plate to drain excess fat and serve immediately.