Imagine flaky, buttery fish that cooks in less than 15 minutes and tastes like you’ve been perfecting it for years. Arctic char is that magical ingredient that transforms weeknight dinner into something restaurant-quality without the stress.
This elegant fish sits somewhere between salmon and trout in flavor and texture, making it incredibly versatile and forgiving for home cooks. The delicate, tender flesh takes well to simple seasoning and various cooking methods, so you can prepare it exactly how you like it.
Whether you pan-sear it with lemon and herbs or bake it with roasted vegetables, arctic char delivers impressive results every single time. Ready to become that person who makes restaurant-worthy fish at home?
Why You’ll Love This Recipe
Arctic char is a game-changer because it’s quick, nutritious, and foolproof for anyone intimidated by cooking fish. The mild, slightly sweet flavor appeals to even skeptical seafood eaters, while its firm texture holds up beautifully whether you pan-sear, bake, or poach it.
- Cooks in under 15 minutes, perfect for busy weeknights
- Rich in omega-3 fatty acids and high-quality protein
- Mild, buttery flavor that works with endless seasoning combinations
- Forgiving to cook, hard to mess up when you follow simple guidelines
- Sustainable farmed option that’s widely available and affordable
My Experience Making This Recipe
I discovered arctic char at a seafood market five years ago and have been making it constantly ever since. The first time I pan-seared it with nothing but butter, lemon, and fresh dill, I couldn’t believe how tender it turned out in under 10 minutes.
My family went from tolerate-it to request-it, which is the true test of any recipe. What sealed the deal was how adaptable it is: I’ve made it on busy Tuesdays with pantry herbs and fancy enough for dinner guests when I add roasted asparagus and a cream sauce.
The key moment was realizing that arctic char doesn’t need much to shine. Once I stopped overthinking it and trusted the quality of the fish itself, every batch turned out perfectly.
Recipe Overview
- Recipe Name: Pan-Seared Arctic Char with Lemon Butter
- Servings: 4
- Prep Time: 10 minutes
- Cook Time: 12 minutes
- Total Time: 22 minutes
- Course: Main Dish
- Cuisine: Scandinavian
- Calories per Serving: 320
Equipment You Will Need
- 12-inch stainless steel or cast iron skillet
- Paper towels
- Instant-read thermometer
- Tongs or thin fish spatula
- Small saucepan for sauce
- Measuring spoons and cups
- Cutting board and sharp knife
Ingredients for Pan-Seared Arctic Char with Lemon Butter
- 4 arctic char fillets, 6 ounces each, skin on
- 3 tablespoons unsalted butter, divided
- 1 tablespoon olive oil
- 1 teaspoon kosher salt
- 1/2 teaspoon freshly ground black pepper
- 2 cloves garlic, thinly sliced
- Juice of 2 lemons, about 1/4 cup
- 2 tablespoons fresh dill, chopped (or 1 teaspoon dried)
- 1/2 teaspoon red pepper flakes (optional)
Ingredient Notes and Substitutions
- Arctic char fillets: The star of the show, prized for mild flavor and firm texture that won’t fall apart. Substitute with salmon or halibut if arctic char isn’t available, though cooking time may vary slightly.
- Unsalted butter: Creates a luxurious lemon sauce that brings everything together without overpowering the fish. Use ghee if you prefer a nuttier flavor, using the same amount.
- Olive oil: Prevents butter from burning at high heat and creates the ideal crust on the fish skin. Use avocado oil if you want a higher smoke point, using the same amount.
- Fresh dill: Brightens the dish with herbal notes that complement the fish naturally. Substitute with fresh tarragon, parsley, or chives in equal amounts.
- Lemon juice: Cuts through richness and brings out the fish’s delicate flavor. Lime juice works beautifully for a different but equally delicious flavor profile.
How to Make Pan-Seared Arctic Char with Lemon Butter
Step 1: Remove the Fish from the Refrigerator
Take your arctic char fillets out of the fridge and let them sit at room temperature for 10 minutes. This ensures even cooking throughout the fillet, so the outside doesn’t overcook while the inside is still cold.
Step 2: Pat the Fillets Completely Dry
Use paper towels to thoroughly dry both sides of each fillet, paying special attention to the skin. Moisture is the enemy of a crispy, golden skin, so take your time here and really get them dry.
Step 3: Season Generously
Sprinkle both sides of each fillet with kosher salt and freshly ground black pepper. Do this just before cooking so the salt doesn’t draw out moisture from the fish.
Step 4: Heat the Skillet and Add Oil
Place a 12-inch skillet over medium-high heat and add the olive oil, letting it heat for about 2 minutes until it shimmers and nearly smokes. A properly heated pan is non-negotiable for developing that beautiful, crispy skin.
Step 5: Sear the Fish Skin-Side Down
Carefully place each fillet skin-side down into the hot skillet, starting with the end closest to you to avoid splashing. Let the fish sear without moving it for 4 to 5 minutes, resisting the urge to poke or flip it early.
Step 6: Flip and Cook the Second Side
Using tongs or a thin fish spatula, gently flip each fillet and add 1 tablespoon of butter to the pan. Cook for another 3 to 4 minutes, basting the fish with the melted butter using a spoon.
Step 7: Make the Lemon Butter Sauce
Transfer the cooked fillets to a warm plate and reduce heat to medium, adding the remaining 2 tablespoons of butter to the same skillet. Add sliced garlic and cook for about 30 seconds until fragrant, then add lemon juice and fresh dill, stirring gently.
Step 8: Plate and Serve
Pour the warm lemon butter sauce over each fillet and sprinkle with fresh dill and optional red pepper flakes. Serve immediately while the fish is hot and the sauce is at its most flavorful.
Pro Tip: The internal temperature of the arctic char should reach 145 degrees Fahrenheit when measured at the thickest part of the fillet for perfectly moist, flaky fish every time.
Tips for the Best Pan-Seared Arctic Char
- Let your skillet get properly hot before adding the fish, which prevents sticking and creates that coveted crispy skin. A shimmering oil surface tells you you’re ready to go.
- Keep your arctic char fillets roughly the same thickness so they cook evenly without any overcooked edges or raw centers. Ask your fishmonger to portion them uniformly if possible.
- Don’t skip the room temperature step, as cold fish straight from the fridge will cook unevenly and take longer than expected. Ten minutes makes a surprising difference in the final texture.
- Use a fish spatula or thin metal turner rather than a regular spatula, which prevents the delicate flesh from breaking apart when you flip it. This tool is worth the investment if you cook fish regularly.
- Buy the freshest arctic char available, ideally from a reputable fishmonger rather than supermarket cases. Fresh fish makes a noticeable difference in flavor and texture.
- Don’t overcrowd the pan with too many fillets at once, which drops the temperature and creates steam rather than a nice sear. Cook in batches if needed.
Common Mistakes to Avoid
- Cooking from cold: Fish straight from the fridge cooks unevenly with a mushy center and overcooked edges. Always bring it to room temperature first.
- Using a wet fish: Moisture prevents the skin from crisping and creates steam that steams rather than sears the fish. Dry patting is essential.
- Moving the fish too early: Flipping or poking the fillets before they’re ready to flip rips the skin and ruins the presentation. Patience rewards you with beautiful results.
- Adding salt too early: Salting more than a few minutes before cooking draws out moisture and prevents that crispy skin from forming. Season just before cooking.
- Overcooking the fish: Arctic char dries out quickly when overcooked, turning from tender and buttery to chalky and dense. Use a thermometer to hit 145 degrees exactly.
Serving Suggestions
Arctic char is a blank canvas that pairs beautifully with bright vegetables and simple sides that let the fish shine. A squeeze of fresh lemon, some herbs, and you’re already at restaurant quality without the fuss.
- Roasted asparagus with garlic and parmesan cheese for an elegant spring dinner
- Creamy risotto or wild rice pilaf to add richness alongside the delicate fish
- Steamed baby potatoes tossed with fresh herbs and a touch of butter for simplicity
- Sauteed spinach or kale with garlic to balance the richness with something green and nutritious
- Simple arugula salad with lemon vinaigrette and shaved parmesan for a lighter, fresher meal
Variations to Try
- Herb-Crusted Version: Mix panko breadcrumbs with chopped fresh herbs, grated parmesan, and lemon zest, then press onto the flesh side of the fillet before pan-searing for added texture and flavor.
- Baked in Parchment: Wrap each fillet with sliced vegetables and herbs in parchment paper, then bake at 400 degrees for 12 to 15 minutes for a moisture-locked, delicate preparation that needs no added fat.
- Asian-Inspired Glaze: Brush the cooked fish with a mixture of soy sauce, ginger, and honey, then finish under the broiler for a sweet and savory crust that changes the flavor profile completely.
- Mediterranean Style: Top the seared fish with a mixture of diced tomatoes, olives, capers, and fresh basil for a bright, tangy twist that feels summery year-round.
- Poached in White Wine: Gently poach the fillets in a mixture of white wine, fish stock, and fresh herbs for a lighter, more delicate cooking method that’s equally impressive and forgiving.
Dietary Adaptations
- Gluten-Free: This recipe is naturally gluten-free as written, but if you make the herb-crusted variation, use certified gluten-free panko breadcrumbs to keep it safe.
- Dairy-Free: Substitute the butter with ghee, coconut oil, or extra virgin olive oil in equal amounts, and omit the fish will still be delicious with just the lemon and herbs.
- Paleo: This entire recipe fits paleo requirements, using only fish, healthy fats, and whole foods without grains, dairy, or processed ingredients.
- Low-Carb/Keto: Arctic char is perfect for keto diets at less than one gram of carbohydrates per serving, making it an ideal protein source for these eating styles.
Storage and Reheating
Refrigerator
Store cooked arctic char in an airtight container for up to 3 days in the coldest part of your fridge. The longer it sits, the more the texture suffers, so plan to eat it within 24 hours for best results.
- Let cooked fish cool completely before covering to prevent condensation
- Store the lemon butter sauce separately to prevent the fish from getting soggy
- Place parchment paper between fillets to prevent them from sticking together
Freezer
You can freeze cooked arctic char for up to 2 months, though the texture becomes slightly softer upon thawing. Raw fillets freeze beautifully for up to 3 months and are actually preferable to freeze if you have the space.
- Wrap each fillet individually in plastic wrap and then foil to prevent freezer burn
- Label with the date and type of fish for easy identification later
- Thaw raw fish in the refrigerator overnight before cooking, never at room temperature
Reheating
The gentlest reheating method is the oven at 275 degrees for 5 to 8 minutes, covered loosely with foil to prevent drying. Avoid the microwave, which creates an unpleasant texture in delicate fish.
- Heat just until the fish reaches 125 to 130 degrees internal temperature, which retains moisture
- Add a splash of water or white wine to the bottom of the baking dish to create steam
- Let the fish rest for 2 minutes after reheating before serving
Nutrition Information
| Nutrient | Amount |
|---|---|
| Calories | 320 |
| Total Fat | 18g |
| Saturated Fat | 5g |
| Carbohydrates | 1g |
| Fiber | 0g |
| Sugar | 0g |
| Protein | 38g |
| Sodium | 480mg |
| Cholesterol | 95mg |
These values are calculated for the basic pan-seared recipe without additional sides or variations. Actual nutrition may vary based on specific ingredients and portion sizes used.
Frequently Asked Questions
Can I Use Frozen Arctic Char?
Yes, but thaw it slowly in the refrigerator overnight before cooking for the best texture and moisture retention. Never thaw at room temperature, which creates bacterial growth and uneven thawing.
How Do I Know When Arctic Char Is Done Cooking?
Use an instant-read thermometer to check that the thickest part of the fillet reaches 145 degrees Fahrenheit, the safe internal temperature for fish. The flesh should also flake easily with a fork and turn opaque.
Can I Make Arctic Char Ahead for a Dinner Party?
Cook the fish up to 24 hours ahead and reheat gently in a 275-degree oven for 5 to 8 minutes just before serving. Make the lemon butter sauce fresh right before plating for the best flavor impact.
What’s the Difference Between Arctic Char and Salmon?
Arctic char has a milder, more delicate flavor and slightly firmer texture than salmon, making it less “fishy” tasting. It’s also often more sustainable and affordable while cooking in almost exactly the same way.
Can I Grill Arctic Char Instead of Pan-Searing?
Absolutely, though it requires more care to prevent sticking and falling apart on the grill grates. Preheat the grill well, oil the grates generously, and cook skin-side up over medium-high heat for 4 to 5 minutes without flipping.
What’s the Best Way to Store Raw Arctic Char?
Store in the coldest part of your refrigerator on a bed of ice and use within 1 to 2 days for peak freshness and flavor. Freeze immediately if you won’t use it within that timeframe.
Final Thoughts
Arctic char has genuinely changed how I approach weeknight cooking because it’s simultaneously elegant and foolproof. Once you nail this basic pan-seared version, you’ll find yourself making it constantly because it checks every box: fast, healthy, delicious, and impressive.
The beauty of this recipe is that it’s just the beginning, giving you a foundation to play with different seasonings, sauces, and sides based on what you’re craving. Give it a try this week and join the group of home cooks who’ve realized that restaurant-quality fish is completely achievable at home.
If you enjoyed this arctic char recipe, explore more delicious seafood options on our site. Try our steelhead trout recipe for another flaky white fish that cooks beautifully, or check out our salmon loaf recipe for a different take on preparing fresh fish for your family.
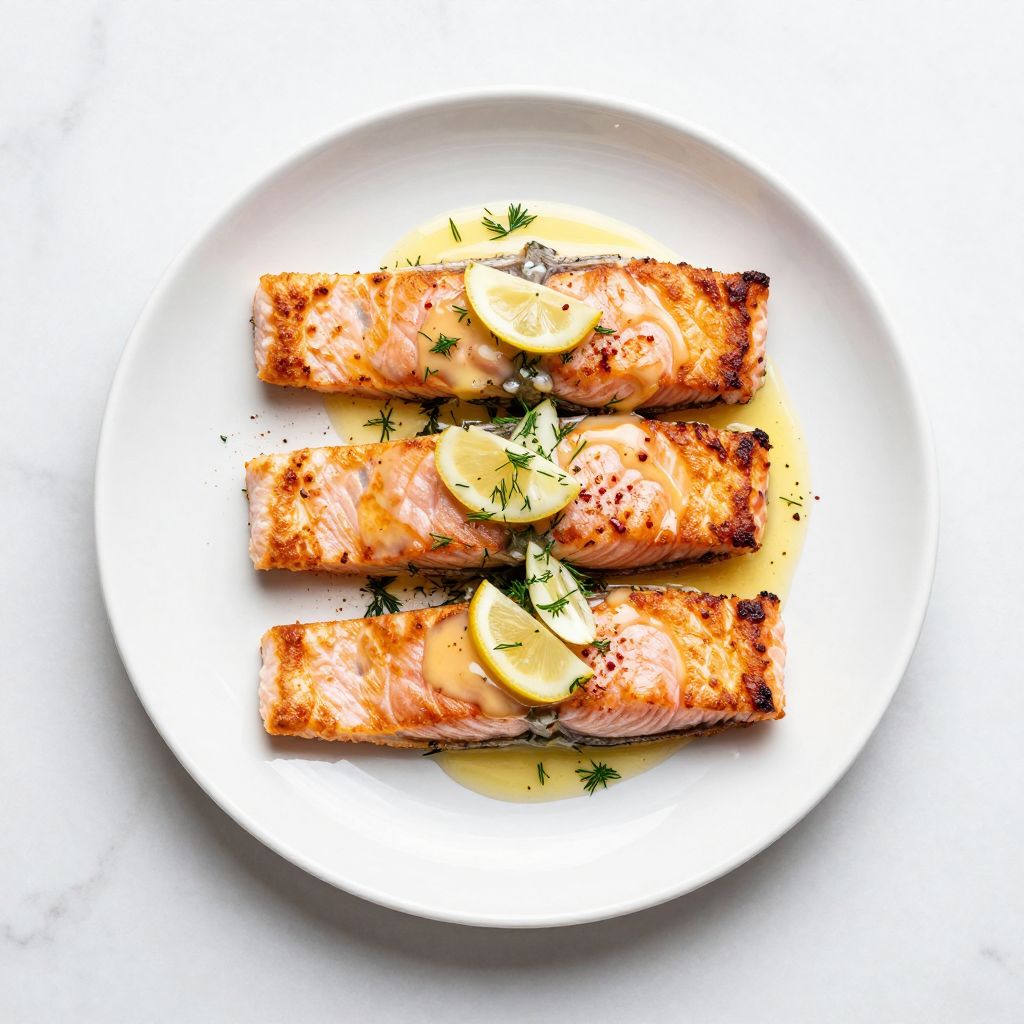
Pan-Seared Arctic Char with Lemon Butter
Ingredients
Equipment
Method
- Remove the fish from the refrigerator and let it sit at room temperature for 10 minutes.
- Pat both sides of each fillet completely dry with paper towels to ensure crispy skin.
- Season both sides of the fillets evenly with 1 teaspoon kosher salt and 1/2 teaspoon freshly ground black pepper.
- Heat a 12-inch skillet over medium-high heat and add 1 tablespoon olive oil, heating until the oil shimmers.
- Place the fillets skin-side down in the hot skillet and sear without moving for 4 to 5 minutes until the skin is golden and crisp.
- Flip the fillets, add 1 tablespoon of butter to the pan, and cook for 3 to 4 minutes while basting the fish with the melted butter.
- Transfer the cooked fillets to a warm plate, reduce heat to medium, add the remaining 2 tablespoons of butter and sliced garlic to the skillet, and cook for 30 seconds until fragrant.
- Stir in the juice of 2 lemons and 2 tablespoons fresh dill, then pour the warm lemon butter sauce over the fillets and sprinkle with red pepper flakes if desired.