The smell of a Boston butt slow-roasting in your oven is one of those kitchen moments that makes your house feel like home. This cut of pork shoulder transforms into the most tender, fall-apart-with-a-fork meat when you give it time and a little seasoning.
Boston butt might sound intimidating, but it’s actually one of the most forgiving cuts to cook. The marbled fat keeps everything moist, the long cook time means you can’t really mess it up, and the result is pure comfort food that works for pulled pork sandwiches, tacos, grain bowls, or just eating straight off a plate. Once you master this recipe, you’ll find yourself making it constantly.
Why You’ll Love This Recipe
This approach delivers incredible flavor without fussy techniques or hard-to-find ingredients. You get tender, juicy meat that shreds beautifully and tastes even better the next day.
- Minimal hands-on time after the initial prep and seasoning
- The fat cap naturally bastes the meat throughout cooking
- Works for sandwiches, tacos, salads, or standalone entrees
- Leftovers freeze beautifully for quick future meals
- The house smells incredible while it cooks
My Experience Making This Recipe
I first made a Boston butt for a summer cookout, and I’ll be honest, I was nervous about the size and the time commitment. The meat looked intimidating sitting in my roasting pan, but once I got it in the oven and walked away, I realized this was the opposite of difficult.
Five hours later, the kitchen smelled like a barbecue restaurant. I pulled the meat apart with two forks and couldn’t believe how easily it shredded. My guests went back for seconds and thirds, and someone actually asked for the recipe written down.
Since then, I make this whenever I need to feed a crowd or want to have quality protein ready for the week. It’s become my go-to recipe for entertaining because the work happens while everyone’s hanging out, not while you’re stuck in the kitchen.
Recipe Overview
- Recipe Name: Slow-Roasted Boston Butt
- Servings: 8 to 10 people
- Prep Time: 15 minutes
- Cook Time: 5 to 6 hours
- Total Time: 5 hours 15 minutes to 6 hours 15 minutes
- Course: Main Dish
- Cuisine: American
- Calories per Serving: 380
Equipment You Will Need
- Large roasting pan with lid or heavy foil
- Meat thermometer (instant-read preferred)
- Sharp knife for trimming
- Two forks for shredding
- Paper towels
- Measuring spoons
- Small bowl for spice rub
Ingredients for Boston Butt
- Boston butt pork shoulder: one 8 to 10 pound bone-in cut, skin on
- Kosher salt: 2 tablespoons
- Black pepper: 1 tablespoon, freshly ground
- Paprika: 2 tablespoons (smoked or sweet)
- Garlic powder: 1 tablespoon
- Onion powder: 1 tablespoon
- Dry mustard powder: 1 teaspoon
- Cayenne pepper: 1/2 teaspoon (adjust for heat preference)
- Brown sugar: 1 tablespoon
- Water or apple juice: 1 cup, for the pan
Ingredient Notes and Substitutions
- Boston butt pork shoulder: This fatty cut becomes tender during low-temperature roasting. If unavailable, pork shoulder blade roast works identically with the same cooking time and results.
- Smoked paprika: It adds a barbecue flavor without a smoker. Regular paprika delivers the same color and results in slightly less smoky depth.
- Kosher salt: The larger grains dissolve better into the spice rub. Sea salt or fine salt works but use slightly less since it’s denser.
- Brown sugar: It balances the spices with subtle sweetness. Honey, white sugar, or maple syrup substitute one-to-one, though maple adds distinct flavor.
- Apple juice: It keeps the meat moist during cooking and adds gentle sweetness. Chicken broth, water, or even beer work equally well.
How to Make Boston Butt
Step 1: Remove the Meat from the Refrigerator
Take the pork shoulder out at least one hour before roasting. Room temperature meat cooks more evenly, which means the exterior doesn’t overcook while the center catches up.
Step 2: Prepare Your Roasting Pan
Position your oven rack in the lower third and preheat the oven to 325 degrees Fahrenheit. A lower position allows heat to circulate underneath the meat while preventing the top from burning.
Step 3: Trim the Fat Cap
Pat the pork shoulder dry with paper towels and place it skin-side up on a cutting board. Trim any excess skin or hard fat, but leave about a quarter-inch of the protective fat cap because it renders during cooking and keeps the meat juicy.
Step 4: Mix Your Spice Rub
Combine kosher salt, black pepper, paprika, garlic powder, onion powder, dry mustard powder, cayenne pepper, and brown sugar in a small bowl. Mixing the spices together before applying them distributes flavors evenly instead of getting isolated pockets of saltiness or heat.
Step 5: Apply the Spice Rub
Rub the entire spice mixture all over the pork shoulder, getting it into any crevices and covering both the meat and fat cap. The rub creates a flavorful crust while also helping to seal in the juices.
Step 6: Add Liquid to the Pan
Place the seasoned pork shoulder into your roasting pan skin-side up and pour one cup of water or apple juice into the bottom of the pan around the meat, not on top of it. The liquid creates steam that keeps the meat tender while the top stays exposed to dry heat for browning.
Step 7: Cover and Roast Low and Slow
Cover the roasting pan tightly with a lid or heavy foil and place it in the preheated 325-degree oven. This low temperature allows the connective tissue and fat to break down slowly into gelatin and tender meat, which would toughen at higher heat.
Roast for approximately five to six hours, depending on the exact size of your cut. The meat is done when it reaches an internal temperature of 190 to 205 degrees Fahrenheit in the thickest part, which is when the collagen has converted to gelatin and the meat tears apart easily.
Step 8: Check Temperature and Tenderness
After four and a half hours, begin checking the internal temperature with a meat thermometer inserted into the thickest part of the meat, avoiding the bone. The meat should be fork-tender and shred easily when fully cooked.
Step 9: Remove from Oven and Rest
Once the internal temperature reaches 190 to 205 degrees, carefully remove the roasting pan from the oven. Let the meat rest for at least fifteen to twenty minutes before shredding, which allows the juices to redistribute throughout the meat instead of running out onto your board.
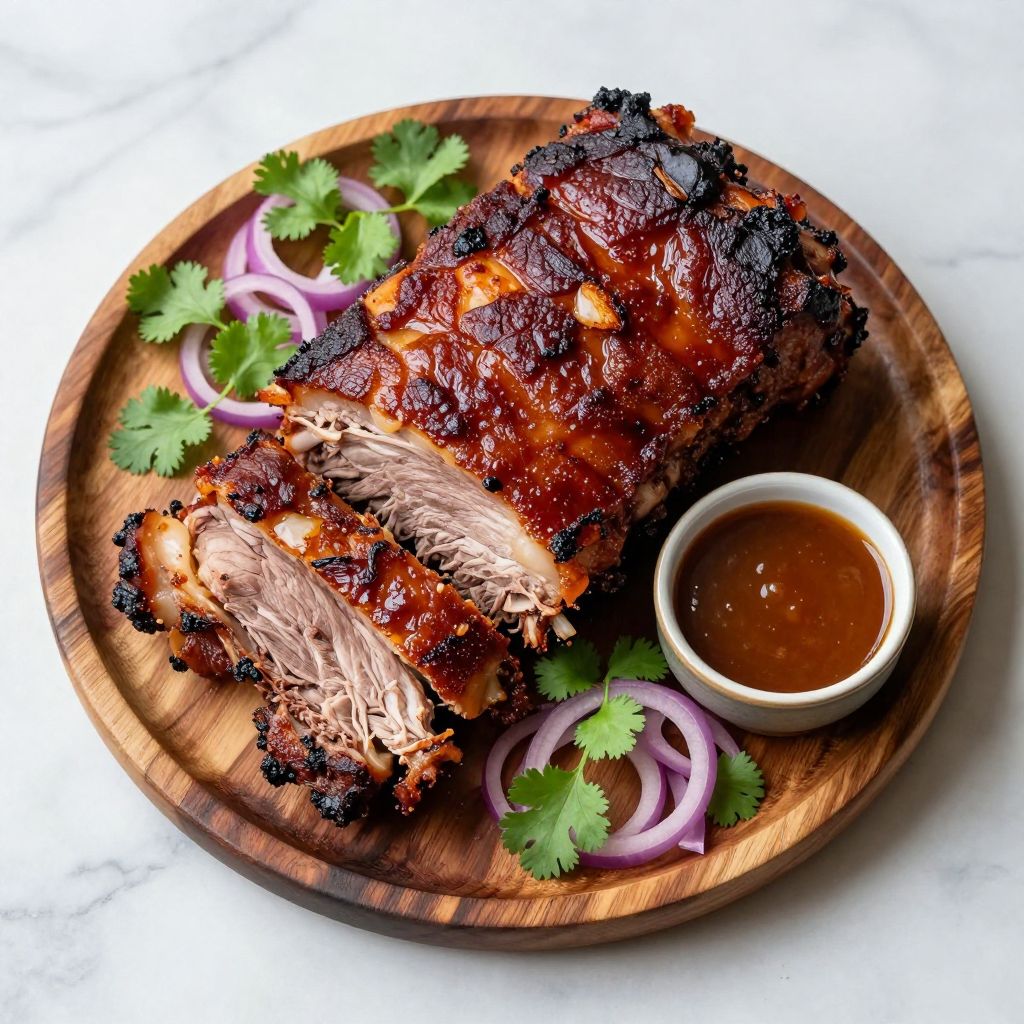
Step 10: Shred the Meat
Using two forks, pull the meat apart into bite-sized shreds, discarding any large pieces of bone or hard fat as you work. The meat should fall apart with minimal effort if it cooked long enough.
Pro Tip: Save the pan drippings and skim the fat from the top, then drizzle the flavorful liquid back over the shredded meat for added moisture and taste.
Tips for the Best Boston Butt
- Use bone-in, skin-on pork shoulder for maximum flavor and moisture. The bone conducts heat and adds richness to the drippings, while the skin protects the meat.
- Don’t peek constantly. Each time you lift the lid, you release heat and extend the cooking time by several minutes.
- Invest in a good meat thermometer rather than relying on cooking time alone. Every oven runs differently, and temperature is the most reliable indicator of doneness.
- If your meat isn’t quite tender at 190 degrees, give it another thirty minutes. Pushing past the recommended time won’t dry it out.
- For extra flavor, add onion slices and garlic cloves to the liquid around the pan. They infuse the drippings and create a richer sauce.
- Let the meat cool slightly before shredding if it’s steaming hot. This makes handling easier and helps you see which pieces are properly tender.
Common Mistakes to Avoid
- Roasting at too high a temperature will toughen the exterior before the inside has time to break down. Stick with 325 degrees Fahrenheit for the slow rendering you want.
- Skipping the rest period means all those flavorful juices run onto your cutting board instead of staying in the meat. Even fifteen minutes makes a noticeable difference.
- Trimming off all the fat cap removes the protection that keeps the meat moist during cooking. Keep that fat layer.
- Pulling the meat too early, before it reaches 190 degrees internally, results in tough, stringy shreds instead of tender meat. Patience wins here.
- Not using enough liquid in the pan can cause the drippings to burn and creates acrid smoke. One cup of liquid is your minimum.
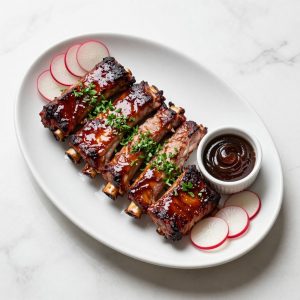
Serving Suggestions
Shredded Boston butt works in almost any context, from casual to special. The tender, juicy meat adapts beautifully to different flavor profiles and accompaniments.
- Pulled pork sandwiches on soft rolls with coleslaw and barbecue sauce
- Tacos with pickled onions, cilantro, and spicy salsa
- Over jasmine rice with steamed broccoli and soy glaze
- Loaded nachos with cheese, jalapeños, sour cream, and black beans
- Grain bowls with quinoa, roasted vegetables, and a drizzle of ranch dressing
Variations to Try
- Asian-style: Replace the spice rub with a mixture of soy sauce, ginger, garlic, and five-spice powder. Serve on rice with scallions and sesame oil for an entirely different flavor profile.
- Spicy Cajun: Add two teaspoons of Cajun seasoning and one teaspoon of hot sauce to the rub. The heat builds throughout cooking, creating a bolder, spicier final dish.
- Coffee-rubbed: Mix in two tablespoons of ground coffee and increase the brown sugar to two tablespoons. The coffee adds depth and subtle bitterness that complements the pork.
- Tropical Caribbean: Add lime juice, cumin, and coconut milk to the roasting liquid, plus a tablespoon of pineapple juice. Serve with black beans and tropical fruit salsa for brightness.
- Maple bourbon: Replace the water with half cup bourbon and half cup maple syrup in the roasting liquid. The bourbon reduces down and creates a rich, slightly sweet glaze.
Dietary Adaptations
- Gluten-free: This recipe is naturally gluten-free, but verify that any store-bought sauce you add contains no hidden gluten or starches.
- Dairy-free: The pork itself contains no dairy, and you can serve it with dairy-free coleslaw or dairy-free sauces depending on your choice of accompaniments.
- Vegan/vegetarian: Substitute a large cauliflower or portobello mushroom, though cooking time will reduce to two to three hours. The texture and heartiness won’t quite match pork, but the spice rub works beautifully on vegetables.
- Low-carb/keto: Skip any sugary sauce and focus on serving the meat with coleslaw, avocado, or leafy greens. The pork itself is pure protein and fat, making it perfectly keto-friendly.
Storage and Reheating
Refrigerator
Transfer cooled shredded pork to airtight containers and refrigerate for up to four days. The meat stays moist and actually develops deeper flavor as it sits.
- Store meat and pan drippings together for maximum moisture
- Keep in shallow containers so it cools quickly
Freezer
Portion the shredded pork into freezer bags or containers and freeze for up to three months. Freezing stops the clock completely, so you have endless time to use it.
- Remove as much air as possible from bags to prevent freezer burn
- Label with the date and amount so you know what you have
- Freeze the pan drippings separately in ice cube trays for easy portioning
Reheating
Thaw frozen pork overnight in the refrigerator, then reheat gently over medium-low heat in a covered skillet with a splash of water or broth. Low heat prevents the meat from drying out, and moisture keeps it tender.
- Microwave works in a pinch but tends to dry the meat slightly
- Slow cooker on low for one to two hours is ideal for reheating large quantities
- Add a little water or pan drippings before reheating to restore moisture
Nutrition Information
| Nutrient | Amount |
|---|---|
| Calories | 380 |
| Total Fat | 22 grams |
| Saturated Fat | 8 grams |
| Carbohydrates | 2 grams |
| Fiber | 0 grams |
| Sugar | 1 gram |
| Protein | 42 grams |
| Sodium | 520 milligrams |
| Cholesterol | 145 milligrams |
Nutrition values are calculated based on an eight-serving portion of the finished pork alone, without any sauce or bread added. Your totals will vary depending on sides and accompaniments you choose.
Frequently Asked Questions
Can I cook Boston butt at a higher temperature to speed things up?
You can cook it at 350 degrees and reduce the time to three to four hours, but you’ll sacrifice tenderness. The low and slow method at 325 degrees converts the tough collagen into gelatin, which is what makes the meat so tender and fall-apart.
Should I remove the skin before cooking or after?
Leave it on during cooking because it protects the meat underneath and renders into crispy bits. You can remove it after cooking if you prefer, or leave it on for extra crunch and added fat.
How much meat does a Boston butt lose during cooking?
Expect roughly 30 to 35 percent weight loss from the raw to the cooked state. An eight-pound raw shoulder will yield approximately five to five and a half pounds of cooked shredded meat, which serves eight to ten people generously.
Can I make Boston butt in a slow cooker instead of the oven?
Yes, slow cook on low for eight to ten hours in a covered slow cooker. The timing is longer but the results are equally tender, though you won’t get the same browning on the exterior.
What’s the difference between Boston butt and pork shoulder?
Boston butt is the upper shoulder with more fat and more flavor, while pork shoulder usually refers to the lower blade portion. Boston butt is preferred for pulled pork because the extra fat keeps it moister during cooking.
Can I partially cook the pork and finish it the next day?
Yes, cool it completely, refrigerate overnight, and return it to a 325-degree oven until it reaches the proper temperature again. This is handy for spreading the cooking over two days if you have oven space constraints.
Final Thoughts
Boston butt is one of those recipes that looks impressive on the table but requires almost no skill or attention once it’s in the oven. You season it, put it in the oven, and six hours later you have incredibly tender, flavorful meat that makes you look like a talented cook.
If you’ve never made this before, commit to trying it this weekend. The reward is worth the minor effort, and your kitchen will smell incredible the entire time it cooks.
Slow-Roasted Boston Butt
Ingredients
Equipment
Method
- Take the pork shoulder out of the refrigerator at least one hour before roasting to bring it to room temperature.
- Position your oven rack in the lower third and preheat the oven to 325 degrees Fahrenheit.
- Pat the pork shoulder dry with paper towels and place it skin-side up on a cutting board. Trim any excess skin or hard fat, but leave about a quarter-inch of the protective fat cap.
- Combine kosher salt, black pepper, paprika, garlic powder, onion powder, dry mustard powder, cayenne pepper, and brown sugar in a small bowl.
- Rub the entire spice mixture all over the pork shoulder, getting it into any crevices and covering both the meat and fat cap.
- Place the seasoned pork shoulder into your roasting pan skin-side up and pour one cup of water or apple juice into the bottom of the pan around the meat, not on top of it.
- Cover the roasting pan tightly with a lid or heavy foil and place it in the preheated 325-degree oven. Roast for 5 to 6 hours.
- After 4.5 hours, begin checking the internal temperature with a meat thermometer inserted into the thickest part of the meat, avoiding the bone. The meat is done when it reaches 190 to 205 degrees Fahrenheit.
- Once the internal temperature reaches 190 to 205 degrees, carefully remove the roasting pan from the oven. Let the meat rest for 15 to 20 minutes.
- Using two forks, pull the meat apart into bite-sized shreds, discarding any large pieces of bone or hard fat. Save the pan drippings and skim the fat from the top, then drizzle the flavorful liquid back over the shredded meat.