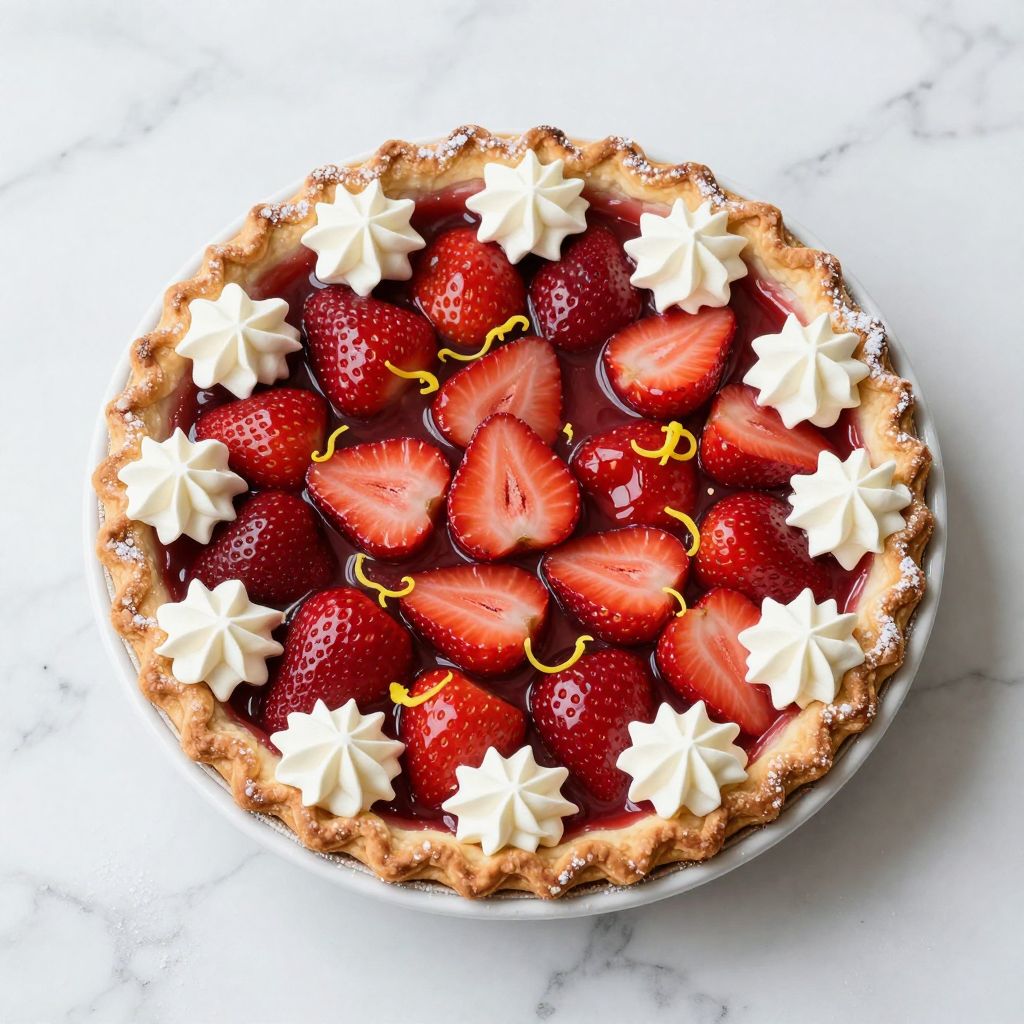
There’s something almost magical about the moment you crack open a jar of homemade strawberry pie filling and smell that concentrated berry sweetness mixed with just a hint of lemon.
This strawberry pie filling recipe delivers that restaurant-quality taste in your own kitchen, and it’s far simpler than you’d expect. The magic lies in using fresh strawberries at peak ripeness, a touch of cornstarch for the perfect gel consistency, and just enough sugar to let the fruit shine without turning it into candy.
You can use this filling for traditional pies, tarts, pastry cups, or even layer it into cheesecake for something special. Once you nail this technique, you’ll find yourself making it constantly.
Why You’ll Love This Recipe
This filling strikes the perfect balance between fresh fruit flavor and smooth, spoonable texture.
- Thick enough to hold its shape in a pie but still bursts with real strawberry taste
- Ready in under 30 minutes from start to finish
- Works beautifully in pies, tarts, cheesecake, or as a topping for ice cream and yogurt
- Makes enough to fill a 9-inch pie with fruit on every bite
- Stores perfectly in the fridge for up to a week or freezes for months
My Experience Making This Recipe
I first made this filling on a late spring morning when I had too many strawberries and not enough time to use them fresh. The kitchen filled with that concentrated strawberry aroma as the filling simmered, and I was immediately hooked.
The real test came when I poured it into a blind-baked pie shell and let it chill overnight. The next day, the filling had set to exactly the right consistency: firm enough to slice cleanly but tender enough to yield to your fork.
My family’s reaction sealed the deal. My partner ate two slices and asked if I could make it weekly, and my neighbors who tried a slice at a gathering immediately asked for the recipe. That’s when I knew this technique was a keeper.
Recipe Overview
- Recipe Name: Strawberry Pie Filling
- Servings: One 9-inch pie (8 servings)
- Prep Time: 15 minutes
- Cook Time: 12 minutes
- Total Time: 27 minutes plus chilling
- Course: Dessert
- Cuisine: American
- Calories per Serving: 95
Equipment You Will Need
- Large pot or saucepan
- Wooden spoon or silicone spatula
- Measuring cups and spoons
- Sharp knife and cutting board
- Colander or fine mesh strainer
- Whisk
- 9-inch pie dish or tart pan
Ingredients for Strawberry Pie Filling
- Fresh strawberries – 3 pounds (about 24 ounces hulled and halved)
- Granulated sugar – 3/4 cup
- Cornstarch – 2 tablespoons
- Fresh lemon juice – 1 tablespoon
- Salt – 1/4 teaspoon
- Vanilla extract – 1/2 teaspoon
Ingredient Notes and Substitutions
- Fresh strawberries: Peak season (April to June in most regions) gives you the sweetest, most flavorful berries. If fresh berries aren’t available, frozen strawberries work well, though you may need to drain excess moisture and reduce the cornstarch slightly.
- Granulated sugar: This dissolves cleanly and creates a smooth filling. Honey or maple syrup can substitute in a 1:1 ratio, but they’ll make the filling slightly thinner and add their own flavor notes.
- Cornstarch: It thickens the filling without adding flavor or graininess. Tapioca starch works as a 1:1 swap and creates a slightly glossier finish, while flour needs double the amount and produces a cloudier filling.
- Lemon juice: It brightens the strawberry flavor and prevents the filling from tasting cloying. Fresh lime juice offers a different but equally lovely citrus note.
- Vanilla extract: It adds depth and rounds out the strawberry flavor. Almond extract creates a different profile but is equally delicious.
How to Make Strawberry Pie Filling
Step 1: Hull and Prepare Your Strawberries
Rinse your strawberries under cool water and pat them completely dry with a clean kitchen towel. Moisture is the enemy of a properly set filling, so don’t skip this step.
Remove the green leafy tops by cutting them out at an angle with a sharp knife, then cut each berry in half lengthwise. Keep the pieces relatively uniform in size so they cook evenly.
Step 2: Measure and Mix the Dry Ingredients
In a small bowl, whisk together the cornstarch, sugar, and salt. This combines them evenly so you won’t get pockets of cornstarch in your filling.
Mixing the dry ingredients separately before adding them to the berries helps prevent lumping and ensures consistent thickening throughout the filling.
Step 3: Combine Berries and Dry Mixture
Pour the halved strawberries into a large pot and sprinkle the sugar and cornstarch mixture over them. Gently toss everything together using a wooden spoon or silicone spatula, making sure the dry ingredients coat the berries evenly.
Let the mixture sit for 2 to 3 minutes so the strawberries begin releasing their juice. This natural liquid helps dissolve the sugar and cornstarch, creating a smooth sauce.
Step 4: Heat the Filling
Place the pot over medium heat and bring the mixture to a gentle simmer, stirring occasionally. You’ll see the liquid transform from cloudy to clear as the cornstarch gelatinizes, which usually takes 10 to 12 minutes.
Keep the heat at medium rather than high because rapid boiling can break down the strawberries into mush and make the filling gritty instead of smooth. Gentle heat preserves the berry texture and creates a silky filling.
Step 5: Add Citrus and Vanilla
Once the filling reaches a gentle simmer and the liquid has thickened, remove the pot from heat and stir in the fresh lemon juice and vanilla extract. Do this off heat so the lemon juice doesn’t curdle the filling.
These additions brighten the strawberry flavor and add complexity that keeps the filling from tasting one-dimensional.
Step 6: Cool Before Transferring
Let the filling cool in the pot for about 5 minutes, stirring gently a few times. This cooling period allows the thickening to fully set while the filling is still warm enough to pour easily.
Pouring hot filling into a pie crust can make the crust soggy, so this brief cooling period is important for texture.
Step 7: Pour Into Your Pie Shell
If using a pre-baked pie crust, pour the slightly cooled filling into it slowly and evenly. If your crust is unbaked, brush the bottom with egg white before pouring to create a moisture barrier.
This moisture barrier prevents the crust from becoming soggy and helps it stay crispy.
Step 8: Chill Until Set
Refrigerate the pie for at least 4 hours, but preferably overnight, until the filling is completely set and firm. This chilling time allows the cornstarch to reach full thickening power.
A properly chilled filling will slice cleanly without running or falling apart on the plate.
Pro Tip: Don’t skip the chilling time. The filling will appear set after 30 minutes at room temperature, but it needs the full refrigerated rest to develop the right texture for slicing.
Tips for the Best Strawberry Pie Filling
- Buy strawberries in season (late spring through early summer) for the sweetest, most flavorful filling. Out-of-season berries often taste watery and bland, requiring more sugar to compensate.
- Don’t use huge berries; they take longer to cook and create uneven texture. Medium to small berries cook uniformly and distribute flavor more evenly throughout the filling.
- Taste a berry before buying if the store allows it, especially if the berries look pale. Pale berries often taste bland no matter how much sugar you add.
- Use fresh lemon juice rather than bottled. Fresh juice is brighter and more complex, while bottled versions can taste bitter and flat.
- If your filling seems too thick after cooling, thin it slightly with a tablespoon of water. If it seems too thin after chilling overnight, you can reheat it and add another half tablespoon of cornstarch mixed with a tablespoon of water to thicken it further.
- Keep the heat moderate while the filling cooks. High heat breaks down the fruit and creates a muddy-colored filling instead of a vibrant red one.
Common Mistakes to Avoid
- Overcooking the filling: Simmering too long breaks down the strawberry pieces into pulp and dulls the color. Aim for 10 to 12 minutes of simmering only.
- Using wet berries: Excess moisture dilutes the flavor and prevents proper thickening. Pat strawberries completely dry before using.
- Adding the thickener too late: If you add cornstarch after the berries have already released lots of liquid, you’ll end up with lumps. Always coat the berries with the thickener before heating.
- Skipping the chilling time: A filling that looks set at room temperature will still be runny when you slice it. Give it the full refrigerated rest for proper texture.
- Using overripe or moldy berries: These berries taste sour and break down into mush during cooking, ruining your filling.
Serving Suggestions
This filling shines in traditional pie form, but it’s far too versatile to limit yourself to just that.
- Spread it on a blind-baked tart shell and serve with fresh whipped cream for an elegant dessert
- Layer it into cheesecake for a strawberry cheesecake that tastes bright and fresh
- Spoon it over vanilla ice cream or Greek yogurt for a simple but satisfying dessert
- Pipe it into individual pastry cups or phyllo cups for a fancy appetizer-style dessert
- Swirl it into a buttercream frosting for strawberry cake filling that stays moist and flavorful
Variations to Try
- Strawberry Rhubarb Filling: Replace half the strawberries with fresh rhubarb for a tart, complex flavor. Increase sugar to 1 cup to balance the rhubarb’s sourness, creating a filling that tastes sophisticated and layered.
- Strawberry Balsamic Filling: Add 1 tablespoon of aged balsamic vinegar along with the lemon juice for a filling with subtle savory depth. This creates an unexpectedly elegant flavor that pairs beautifully with dark chocolate crust.
- Strawberry Mint Filling: Add 6 to 8 fresh mint leaves finely chopped just before the filling finishes cooking. The mint adds a refreshing note that makes the strawberry taste even brighter and more summery.
- Spiced Strawberry Filling: Add a pinch of cinnamon and a tiny bit of nutmeg to the sugar mixture before adding it to the berries. These warm spices complement strawberry beautifully and add subtle complexity.
- Strawberry Chambord Filling: Replace the lemon juice with 1 tablespoon of Chambord liqueur for a more sophisticated, wine-forward flavor. The liqueur adds berry depth that makes the filling taste richer and more complex.
Dietary Adaptations
- Gluten-Free: This recipe is naturally gluten-free as written. If using it in a pie, make sure your crust is gluten-free, as some store-bought crusts contain hidden gluten.
- Dairy-Free: The filling itself contains no dairy, so it works perfectly in dairy-free pies. Just use a dairy-free pie crust and serve with coconut whipped cream instead of traditional whipped cream.
- Vegan: The filling is vegan as is. For a vegan pie, use a vegan crust and brush the bottom with aquafaba instead of egg white to prevent sogginess.
- Low-Carb or Keto: Replace granulated sugar with erythritol or monk fruit sweetener in a 1:1 ratio. Note that the filling may set slightly differently, so test with a small batch first to get the consistency right.
Storage and Reheating
Refrigerator
Store your filled pie in an airtight container or covered with plastic wrap on a plate. The filling stays fresh and properly textured for up to 5 days.
- Keep the pie in the coldest part of your refrigerator, away from the door where temperature fluctuates
- Don’t store the pie in the freezer compartment of a frost-free refrigerator, as frost can cause the filling to separate
Freezer
Freeze the filled, unsliced pie uncovered on a flat shelf for 2 hours until solid, then wrap it tightly in plastic wrap and foil. It freezes beautifully for up to 3 months.
- Thaw overnight in the refrigerator before serving for the best texture
- Don’t thaw at room temperature, as this can separate the filling
Reheating
Cold pie is delicious, but if you prefer it warm, let a slice sit at room temperature for 15 to 20 minutes or microwave it for 20 to 30 seconds. Never reheat the whole pie in the oven, as this can overcook the crust.
- A slice at room temperature tastes fresh and naturally sweet
- Warmed filling is slightly softer and more syrupy, which some people prefer
Nutrition Information
| Nutrient | Amount |
|---|---|
| Calories | 95 |
| Total Fat | 0g |
| Saturated Fat | 0g |
| Carbohydrates | 24g |
| Fiber | 1g |
| Sugar | 21g |
| Protein | 0.5g |
| Sodium | 65mg |
| Cholesterol | 0mg |
These values are estimates based on the filling only and don’t include pie crust. Serving size is approximately one slice of a 9-inch pie.
Frequently Asked Questions
Can I use frozen strawberries instead of fresh?
Yes, frozen strawberries work well and often cost less. Thaw them completely, drain any excess liquid, and reduce the cornstarch to 1.5 tablespoons since frozen berries release more juice than fresh ones.
How far in advance can I make this filling?
Make the filling up to 2 days before you need it and store it in an airtight container in the refrigerator. You can also make it several months ahead and freeze it in an airtight container, thawing overnight in the fridge before using.
My filling turned out runny. Can I fix it?
Yes. Mix 1 tablespoon of cornstarch with 2 tablespoons of water until smooth, then stir it into the filling while it simmers for 1 to 2 minutes. Let it cool and refrigerate again to set properly.
Why did my filling separate into liquid and solids?
This usually happens when the pie thaws too quickly or was stored in a frost-free freezer where ice crystals form. Prevent this by thawing slowly in the refrigerator and storing in a regular freezer or coldest part of a non-frost-free refrigerator.
Can I use this filling in a no-bake cheesecake?
Absolutely. Let the filling cool to room temperature before spreading it over chilled cheesecake filling, or chill it completely and spread it as a topping just before serving. Either way, it stays stable and tastes delicious.
What if I want a less sweet filling?
Reduce the sugar to 1/2 cup and taste the mixture as it cooks. If it tastes too tart, add another 2 tablespoons of sugar and stir until dissolved. You can also boost flavor with an extra 1/2 teaspoon of vanilla extract instead of more sugar.
Final Thoughts
This strawberry pie filling recipe proves that you don’t need complicated techniques or hard-to-find ingredients to create something restaurant-quality at home. Once you’ve made it once, you’ll feel confident enough to adjust it based on how sweet your berries taste and what flavor combinations you’re drawn to.
The beauty of this filling is that it celebrates strawberries themselves rather than hiding behind excessive sugar or artificial flavoring. Make it this weekend when strawberries are at their peak, and you’ll understand why this simple recipe
Strawberry Pie Filling
Ingredients
Equipment
Method
- Rinse your strawberries under cool water and pat them completely dry with a clean kitchen towel. Remove the green leafy tops by cutting them out at an angle with a sharp knife, then cut each berry in half lengthwise.
- In a small bowl, whisk together the cornstarch, sugar, and salt until evenly combined.
- Pour the halved strawberries into a large pot and sprinkle the sugar and cornstarch mixture over them. Gently toss everything together using a wooden spoon or silicone spatula, making sure the dry ingredients coat the berries evenly. Let the mixture sit for 2 to 3 minutes so the strawberries begin releasing their juice.
- Place the pot over medium heat and bring the mixture to a gentle simmer, stirring occasionally. Cook for 10 to 12 minutes until the liquid transforms from cloudy to clear as the cornstarch gelatinizes.
- Once the filling reaches a gentle simmer and the liquid has thickened, remove the pot from heat and stir in the fresh lemon juice and vanilla extract.
- Let the filling cool in the pot for about 5 minutes, stirring gently a few times.
- Pour the slightly cooled filling into a pre-baked pie crust slowly and evenly. If your crust is unbaked, brush the bottom with egg white before pouring to create a moisture barrier.
- Refrigerate the pie for at least 4 hours, but preferably overnight, until the filling is completely set and firm.