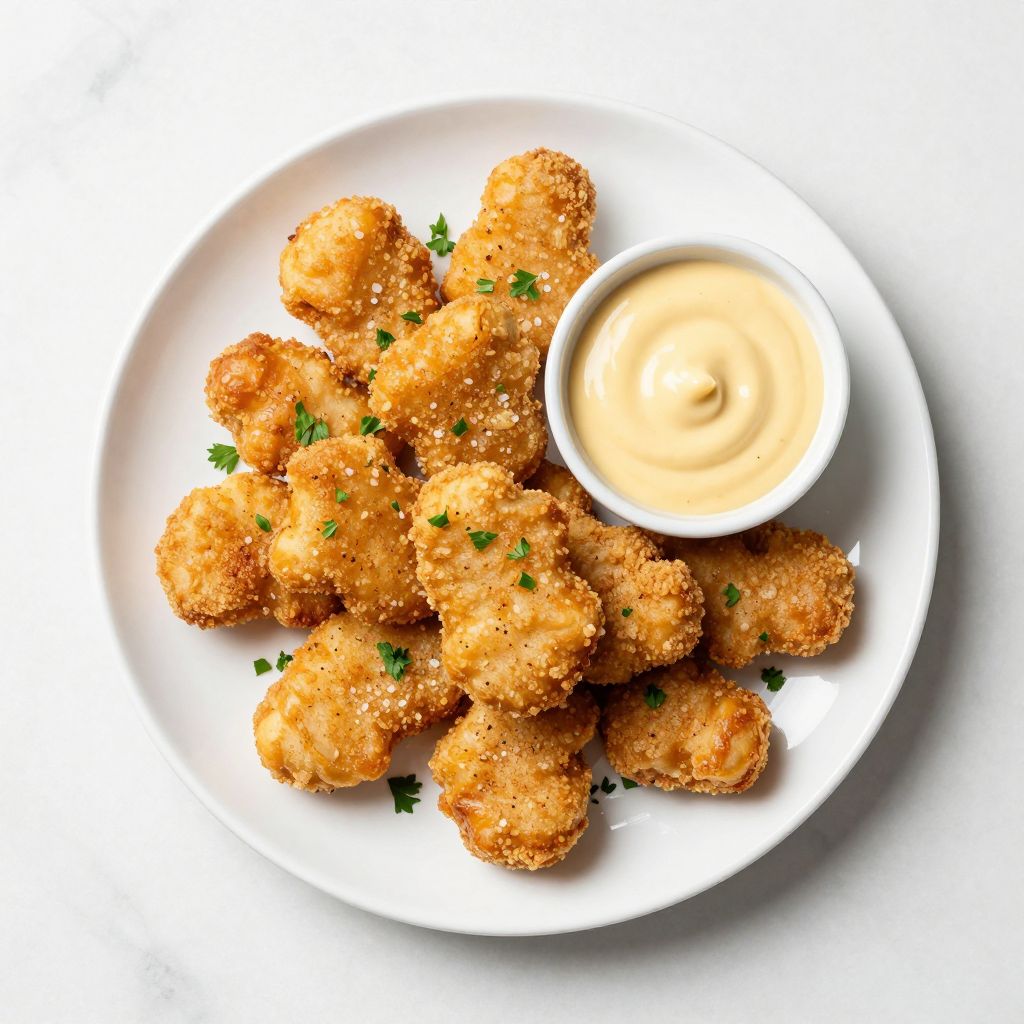
There’s something magical about biting into a warm Chick-fil-A nugget, that perfect blend of tender chicken and crispy golden coating that somehow tastes like home and fast food nostalgia all at once. Whether you’re craving that iconic taste or tired of the drive-thru line, making these nuggets at home is easier than you’d think and tastes just as good (maybe even better, since they’re fresh from your own kitchen). This recipe captures the signature breading, the juicy chicken interior, and that addictive flavor without any of the mystery ingredients you can’t pronounce. Let’s get cooking and bring that Chick-fil-A magic to your dinner table.
Why You’ll Love This Recipe
These homemade nuggets deliver that restaurant-quality taste with complete control over ingredients and freshness. You’ll save money, impress your family, and never wonder what’s actually in your food again.
- Crispy exterior with a tender, juicy chicken center that rivals the real thing
- Uses simple pantry staples and takes under 30 minutes from start to finish
- Perfect for meal prep, weeknight dinners, or feeding hungry kids who demand seconds
- Works with any dipping sauce you love, from honey mustard to their famous sauce
- Freezer-friendly so you can batch-cook and have nuggets ready whenever you need them
My Experience Making This Recipe
I first tried recreating these nuggets on a lazy Sunday afternoon when my kids wouldn’t stop talking about their school lunch. I had no special equipment, just basic kitchen tools and chicken breasts I had on hand.
The first batch came out golden and crispy, and the moment I bit into one, I knew I’d nailed it. My kids actually said they tasted better than the restaurant version (I’m still not sure if they were being honest or just loved the novelty of homemade). The smell alone filled the kitchen with that familiar fast-food aroma that somehow tastes better when you know exactly what went into it.
Since then, I’ve made these at least a dozen times, tweaking the seasoning and testing different cooking methods. My go-to is the shallow-fry method because it gives you that authentic Chick-fil-A texture without needing a full deep fryer or dealing with excess oil.
Recipe Overview
- Recipe Name: Homemade Chick-fil-A Nuggets
- Servings: 4 to 6 servings
- Prep Time: 15 minutes
- Cook Time: 12 minutes
- Total Time: 27 minutes
- Course: Main Dish
- Cuisine: American
- Calories per Serving: 280 calories
Equipment You Will Need
- Sharp knife for cutting chicken into nugget pieces
- Three shallow bowls for breading station setup
- Meat mallet or rolling pin for even thickness
- Large skillet or Dutch oven for frying
- Candy or deep-fry thermometer for monitoring oil temperature
- Paper towels and a plate for draining fried nuggets
- Tongs or slotted spoon for flipping and removing nuggets
Ingredients for Homemade Chick-fil-A Nuggets
- 2 boneless, skinless chicken breasts (about 1.5 pounds total)
- 1 cup all-purpose flour
- 1 large egg
- 1/4 cup whole milk
- 1 teaspoon salt
- 1/2 teaspoon black pepper
- 1/2 teaspoon garlic powder
- 1/4 teaspoon paprika
- 1/4 teaspoon onion powder
- 2 cups vegetable oil (for frying)
Ingredient Notes and Substitutions
- Boneless, skinless chicken breasts form the foundation of these nuggets because they’re lean, cook evenly, and have that mild flavor the original uses. You can swap in chicken tenders or pound out a whole chicken yourself, though the cook time may vary slightly.
- All-purpose flour creates the crispy coating you expect from a fried nugget. Cornstarch mixed half-and-half with flour makes an extra-crunchy version if you prefer maximum texture.
- The egg and milk mixture acts as a binder to help the breading stick to the chicken. Buttermilk alone works beautifully here if you want to skip the egg, adding a subtle tang.
- The spice blend of garlic, paprika, and onion powder mimics Chick-fil-A’s signature seasoning profile. Feel free to adjust amounts to your taste or add a pinch of cayenne for heat.
- Vegetable oil is neutral and has a high smoke point, perfect for shallow frying. Canola oil works just as well and costs less.
How to Make Homemade Chick-fil-A Nuggets
Step 1: Prepare Your Chicken
Place your chicken breasts on a cutting board and slice each one horizontally into three or four thin pieces, depending on thickness. This creates pieces that are roughly the size and thickness of actual Chick-fil-A nuggets, so they cook through quickly and evenly.
Step 2: Even Out the Thickness
Lay each chicken piece between two sheets of plastic wrap and gently pound with a meat mallet or rolling pin until they’re about 1/4 inch thick and uniform. This step matters because uniform thickness ensures every nugget cooks at the same rate instead of some staying raw while others dry out.
Step 3: Set Up Your Breading Station
Arrange three shallow bowls in a line: one with your flour mixed with salt, pepper, garlic powder, paprika, and onion powder; one with the beaten egg and milk combined; and one empty bowl for the final breaded nuggets. This assembly-line approach keeps you organized and prevents getting flour in your egg mixture.
Step 4: Bread Each Nugget
Working one piece at a time, coat the chicken lightly in the seasoned flour, shaking off any excess. Then dip it into the egg mixture, making sure it’s fully coated, and finally roll it in the flour again for a double-breaded finish that gives you that signature crunch.
The double-breading step is what separates okay homemade nuggets from restaurant-quality ones, so don’t skip it. Place each breaded nugget on your empty bowl or a clean plate.
Step 5: Heat Your Oil
Pour vegetable oil into your skillet to a depth of about 1/2 inch and heat it over medium-high heat until it reaches 350 degrees Fahrenheit. Use your thermometer to check; if the oil isn’t hot enough, your nuggets will absorb oil and turn greasy instead of crispy.
Step 6: Test the Oil Temperature
Drop a tiny piece of breaded chicken into the oil to test the temperature; it should sizzle immediately and float to the surface in about 15 seconds. If it burns right away, the oil is too hot; if it sinks and takes forever to cook, it needs more heat.
Step 7: Fry the Nuggets
Carefully place your breaded nuggets into the hot oil, working in batches so you don’t overcrowd the pan. Overcrowding causes the temperature to drop too quickly, which leads to soggy, oil-logged nuggets instead of the crispy texture you’re after.
Fry each batch for about 3 to 4 minutes, flipping halfway through, until they’re golden brown on all sides. The nuggets should bob to the surface and maintain that color without turning dark brown.
Step 8: Drain and Cool
Remove each batch with tongs or a slotted spoon and place them on paper towels to drain excess oil. Let them cool for just a minute or two before serving so the coating sets slightly and stays crispy instead of getting soggy.
Pro Tip: Keep your finished nuggets warm in a 200-degree oven while you fry the remaining batches, and they’ll all be hot and ready to eat at the same time without getting dried out.
Tips for the Best Homemade Chick-fil-A Nuggets
- Pat your chicken dry with paper towels before breading because excess moisture prevents the coating from adhering properly. This extra 30 seconds makes a huge difference in final texture.
- Use a thermometer religiously rather than guessing on oil temperature; accurate heat is the difference between crispy and greasy. Even 10 degrees too low changes everything.
- Don’t let your breaded nuggets sit more than 5 minutes before frying or the coating absorbs moisture from the chicken and becomes soggy. Fry them fresh and straight from the breading station.
- Maintain your oil temperature throughout cooking by letting it come back to 350 degrees between batches. Drop in a quick test piece if you’re unsure.
- Season your breading generously because the breading is where all the flavor lives. You want every bite to taste seasoned, not just the pieces that touch the coating.
- Serve immediately with your favorite dipping sauce for the best experience. Cold nuggets are fine the next day, but fresh-fried nuggets straight from the oil are unbeatable.
Common Mistakes to Avoid
- Not pounding the chicken evenly results in some nuggets cooking faster than others, leaving you with a mix of raw and overcooked pieces. Take the two minutes to do this step properly.
- Skipping the double-breading step gives you a thin, pale coating instead of that thick, crispy shell. The two-coat method is non-negotiable for authenticity.
- Frying at too low a temperature creates nuggets that absorb oil like sponges and taste greasy instead of crispy. Get that thermometer out and stick to 350 degrees.
- Overcrowding the pan causes the oil temperature to plummet and nuggets to steam instead of fry. Work in smaller batches and wait for the oil to recover between rounds.
- Using low-quality or old oil gives your nuggets an off taste that no seasoning can fix. Fresh, clean oil makes a noticeable difference in final flavor.
Serving Suggestions
These nuggets shine as a main course with simple sides that let them be the star of the show. Pair them with dipping sauces and your favorite accompaniments for a complete meal.
- Classic route: serve with waffle fries and a cold drink for that full fast-food experience at home
- Healthier spin: pair with a fresh green salad and sweet potato fries for balance
- Sandwich form: place warm nuggets on a soft bun with pickles and your favorite sauce for a homemade chicken sandwich
- Dipping party: offer multiple sauces like honey mustard, ranch, barbecue, and spicy mayo so everyone can customize
- Salad topper: break up nuggets and toss them over a bed of greens with your favorite dressing for a warm chicken salad
Variations to Try
- Spicy Nuggets: Add 1/2 teaspoon cayenne pepper and 1/4 teaspoon black pepper to your breading mix for a kick that builds heat without overwhelming the chicken flavor.
- Herb-Seasoned Version: swap half the flour for panko breadcrumbs and add 1 teaspoon dried Italian seasoning to the mix for an herby, extra-crunchy texture.
- Honey Butter Drizzle: brush warm nuggets with melted butter mixed with a drizzle of honey right out of the pan for a sweet-savory coating inspired by Chick-fil-A’s chicken sandwich.
- Parmesan Crusted: add 1/4 cup grated Parmesan cheese to your flour mixture and reduce salt slightly for a cheesy, umami-rich version.
- Baked Version: skip the frying and bake breaded nuggets on a greased sheet pan at 400 degrees for 15 to 18 minutes, flipping halfway through. You’ll sacrifice some crunch but gain simplicity and fewer calories.
Dietary Adaptations
- Gluten-Free: replace all-purpose flour with a gluten-free flour blend or cornstarch and use gluten-free breadcrumbs if breading; the texture is nearly identical and most people won’t notice the difference.
- Dairy-Free: swap the milk in your egg mixture for unsweetened almond milk or oat milk in the same amount; the coating works just as well without any dairy.
- Vegan: use extra-firm tofu pressed and cut into nugget shapes or thick slices of cauliflower instead of chicken, coat in a mixture of plant-based milk and cornstarch, and fry the same way. Texture differs but the breading technique remains the same.
- Low-Carb/Keto: use almond flour or a mix of almond flour and crushed pork rinds instead of regular flour for a grain-free coating; protein content stays high and carbs drop significantly.
Storage and Reheating
Refrigerator
Store leftover nuggets in an airtight container for up to 3 days in the refrigerator. They’ll stay safe to eat and the coating won’t get too soggy if you use a container with a tight seal.
- Place a paper towel on the bottom of the container to absorb excess moisture
- Don’t stack nuggets directly on each other; separate layers with parchment paper for better airflow
- Keep them away from raw meat and other potential contaminants
Freezer
Freeze cooked nuggets in a single layer on a baking sheet for 2 hours, then transfer to a freezer bag for up to 2 months. This method prevents them from clumping together into one solid mass.
- Label your bag with the date so you remember how long they’ve been frozen
- You can also freeze uncooked breaded nuggets the same way and fry them directly from frozen, adding just 1 to 2 minutes to cook time
Reheating
Reheat in a 375-degree oven for 8 to 10 minutes until they’re warm and the coating re-crisps. Avoid the microwave if you can because it makes the coating chewy instead of crispy.
- Place nuggets on a wire rack over a baking sheet so heat circulates underneath and coating crisps on all sides
- For frozen nuggets, add 2 to 3 minutes to the oven time but don’t thaw first
- An air fryer also works beautifully for reheating at 350 degrees for 5 to 6 minutes
Nutrition Information
| Nutrient | Amount |
|---|---|
| Calories | 280 |
| Total Fat | 14 grams |
| Saturated Fat | 3 grams |
| Carbohydrates | 15 grams |
| Fiber | 0 grams |
| Sugar | 0 grams |
| Protein | 26 grams |
| Sodium | 520 milligrams |
| Cholesterol | 75 milligrams |
These values are estimates based on standard ingredients and a serving size of 6 nuggets per person. Nutrition varies based on oil absorption during frying and exact ingredient measurements.
Frequently Asked Questions
Can I make these nuggets ahead of time?
Absolutely, and it’s one of my favorite meal-prep tricks. Bread your chicken pieces and freeze them on a sheet pan, then fry them straight from frozen, adding just 1 to 2 minutes to your cook time.
What’s the best oil for frying these nuggets?
Vegetable oil and canola oil both work great because they have high smoke points and neutral flavor. Avoid olive oil because it has a lower smoke point and will burn before your nuggets finish cooking.
Why do my nuggets come out greasy?
Your oil temperature is too low, which causes the chicken to absorb oil instead of crisping up. Invest in a thermometer and keep it at exactly 350 degrees throughout cooking.
Can I use boneless, skinless chicken thighs instead?
Thighs work but they’re fattier and darker than breast meat, so the flavor and texture shift away from the Chick-fil-A original. If you love thigh meat, go for it, but expect a different final product.
How do I get that exact Chick-fil-A taste?
The double-breading, shallow frying at 350 degrees, and that specific spice blend of salt, pepper, garlic powder, paprika, and onion powder are what create the signature flavor. Don’t skip any steps and use fresh seasoning that hasn’t been sitting in your cabinet for years.
Can I bake these instead of frying?
You can bake them at 400 degrees for 15 to 18 minutes on a greased baking sheet, but you’ll lose that crispy, fried exterior texture that makes them so crave-worthy. Baking is quicker and easier, but fried nuggets are superior in every sensory way.
What dipping sauces pair best with these?
Honey mustard is the classic pairing, but ranch, barbecue sauce, and spicy mayo are all fantastic. Make your own honey mustard by combining equal parts honey and yellow mustard for that Chick-fil-A
Homemade Chick-fil-A Nuggets
Ingredients
Equipment
Method
- Place your chicken breasts on a cutting board and slice each one horizontally into three or four thin pieces, depending on thickness.
- Lay each chicken piece between two sheets of plastic wrap and gently pound with a meat mallet or rolling pin until they're about 1/4 inch thick and uniform.
- Arrange three shallow bowls in a line: one with your flour mixed with salt, pepper, garlic powder, paprika, and onion powder; one with the beaten egg and milk combined; and one empty bowl for the final breaded nuggets.
- Working one piece at a time, coat the chicken lightly in the seasoned flour, shaking off any excess. Then dip it into the egg mixture, making sure it's fully coated, and finally roll it in the flour again for a double-breaded finish. Place each breaded nugget on your empty bowl or a clean plate.
- Pour vegetable oil into your skillet to a depth of about 1/2 inch and heat it over medium-high heat until it reaches 350 degrees Fahrenheit.
- Drop a tiny piece of breaded chicken into the oil to test the temperature; it should sizzle immediately and float to the surface in about 15 seconds.
- Carefully place your breaded nuggets into the hot oil, working in batches so you don't overcrowd the pan. Fry each batch for about 3 to 4 minutes, flipping halfway through, until they're golden brown on all sides.
- Remove each batch with tongs or a slotted spoon and place them on paper towels to drain excess oil. Let them cool for just a minute or two before serving.